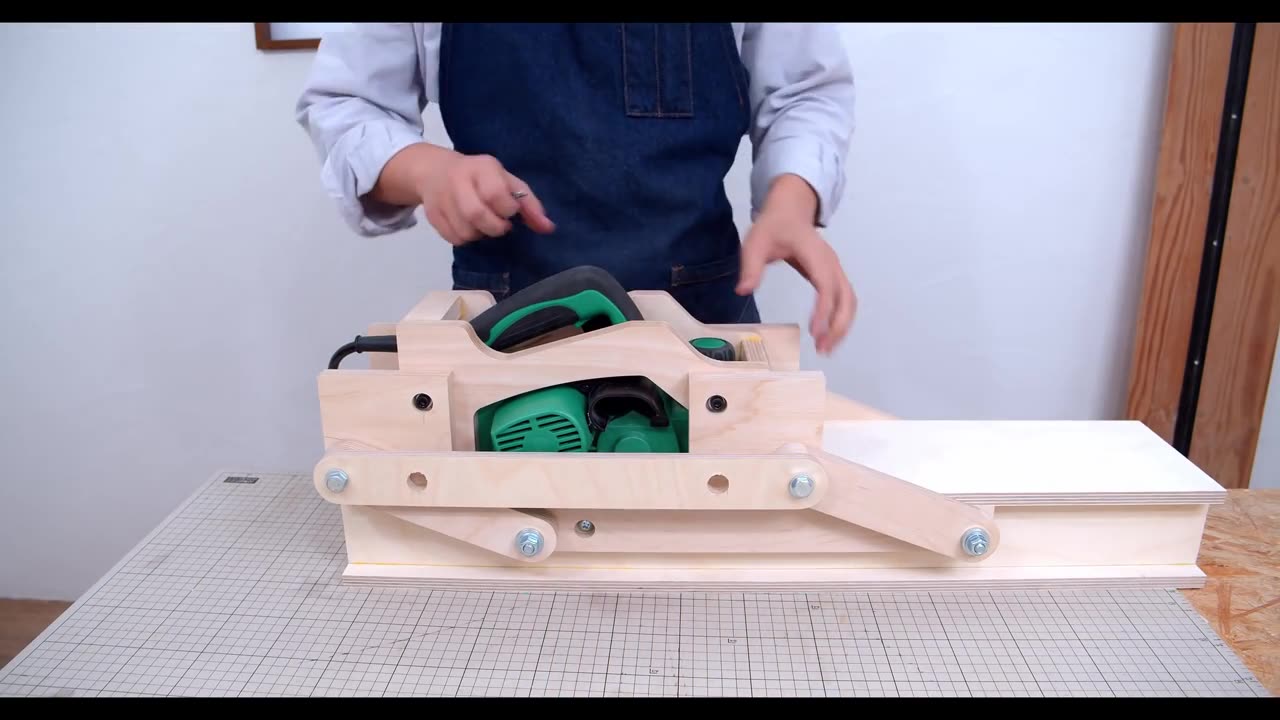
Parallel link Planer jig - Rig System Part.2
For Part 2 of your parallel link planer jig rig system project, you can focus on constructing the moving parts and fine-tuning the alignment for precise planing results. Here's a breakdown of what you can cover:
Introduction:
Recap briefly on what was covered in Part 1, which likely included designing and building the base or framework for the jig rig system.
Introduce the focus of Part 2, which is to create the moving parts and ensure smooth operation.
Materials and Tools:
Provide a list of additional materials and tools needed for this part of the project, such as:
Metal or wooden bars for the parallel links
Screws, bolts, and washers
Hinges or pivots for connecting the links
Leveling feet or adjustable supports
Measuring tools for precise alignment
Construction Steps:
Building the Parallel Links:
Cut the metal or wooden bars to the desired length for the parallel links.
Attach hinges or pivots to one end of each link to allow for movement.
Mounting the Links:
Attach the parallel links to the base of the jig rig system using screws, bolts, and washers.
Ensure the links are mounted securely and aligned parallel to each other and perpendicular to the planer.
Connecting the Planer:
Install brackets or mounts on the parallel links to secure the planer in place.
Test the movement of the planer along the parallel links to ensure smooth sliding motion.
Fine-Tuning Alignment:
Use leveling feet or adjustable supports to fine-tune the alignment of the planer.
Check for any misalignment or unevenness and make adjustments as needed to achieve precise planing results.
Testing and Adjustment:
Conduct test runs with the planer to verify the functionality and performance of the jig rig system.
Make any necessary adjustments to the parallel links, mounts, or alignment to optimize the operation of the planer.
Safety Precautions:
Remind viewers to prioritize safety when working with power tools and heavy machinery.
Emphasize the importance of proper assembly and alignment to prevent accidents and ensure accurate planing.
Conclusion:
Summarize the key steps covered in Part 2 of the project.
Encourage viewers to apply the techniques learned to their own woodworking projects and stay tuned for future tutorials.
By following these guidelines, you can create an informative and engaging Part 2 video for your parallel link planer jig rig system project, providing viewers with the knowledge and skills to build and optimize their own jig rig systems for precise planing.
-
 LIVE
LIVE
Badlands Media
10 hours agoBadlands Daily – December 2, 2025
4,047 watching -
 LIVE
LIVE
Viss
1 hour ago🔴LIVE - The Arc Raider Duo That Changed Everything - Viss w/ Hambino
215 watching -
![[MnK] Let's Dominate Solo Lobbies](https://1a-1791.com/video/fwe2/07/s8/1/Y/4/Q/E/Y4QEz.0kob-small-MnK-Lets-Dominate-Solo-Lobb.jpg) LIVE
LIVE
GloryJean
1 hour ago[MnK] Let's Dominate Solo Lobbies
143 watching -
 LIVE
LIVE
Wendy Bell Radio
6 hours agoWe Don't Want Them
7,410 watching -
 LIVE
LIVE
The Big Mig™
29 minutes agoThere Is Hope for Colorado w/ Candidate Hope Scheppelman
2,409 watching -
 LIVE
LIVE
The State of Freedom
23 hours agoHe Served His Country – Now He’s Suing the State | Citizen Spotlight feat. Bert Callais | Ep. 354
42 watching -
 1:36:07
Graham Allen
2 hours agoThe Media “Outrage” Against The DOW, FBI, and The White House Is COORDINATED!!
99.7K520 -
 1:07:59
Chad Prather
15 hours agoWhen Heaven Stands: The Hidden Power of a Faithful Witness
65.1K22 -
 11:36
11:36
tactical_rifleman
11 days agoNever Run Out Of Ammo | Magazine Pez Dispenser | Tactical Rifleman
51K8 -
 26:11
26:11
Upper Echelon Gamers
18 hours ago $3.47 earned"Her" Wasn't Fiction - Its Real
23.5K4