Bike Upgrades. Shimano Hollowtech II Bottom Bracket and cranks Replacement
Hello cyclists!
Bike upgrades. DIY with ASRM
Turn on the subtitles, sit back and let us begin.
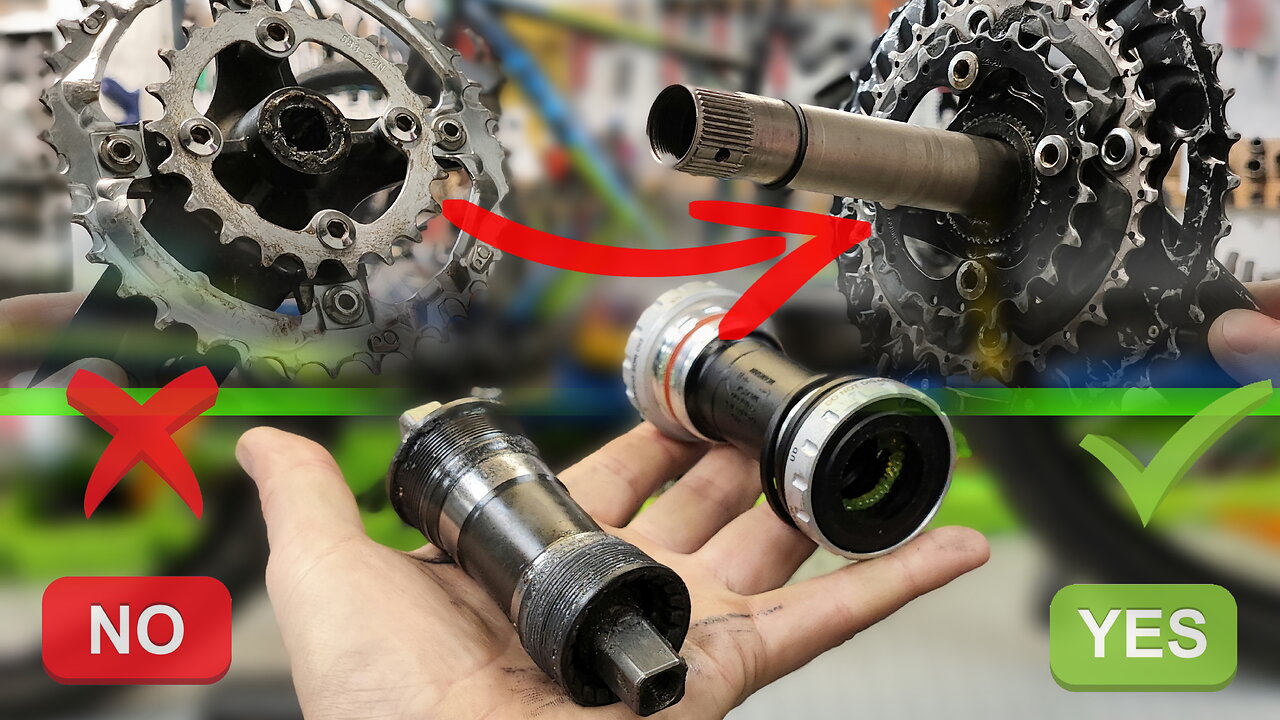
In this video tutorial I will show you how to replace a Shimano Hollowtech II bottom bracket and cranks. How to remove bicycle cranks.
Be sure to lubricate the removal tool, all threaded connections must be lubricated. Your equipment will last longer and the disassembly of the assembly will be easier and faster.
Repeat after us and you will be able to replace cranks on a bike without difficulty. Now let's compare the difference in weight between old and new bike cranks. The difference is insignificant, but it lies in the weight.
How to remove a bicycle bottom bracket. The old bottom bracket under the square is heavier. Therefore, the whole rod system is lighter when using Hollowtech II. In the workshop I use long levers, large tubes so you can unwind each part. Come to our playlist, you will find many videos on the operation of the transmission. The old bottom bracket was dirty. All the dirt that flies into the frame falls on the bottom bracket. Then everything creaks and squeaks. New bottom bracket. Shimano Hollowtech II bottom bracket sm-bb52 out of the box. The manufacturer puts a lot of grease in the bottom bracket. This grease can be used to lubricate threaded connections.
Spacers, a very important detail. I'll show you clearly how, without instructions, individually for your carriage knot, you can pick up RINGS. First, we will weigh our new Hollowtech II bottom bracket. The old bottom bracket for the square and the new bottom bracket, as you can see, the difference is significant. Our bottom bracket is 68 - 73 mm. The frame is 73 mm wide at the bottom bracket shell. Spacers allow you to adjust the width of the bottom bracket. Pay attention to the spacer selection. Depending on the trimming, dobby glasses can be completely different.
This is the universal way to choose the right spacers. Replace the bottom bracket. Lubricate threaded connections well. The lubricant will repel water and your sled will live much longer. Subscribe to the channel and like) Bicycle cranks replacement. If you do not lubricate the splines, and they need to be lubricated, your cranks will creak and make an unpleasant creaking noise.
The left crank has a special pin. It must be lifted. It is necessary to tighten it so that the rod does not dangle and does not have to be pulled. The force should be moderate. Left connecting rod, it is important to tighten correctly with a force of 12 or 14 Newton per meter.
The rest of the knots in this video we tighten by hand, according to my experience, sensations. But this knot must be tightened according to the rules cross over the cross tighten the bolts in turn. All! Our bikes are ready.
00:00 Bike upgrades DIY
00:23 How to replace a Shimano Hollowtech II bottom bracket and crankset
00:35 How to remove bike cranks
02:30 How to remove a bicycle bottom bracket
04:34 Shimano hollowtech II bottom bracket sm-bb52 unboxing
06:53 Bottom bracket replacement
09:04 Replacing bicycle cranks
#cranks #bicycle #bikeoverhaul
-
 14:17
14:17
Nice Bike Service
10 days agoBike upgrade. How to keep the chain from coming off
281 -
 8:14
8:14
MattMorseTV
9 hours ago $1.10 earnedBrazil just FOUND OUT.
9.59K16 -

SpartakusLIVE
6 hours agoWZ Solos || GCX St. Jude Charity Marathon @ 8PM EST
17.5K -
 4:27:47
elwolfpr
4 hours agoThe Reaper Returns: I’m Back, Baby!
7.59K1 -
 3:02:07
TinyPandaface
3 hours agoYour FACE is a Gaming Channel! | Birth
9.02K -
 1:49:18
FreshandFit
6 hours agoLauren Southern Accuses Tate Of Abuse!
41.2K63 -
 LIVE
LIVE
Toolman Tim
2 hours agoDOOM: Dark Ages - First Runthrough | Gaming Thinktank
190 watching -
 2:52:05
TimcastIRL
4 hours agoBREAKING: Trump DOJ FIRES Epstein Prosecutor, James Comey's Daughter Amid Controversy | Timcast IRL
228K94 -
 3:23:07
Barry Cunningham
6 hours agoPRESIDENT TRUMP IS BUILDING A NEW MAGA! ARE YOU READY FOR THE NEXT ACT?
61.7K85 -
 2:33:10
Laura Loomer
4 hours agoEP133: GOP Congresswoman Caught Leaking To Qatar
44.6K21