Part 4 - Comparison of zoom techniques for different blur operators
8 months ago
7
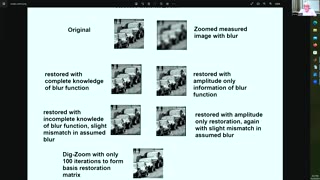
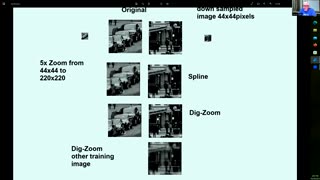
We compare several methods to zoom an image that is decimated and had a blur operator applied. Results are shown for various amounts of pre knowledge concerning the blur and contrasted with a new method of digital zoom with a projection matrix trained on another measured image. Results show that the new technique is superior in the manner it uses available information.
Loading comments...
-
 13:18
13:18
Applied Mathematics
8 months agoPart 3 - Further image processing with zoom.
18 -
 15:27
15:27
Applied Mathematics
8 months agoPart 2 - Application to basic imaging, digital zoom
19 -
 3:35
3:35
ALLCHECKOUT
3 years agoHow To Blur Parts of a Picture For Free On Windows 10 (Best Free Photo Blur Tool)
35 -
 2:35
2:35
cherazer65
3 months ago10x Monocular vs Samsung Galaxy S23 Ultra: Zoom Comparison
8 -
 0:27
0:27
George Hopkins
1 year agoCan you spot the differences?
1 -
 0:39
0:39
Videos for laser enthusiasts
3 years agoBeam Comparision of a NUBM44 Laser Pointer With and Without a Beam Expander
1311 -
 1:44
1:44
DIY Digital
1 year agoHow To Apply Zoom In Zoom Out Effect on Capcut
26 -
 2:39
2:39
Code Boxx
7 months ago4 Ways To Create Blurred Images In HTML CSS
3 -
 5:50
5:50
Overlanding, cars, and machinima
2 years ago $0.02 earnedVideo Zoom Pixelation Tests
42 -
 6:59
6:59
GIMP tutorials
3 years agoGIMP scaling
15