Premium Only Content
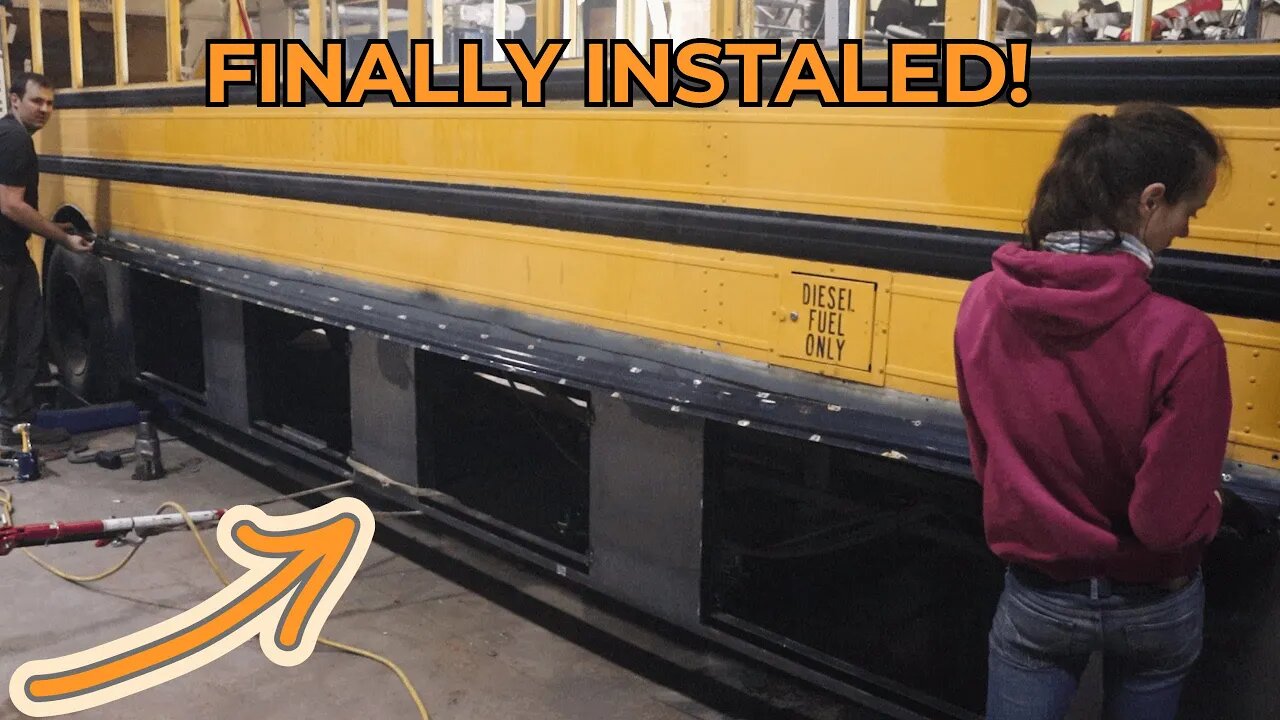
Installing Our Underbay Walls! Skoolie Build Series
Now that the Underbay walls are finished, its time to install them! I made sure to prime any bare metal between the underbay walls and the skin of the bus to avoid future rusting. After we got them into place, we bolted them up, welded them to the body of the bus, and riveted the rub rails back into place.
We are a husband and wife team that loves to take on hard projects. We finished our bus project after 2 years of hard work and are now enjoying life on the road. We plan to travel for a year or two more while we prepare to homestead in northern Idaho. Come join us as we document our journey. Our goal is to inspire you and your fellow viewers to go out and life life the Hard Way.
►Subscribe for weekly videos!
https://www.youtube.com/channel/UCqajQ15EGtfPLSMmkFpDPQw
►Follow us on Instagram, Facebook, Pinterest, and Spotify!
https://linktr.ee/aurora.theadventurebus
► Check out our website!
https://thehardway.works/
#diy #welding #skoolieconversion
00:00 Intro
00:18 Removing Side Door
00:50 Installing Driver's Side Wall
03:32 Installing Passenger Side Wall
06:25 Caulking the Seam
06:57 Installing the Rub Rail
08:50 Next Time
Music from #Uppbeat (free for Creators!):
https://uppbeat.io/t/the-lakes/gold
Music from #Uppbeat (free for Creators!):
https://uppbeat.io/t/zimpzon/country
#Metalworking #DIY #diy #busconversion #skoolieconversion #metalworkingtools #welding #metalworking #vanlife #skoolie #skoolielife #nomad #nomadlife #travel #rv #rvlife #adventure #husbandwifeteam #busbuildseries #busconversionbuildseries #diy #homemade #howto #skoolielife #fixingitright
-
 1:08:20
Man in America
12 hours ago🇨🇳 RedNote: A CCP Trojan Horse Deceiving Americans? w/ Levi Browde
35.1K32 -
 3:55:11
I_Came_With_Fire_Podcast
15 hours agoTrump SABOTAGE, LA FIRE CHIEF SUED, and BIDEN’S LAST F-U!
21.8K7 -
 2:59:47
Joker Effect
6 hours agoUkraine in a video game? Hardest thing I have done. S.T.A.L.K.E.R.2 Heart of Chornobyl,
80K4 -
 1:15:22
Flyover Conservatives
1 day agoEczema, Brain Fog, B.O., and Gas… Eating Steak and Butter Creates Ultimate Health Hack - Bella, Steak and Butter Gal | FOC Show
61.3K3 -
 51:58
51:58
PMG
10 hours ago $2.62 earned"Can the Government Learn from Elon Musk’s 70% Labor Cut? A Deep Dive into Inefficient Agencies"
42.9K1 -
 6:39:15
Amish Zaku
9 hours agoRumble Spartans #10 - New Year New Maps
37.4K2 -
 1:04:58
In The Litter Box w/ Jewels & Catturd
1 day agoNo Tax On Tips! | In the Litter Box w/ Jewels & Catturd – Ep. 722 – 1/17/2025
155K32 -
 5:35:39
Dr Disrespect
16 hours ago🔴LIVE - DR DISRESPECT - WARZONE - CRAZY CHALLENGES
175K34 -
 1:16:30
Edge of Wonder
12 hours agoLA Fire Updates: Miracles Amidst the Devastation
48.7K14 -
 54:54
54:54
LFA TV
16 hours agoBanning Mystery of the Ages | TRUMPET DAILY 1.17.25 7pm
41.5K8