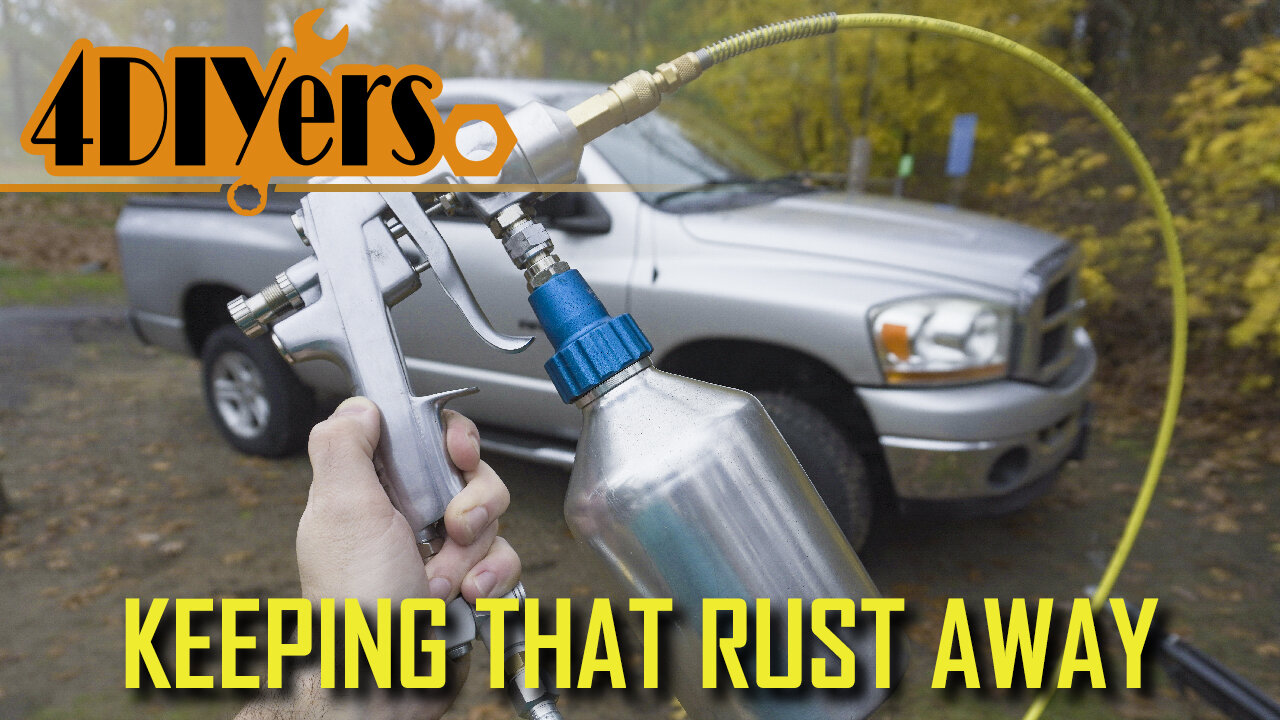
How to Protect your Vehicle from Rust - 2nd Year Follow-up
Due to this being a popular request over the last year from my first rustproofing video using the wax and oil hybrid spray, here you’ll get to see my follow-up spray for this year. In this video I will be showing you how to apply a second application for the rust inhibiting coating on my Dodge Ram and you can see how that original application is holding up too. If you’re living in a climate that experiences snowy winters and has salt applied to the roads, this is by far the best method is protecting your vehicle. This time around I’m using only an oil-based coating. #dodgeram #rustproofing #canada
Website: http://4diyers.com
Patreon: https://www.patreon.com/4diyers
Facebook: https://www.facebook.com/4diyers
Twitter: https://twitter.com/4DIYers
Instagram: https://www.instagram.com/4diyers/
Tumblr: http://4diyers.tumblr.com
Pintrest: https://www.pinterest.com/4diyers/
Tools/Supplies Needed:
-oil based coating
-rustproofing applicator gun
-rubber gloves
-safety glasses
-respirator
Chapters:
00:00 Intro
00:30 Coating Type & Applicator Gun
02:16 Spaying Inside the Frame
03:33 Inside the Rockers
04:28 Behind the Rear Fenders
04:44 Driver's Side
05:01 Inside the Rockers
05:33 Inside the Doors
06:22 Inside the Tailgate
06:42 Under the Hood
07:11 The Full Underbody
Procedure:
I’m doing this on a cooler day but it’s typically recommended to apply this in warmer weather as it’ll creep better on the surface, getting into all those cracks and crevices. I’m using the same applicator gun as last year, it has a pressurized tank and comes with different attachments to get in behind body panels, inside the frame, work around tight areas and even a fan spray for large areas. Each product will have it’s own instructions. Ensure it’s mixed, so shake up the container. For the Dodge Ram, I used the whole can which is 3.78L or 1 US gallon. Fill up the container, not to the top as we need to make room for the pick-up tube so this can displace some of the coating.
Install the container and tighten. Then place the container in a bucket of hot water. This will overcome the cooler weather, today was the minimum required temperature for applying this product. Allow it to soak for about 10 minutes. I’m using the same small pancake compressor. I set the regulator to around 75 psi but bumped it up after to about 85 psi due to the cooler weather. Do not exceed the maximum pressure of the applicator gun.
With this having a full boxed frame, I’ll start with the inside of the frame, front first and work my way back to the rear of the truck. The wand I’m using here has a 360 degree spray to provide an even coating inside enclosed areas. Find any factory-made holes inside the frame, push the wand fully inside, press the trigger to dispense the spray and slowly pull the wand out. Feed rates will depend on how much product is being applied along with air pressure.
Now is the outer cavity of the rockers. Someone had predrilled access holes in the rockers as shown by the black caps and this can be done to your vehicle too. A step drill is recommended for such a job as they make a clean hole in body panels and you can purchase caps to plug up the holes afterward. Here is a great example of using the same hole to work ahead and behind it making sure the inside is fully coated. Once done, then reinstall the cap.
Next step is the doors. These have been pre-drilled but the drains behind the gasket are big enough to slide the cavity hose in. The spray should be directed at the bottom of the door and partly up the sides, just where the water may drain inside. Drains may vary between vehicles, typically there’s one at the front and rear. On this Dodge, they’re hidden behind the door seal.
Moving onto the rear of the vehicle, for this truck it would be the tailgate. On other vehicles this maybe a truck or hatch. The 360 degree spray nozzle is used here too and a mist is sprayed throughout the inside.
Under the hood, spray within any structure members or tube cavities, in the fender cavity between the inner and outer fenders, radiator support, steel structure behind the bumper, within the hood structure, etc.
For the last step, this is the full outer coating on the underside of the vehicle. There are a couple different attachments that can be used such as the spray tip and the 90 degree wand tip which is what I prefer. The spray tip would be better if you have your vehicle elevated. The 90 degree tip allows me to get into tight areas, around corners, and even provides a great overall surface mist.
Thank you to all those who watch my videos and support my content. Don't forget to subscribe to my channel for future tutorial videos and like my video if you found it helpful. New videos are always being uploaded every week!
© 4DIYers 2013
All Rights Reserved
No part of this video or any of its contents may be reproduced, copied, modified or adapted, without the prior written consent of the author.
-
 1:22:54
DeVory Darkins
2 hours agoTrump makes shocking announcement as Major ELECTION UPDATE drops after bomb threat
31.3K22 -
 10:11
10:11
Dr. Nick Zyrowski
8 days agoDoes Creatine CAUSE Hair Loss? (We All Got This Wrong)
9121 -
 1:09:24
Timcast
2 hours agoZohran Mamdani BLAMES Trump Over Bomb Threats At Polling Locations
125K57 -
 3:09:52
Right Side Broadcasting Network
4 hours agoLIVE REPLAY: White House Press Secretary Karoline Leavitt Holds a Press Briefing - 11/4/25
53.6K8 -
 1:58:04
The Charlie Kirk Show
2 hours agoGo Vote! + Healthcare and the Shutdown | Dr. Oz, Baris | 11.4.2025
57.8K5 -
 58:49
58:49
The White House
3 hours agoPress Secretary Karoline Leavitt Briefs Members of the Media, Nov. 4, 2025
20.1K9 -
 1:00:22
Sean Unpaved
2 hours agoCarousel Chaos: CFB Week 10 Shocks & Drops, Cardinals Stun MNF, & CBB's Opening Tip-Off Frenzy
18.2K1 -
 1:57:43
Steven Crowder
5 hours agoFailed Hit Job: Another Trump Media Hoax Exposed
329K266 -
 56:36
56:36
The Rubin Report
4 hours agoFox Hosts Stunned by Piers Morgan’s Dark Prediction for NYC Under Zohran Mamdan
39K42 -
![GRAY ZONE DEVLOG FOR .3.5 UPDATE!!! [RGMT CONTENT Mgr. | RGMT GL | GZW CL]](https://1a-1791.com/video/fww1/c0/s8/1/y/7/B/w/y7Bwz.0kob-small-GRAY-ZONE-DEVLOG-FOR-.3.5-U.jpg) 2:11:58
2:11:58
XDDX_HiTower
2 hours ago $0.61 earnedGRAY ZONE DEVLOG FOR .3.5 UPDATE!!! [RGMT CONTENT Mgr. | RGMT GL | GZW CL]
7.92K