How to Make a Portable 12v Fuel Transfer Pump
How to make a fuel transfer pump. I have found some versions available online, however after reading the reviews, I didn’t want to be stuck with a poor product that quits after a couple of months of usage. I need the fuel transfer pump as I can no longer fill up with straight gas from the marine pumps for my boat, I am required to fill the tank with a gas and oil mixture as I did an oil injection delete. Also trying to fill the tank with a 20 liter or 5 gallon fuel can hanging over the edge of the boat isn’t the easiest task either. #oemtools #electronic #gasoline
Heat Gun: https://www.mobiledistributorsupply.com/24498-oemtools-24498-dual-temp-heat-gun-oem
Amazon affiliated links:
US:
Fuel pump: https://amzn.to/3WNW5rT
Brass sintered filters: https://amzn.to/3A202z5
Hose barb: https://amzn.to/3fXERaQ
Ear hose clamps: https://amzn.to/3DYYMxZ
Fuel hose: https://amzn.to/3WNXrTv
Switch: https://amzn.to/3NYyDnE
Canada:
Fuel pump: https://amzn.to/3Tte7wB
Brass sintered filters: https://amzn.to/3A4vEEg
Hose barb: https://amzn.to/3E0nI8e
Ear hose clamps: https://amzn.to/3WNXezH
Fuel hose: https://amzn.to/3TqZGcs
Switch: https://amzn.to/3NZ0rZ5
Website: http://4diyers.com
Patreon: https://www.patreon.com/4diyers
Facebook: https://www.facebook.com/4diyers
Twitter: https://twitter.com/4DIYers
Instagram: https://www.instagram.com/4diyers/
Tumblr: http://4diyers.tumblr.com
Pintrest: https://www.pinterest.com/4diyers/
Tools/Supplies Needed:
-soldering iron
-solder
-heat shrink
-heat gun
-wire cutters
-wire
-cigarette lighter plug
-fuel pump
-fuel hose
-fuel pump
-hose clamps
-brass sintered filter
-switch
Procedure:
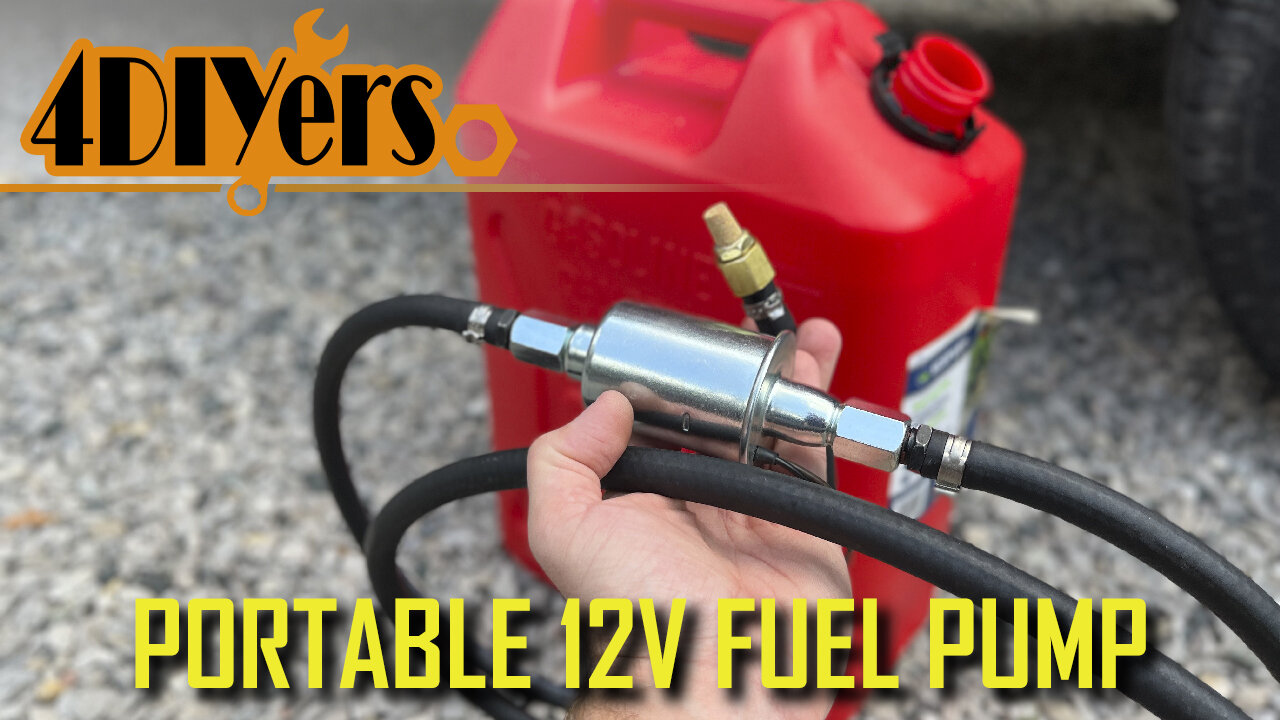
First was stripping the wires on the fuel pump. The fuel pump only has two wires, the black is the ground and the brown is the power. The connector was cut off the cigarette lighter wire.
Both wires are the same color on the cigarette lighter, using a multimeter I was able to determine which is ground and which is the power wire. The center pin is the power and the outer contacts are the ground for the cigarette lighter plug.
Then was stripping these wires.
Heat shrink was then installed on both the ground and power wires. The wires are then twisted together and soldered. if you are looking for a tutorial on how to solder wires, I do have one for this.
Allow those soldered connections to cool before applying the heat shrink. Not doing so can have the heat shrink prematurely shrink around the connection making the installation difficult. After that is using a heat gun on the heat shrink.
For the switch installation, I had to separate the molded wire using a razor knife. Be extremely careful not to pierce the insulation on the wire as this may cause a short.
Using a screwdriver, the switch was disassembled. One wire will be routed inside the case and the other one will be routed to the switched portion. The power wire will need to be clipped so it does have a broken connection and the switch fully controls that part of the circuit.
I have found installing the wires on the opposite portion of the case is far easier than installing them on the wheel portion.
After that is putting the case back together and ensuring those wires are properly seated inside.
I also installed an extension of this wire so it was able to reach the cigarette lighter port in my cuddy cabin. Again the insulation was stripped back, the wires were soldered, and then heat shrink was applied.
The hose barb‘s fittings already have sealant applied to the threads.
Hose sizes may vary based on what type of fittings are included with the fuel pump.
A single ear clamp is used and that is crimped into place. Again the size of that clamp will vary based on the size of the hose.
This will be the suction line so a brass sintered filter is installed on the end with a hose barb. This also has a hose clamp applied.
The larger supply line is that installed. This will be a longer line as it needs to be able to reach the fuel tank filler area.
Once done, here is a quick test using the fuel can while being hooked up to the cigarette lighter in a vehicle.
And now for a test on the boat. As you can see I do have the wire running to the cuddy cabin, I can turn the pump on or off using that rotary switch, I have the suction line installed in the fuel tank with a filter so it doesn’t have the chance of picking up any debris and then the filler line is inserted into the gas cap for the boat.
Thank you to all those who watch my videos and support my content. Don't forget to subscribe to my channel for future tutorial videos and like my video if you found it helpful. New videos are always being uploaded every week!
© 4DIYers 2013
All Rights Reserved
No part of this video or any of its contents may be reproduced, copied, modified or adapted, without the prior written consent of the author.
-
 15:27
15:27
Sideserf Cake Studio
1 day ago $10.40 earnedThis K-Pop Demon Hunters CAKE is how it's done, done, done!
32.8K14 -
 54:47
54:47
Side Scrollers Podcast
1 day agoSide Scroller Presents KING OF THE KART | MASSIVE MARIO KART TOURNAMENT
74.9K2 -
 LIVE
LIVE
Astral Doge Plays!
1 hour agoZelda NES Randomizer ~LIVE!~ Let the Randomization Begin!
90 watching -
 33:18
33:18
Athlete & Artist Show
11 hours ago $2.28 earnedHockey Is Back In Europe!
20.7K3 -
 LIVE
LIVE
Total Horse Channel
4 hours ago2025 URCHA Futurity | Derby & Horse Show | Sunday
177 watching -
 LIVE
LIVE
GhillieSuitGaming
1 hour agoThe Evil Within 2: Part 4 - Art Destruction!
41 watching -
 LIVE
LIVE
Chi-Town Gamers Livestreams
1 hour agoGears 5 Ep. 4 W/ CTG | Into Kait's Mental Issues | GOW: RELOADED LATER & SHENANIGANS 😎
34 watching -
 LIVE
LIVE
Scottish Viking Gaming
4 hours agoSUNDAY FUNDAY :|: Still in the original packaging! Mint!
37 watching -
 2:20:14
LumpyPotatoX2
3 hours agoKOMPETE: Quick Gameplay - #RumbleGaming
8.65K1 -
 2:16:57
XxXAztecwarrior
3 hours agoSearching for more Reds!!
11.5K