Premium Only Content

After Effect lesson# 12(Flying effect)
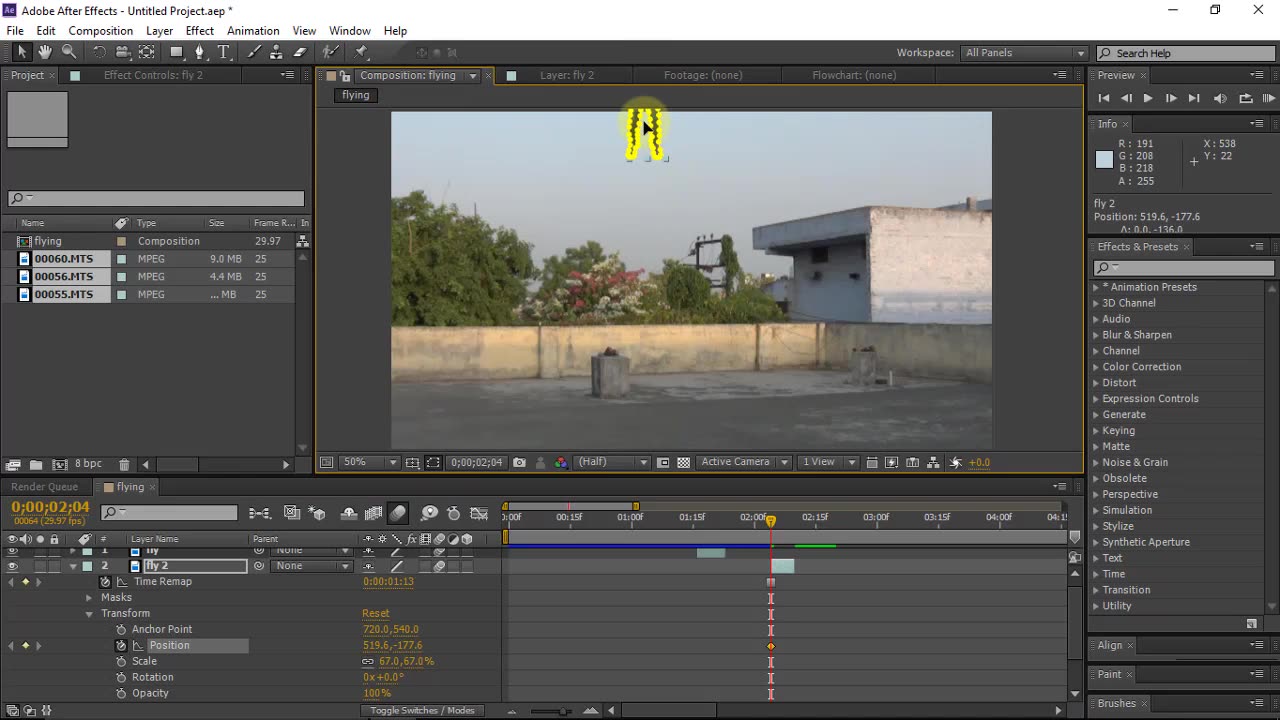
The "flying effect" in After Effects refers to a visual technique used to create the illusion of a person or object flying through the air. This effect is commonly seen in various types of media, including movies, television shows, and advertisements. By utilizing keyframes, motion paths, and various visual elements, After Effects allows designers and video editors to seamlessly integrate the flying effect into their projects. Here's a step-by-step description of how to achieve this effect:
Import Footage: Begin by importing the footage or video clip where you want to apply the flying effect. This could be a shot of a person, an object, or any subject that you want to make appear as if it's flying.
Create a New Composition: Create a new composition in After Effects by right-clicking in the Project panel and selecting "New Composition." Set the composition settings, including the resolution, frame rate, and duration.
Place the Footage: Drag and drop the imported footage into the new composition. Position it within the composition where you want the flying effect to start.
Keyframing: Open the Transform properties of the footage layer by clicking the arrow next to the layer name. Enable keyframing for Position, Rotation, and Scale. Set the initial keyframes for the starting position.
Motion Path: To create the trajectory of the flying effect, move a few frames forward in the timeline. Adjust the position of the footage layer to where you want it to appear as if it's flying. This could be higher in the frame or in a different location altogether.
Refining the Motion: Continue moving forward in the timeline and adjusting the position, rotation, and scale of the footage layer to create a smooth and natural-looking motion path. This is where the flying effect truly comes to life. You can use curves in the graph editor to fine-tune the motion for more organic movement.
Camera Movement (Optional): To enhance the flying effect, you can also animate a virtual camera in After Effects. Create a new camera layer, and using keyframes, adjust its position, rotation, and field of view to simulate the movement of a camera following the flying subject.
Adding Visual Elements: Depending on the context of your flying effect, you might want to add visual elements to enhance the illusion. For example, you could include motion blur to simulate the speed of movement, or you could add particle effects like dust or sparks to emphasize the sense of motion.
Color Correction and Effects (Optional): Apply color correction or visual effects to the footage layer to integrate it more seamlessly into the scene. This step can help match the lighting and atmosphere of the scene to create a cohesive look.
Preview and Adjust: Play back the composition to preview the flying effect. Make any necessary adjustments to the timing, motion path, or visual elements to ensure the effect looks realistic and visually appealing.
Rendering: Once you're satisfied with the flying effect, render the composition to create the final video file.
By combining keyframing, motion paths, visual effects, and camera animation, you can achieve a convincing flying effect in After Effects that adds dynamic and captivating visuals to your project. Remember to experiment, iterate, and refine your approach to achieve the desired result.
-
 10:48
10:48
Nikko Ortiz
17 hours agoDont Watch These TikToks
58.1K11 -
 10:17
10:17
MattMorseTV
16 hours ago $10.55 earnedTrump's DOJ just DROPPED a NUKE.
63.8K75 -
 2:09:32
Side Scrollers Podcast
19 hours agoStreamer DIES Live On Air + Your Food is Poison + Xbox Announces $900 Handheld | Side Scrollers Live
25.2K11 -
 15:32
15:32
GritsGG
15 hours agoFull Auto ABR Sniper Support! Most Winning Quad Win Streaking!
13K2 -
 7:42
7:42
The Pascal Show
14 hours ago $0.89 earnedBREAKING! Police Provide UPDATE In Emmanuel Haro's Case! Is Jake's Lawyer Lying To Us?!
13.7K -
 2:29:46
FreshandFit
8 hours agoAfter Hours w/ Girls
108K74 -
 5:28
5:28
Zach Humphries
13 hours ago $0.90 earnedNEAR PROTCOL AND STELLAR TEAM UP!
20.8K2 -
 1:09:57
Brandon Gentile
1 day ago10,000 Hour BITCOIN Expert Reveals Why $13.5M Is Just The Start
26K3 -
 2:03:55
Badlands Media
8 hours agoDevolution Power Hour Ep. 382: DOJ Coverups, Clapper’s Team Sport & Trump’s Countermoves
138K24 -
 2:06:30
Inverted World Live
11 hours agoDon't Approach the Zombie Rabbits | Ep. 95
53.9K24