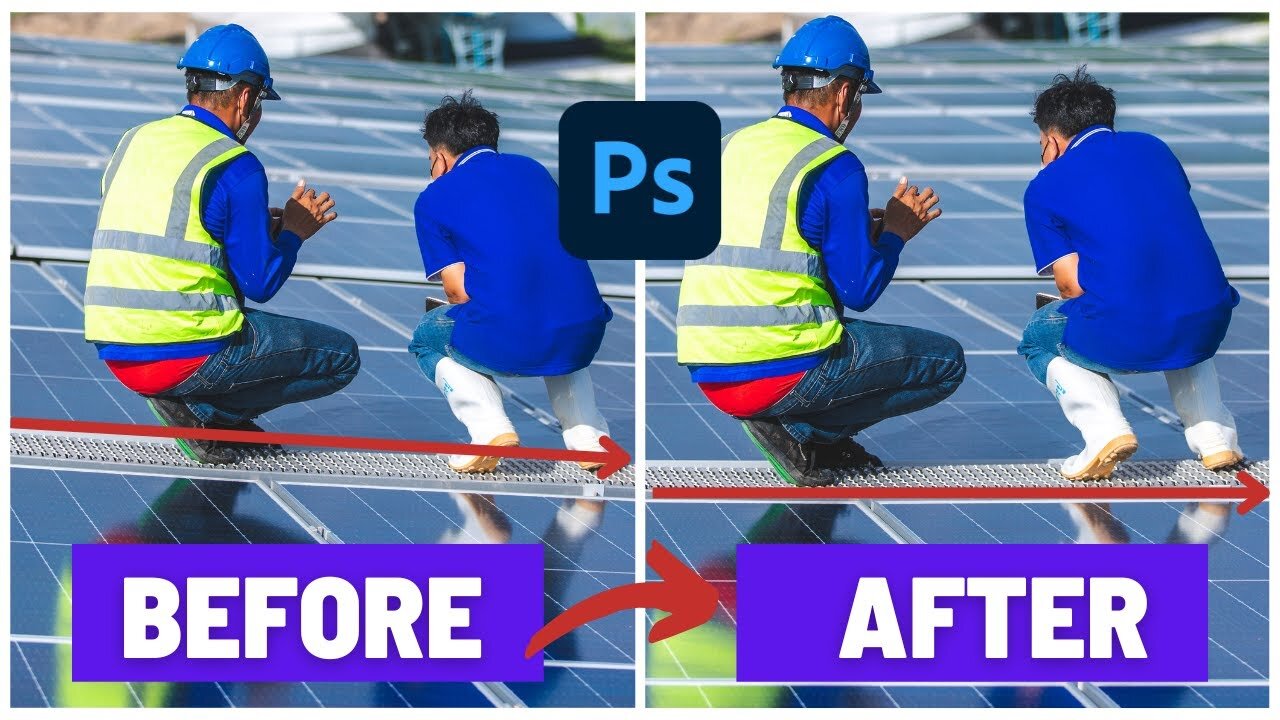
Photoshop Tutorial: How to Straighten Any Image using Perspective Warp and Geometry
In this comprehensive tutorial, we delve into the basics of image correction and manipulation using Adobe Photoshop. We will demonstrate how you can easily straighten out any image that may have been shot at a bad angle, using techniques such as perspective warp and geometry corrections. Here's a breakdown of what to expect:
Timestamps:
00:00 - 00:16: Introduction and overview of the image we'll be straightening
00:16 - 00:36: Explanation of the original, skewed image
00:36 - 01:01: Steps to load the image and navigate to the camera raw filter
01:01 - 01:03: Loading the image into the camera raw filter
01:03 - 01:13: Introduction to geometry corrections in the Camera Raw tool
01:13 - 01:18: Quick auto-correction using the 'A' button
01:18 - 01:25: Introduction to the Guided tool for more flexibility
01:25 - 01:31: The start of drawing guidelines for the Guided tool
01:31 - 01:34: Clicking on the Guided tool
01:34 - 01:37: How the Guided tool cross appears on the image
01:37 - 01:58: Using shift to zoom and draw the guidelines
01:58 - 02:18: Completion of the straightening process and how to deal with transparency on the edges
02:18 - 02:37: Scaling and finalizing the corrected image
02:37 - 02:55: Cross-verifying the image straightening using a brush tool
02:55 - 02:56: Wrapping up and thanking viewers for watching
Tags: #AdobePhotoshop #PhotoshopTutorial #ImageCorrection #PerspectiveWarp #GeometryCorrection
If you found this tutorial useful, don't forget to hit that like button, leave a comment about your favorite Photoshop tricks, and consider subscribing to our channel for more in-depth tutorials! Your support helps us keep making great content.
-
 LIVE
LIVE
Chad Prather
15 hours agoGratitude That Grows in Hard Ground: A Thanksgiving Message for the Soul
7,804 watching -
 LIVE
LIVE
LFA TV
11 hours agoLIVE & BREAKING NEWS! | WEDNESDAY 11/26/25
4,463 watching -
 LIVE
LIVE
The Chris Salcedo Show
11 hours agoRemembering Rush On A Truly American Holiday
712 watching -
 36:24
36:24
Julie Green Ministries
2 hours agoLIVE WITH JULIE
37.2K108 -
 1:05:27
Crypto Power Hour
10 hours ago $5.94 earnedWhat You Need To Know About Gold Tokenization
29.3K6 -
 1:46:14
LIVE WITH CHRIS'WORLD
11 hours agoTHE WAKE UP CALL - 11/26/2025 - Episode 14
8.86K2 -
 2:16:19
The Bold Lib
14 hours agoBOLDCHAT: Trump Pardons | DOGE | Patel w/ANGELA BELCAMINO
11.1K6 -
 47:14
47:14
Brad Owen Poker
22 hours ago $1.70 earnedI Have STRAIGHT FLUSH vs Flopped NUTS!! ALL IN w GOLD BRACELET LEGEND!! $15,000+! Poker Vlog EP 358
9.6K -
 36:11
36:11
Uncommon Sense In Current Times
17 hours ago $2.04 earnedThe Truth About the Abortion Pill | Sue Liebel Exposes FDA Failures & Hidden Dangers
20.8K2 -
 LIVE
LIVE
BEK TV
23 hours agoTrent Loos in the Morning - 11/26/2025
178 watching