Step-by-Step - How To Make Icons Larger (Assistive Access) For iPhone and iOS 17
Welcome back to another comprehensive iOS 17 tutorial! In this video, we explore Assistive Access, a new feature introduced with iOS 17 that aims to declutter the user interface and enlarge your icons.
Assistive Access is a helpful feature for individuals experiencing visual impairment or any cognitive challenges. The step-by-step walkthrough provided in the video helps you set up the feature without a hitch.
Timestamps:
00:00 - Curtis' intro and brief overview of Assistive Access
00:22 - Importance of Assistive Access for different users
00:37 - Detailed step-by-step instructions to enable Assistive Access in Settings
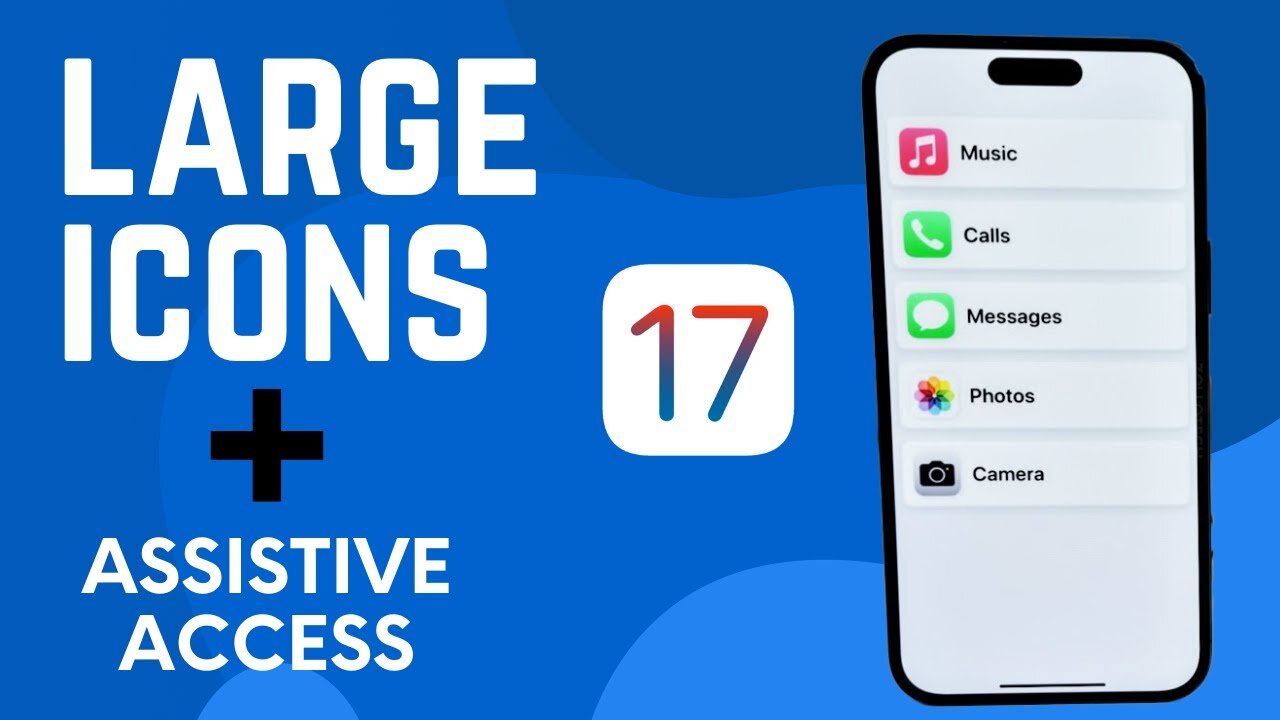
00:55 - Introduction to the Assistive Access screen and starting the setup process
01:10 - Choosing the layout: Rows or Grids
01:27 - Selecting and customizing apps for Assistive Access
01:42 - Important note about Camera settings within Assistive Access
01:59 - Additional app selection and customization for Assistive Access
02:14 - Further customization for individual needs
02:31 - Adding more apps to Assistive Access
02:48 - Notifying about important Assistive Access functionalities
03:07 - Confirming password and wrapping up the setup process
03:23 - End of setup process, showing screenshots due to screen recording limitations
Remember, the choice of apps and layout depends on your personal preference and you can change it anytime. I hope this tutorial was helpful. Please drop your questions or comments below. Make sure to give a thumbs up if this video was useful and subscribe for more such iOS tutorials!
-
 2:16:19
The Bold Lib
13 hours agoBOLDCHAT: Trump Pardons | DOGE | Patel w/ANGELA BELCAMINO
4.07K5 -
 47:14
47:14
Brad Owen Poker
22 hours ago $0.78 earnedI Have STRAIGHT FLUSH vs Flopped NUTS!! ALL IN w GOLD BRACELET LEGEND!! $15,000+! Poker Vlog EP 358
2.96K -
 36:11
36:11
Uncommon Sense In Current Times
17 hours ago $0.85 earnedThe Truth About the Abortion Pill | Sue Liebel Exposes FDA Failures & Hidden Dangers
11.8K -
 LIVE
LIVE
BEK TV
22 hours agoTrent Loos in the Morning - 11/26/2025
165 watching -
 6:30
6:30
The Shannon Joy Show
13 hours agoMTG DIVORCES Herself From Trump & the MAGA Movement
5.27K14 -
 LIVE
LIVE
The Bubba Army
22 hours agoJELLY ROLL'S WIFE GOING TO JAIL! - Bubba the Love Sponge® Show | 11/26/25
1,787 watching -
 14:17
14:17
Actual Justice Warrior
15 hours agoBlack Man CRIES Victim After Welfare Gets Cut
18.8K19 -
 23:51
23:51
Code Blue Cam
22 hours agoDrunk Man Goes to War on Cops After Being Denied More Alcohol
19.3K18 -
 1:03:23
Coin Stories with Natalie Brunell
18 hours agoFinding the Next 100x Investment with Eric Jackson
16.2K3 -
 15:54
15:54
MetatronGaming
2 days agoChronicles Medieval trailer reaction METATRON
9.24K4