Adobe After Effects Tutorial: Finding the Missing Camera And Renderer Views
00:00:00:00 - 00:00:18:14
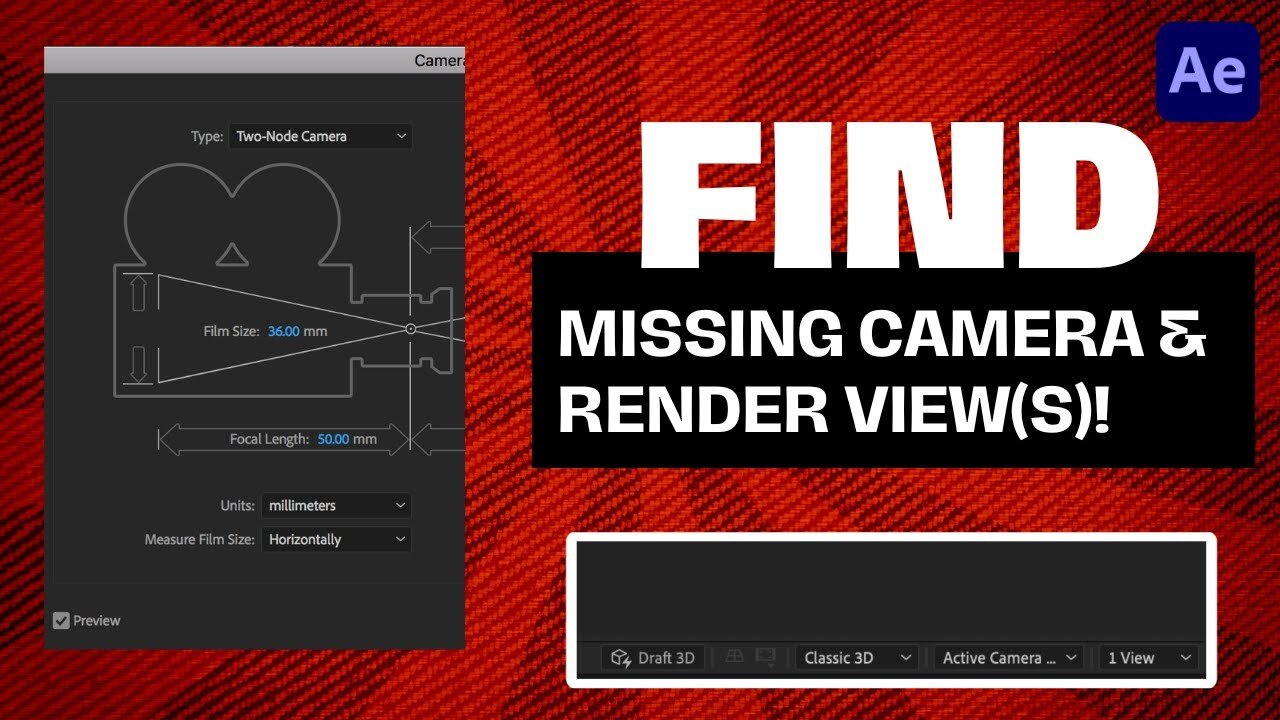
The video begins with a cordial greeting from the speaker, welcoming viewers back to another Adobe After Effects tutorial. The aim of this particular tutorial is to guide viewers on how to locate a missing camera view or option, a task which may seem complex to beginners but is, in fact, quite straightforward. The speaker elaborates on their issue by providing an example: a digital image of their puppy dog, seemingly suspended in space. After adding a 'wiggle' effect to the image, the speaker explains they were unable to locate the camera view.
00:00:18:14 - 00:00:35:22
The speaker then dives into the solution. In order to regain visibility of the camera's distance, they instruct viewers to go to the left side of the software interface and click on the option to 'expand or collapse the layers, swatches, switches, paint, switch swatches'. Following this step, it's crucial to ensure at least one layer is set to 3D mode. The speaker highlights this on their own project, drawing attention to their 3D layer.
00:00:35:25 - 00:00:50:21
After setting a layer (or multiple layers) to 3D, additional options will appear on the right side of the interface, including the active camera and multiple camera views. The speaker emphasizes this point, explaining that the 3D setting is mandatory for these features to be available. If the 3D layer is deactivated, the camera view options will disappear.
00:00:50:23 - 00:00:58:02
The speaker reiterates the core lesson: activating the 3D mode on at least one layer will reveal the missing active camera and multiple camera views options. They succinctly conclude that this is all there is to the process before thanking the viewers for watching their tutorial.
-
 1:46:14
LIVE WITH CHRIS'WORLD
11 hours agoTHE WAKE UP CALL - 11/26/2025 - Episode 14
8.86K2 -
 2:16:19
The Bold Lib
14 hours agoBOLDCHAT: Trump Pardons | DOGE | Patel w/ANGELA BELCAMINO
11.1K6 -
 47:14
47:14
Brad Owen Poker
22 hours ago $1.70 earnedI Have STRAIGHT FLUSH vs Flopped NUTS!! ALL IN w GOLD BRACELET LEGEND!! $15,000+! Poker Vlog EP 358
9.6K -
 36:11
36:11
Uncommon Sense In Current Times
17 hours ago $2.04 earnedThe Truth About the Abortion Pill | Sue Liebel Exposes FDA Failures & Hidden Dangers
20.8K2 -
 LIVE
LIVE
BEK TV
23 hours agoTrent Loos in the Morning - 11/26/2025
180 watching -
 6:30
6:30
The Shannon Joy Show
13 hours agoMTG DIVORCES Herself From Trump & the MAGA Movement
13.2K18 -
 LIVE
LIVE
The Bubba Army
22 hours agoJELLY ROLL'S WIFE GOING TO JAIL! - Bubba the Love Sponge® Show | 11/26/25
1,527 watching -
 14:17
14:17
Actual Justice Warrior
15 hours agoBlack Man CRIES Victim After Welfare Gets Cut
26.2K22 -
 23:51
23:51
Code Blue Cam
23 hours agoDrunk Man Goes to War on Cops After Being Denied More Alcohol
24.4K18 -
 1:03:23
Coin Stories with Natalie Brunell
19 hours agoFinding the Next 100x Investment with Eric Jackson
19.3K3