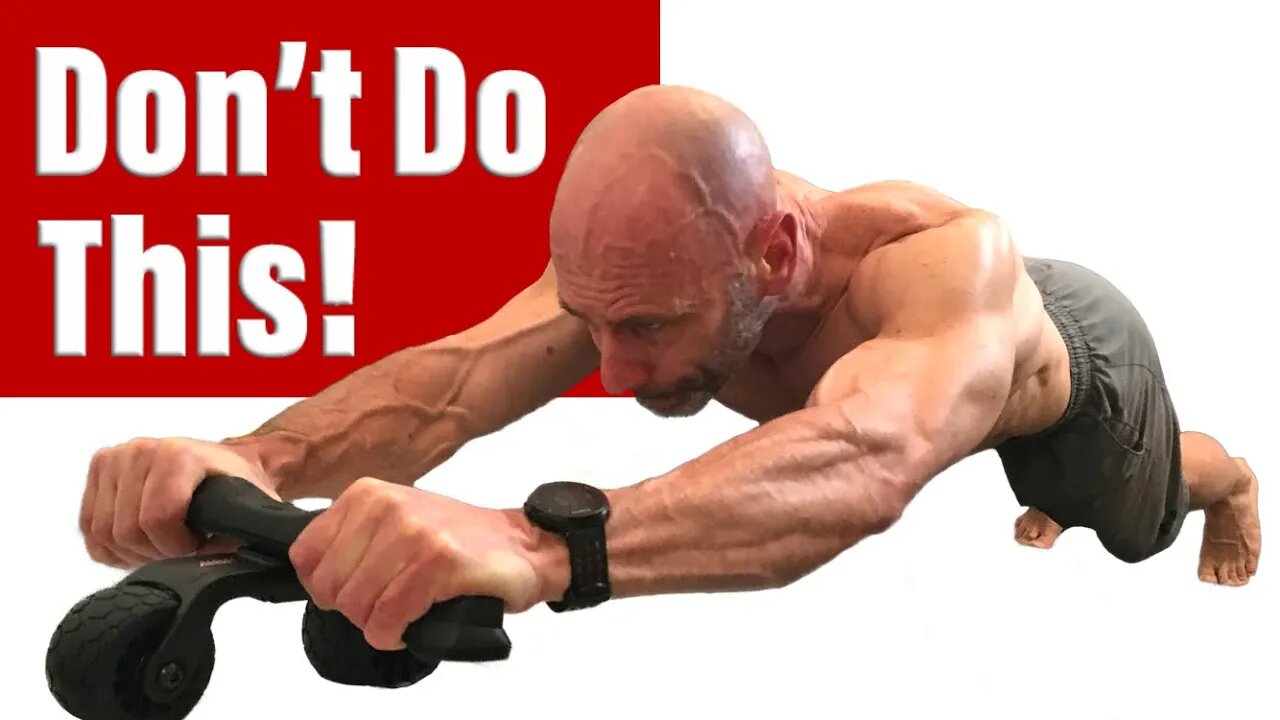
Ab Wheel Rollouts Progress From Kneeling To Standing Featuring the Trosssmolly Abdominal Wheel
Ab wheel rollouts progress from kneeling to standing
If you are interested in losing body fat and adding muscle, please email me at 1shark1bite@gmail.com for information on my personal training services.
Check your testosterone levels from home. Just click this link http://trylgc.com/laurence and receive 20% off with code: LAURENCE20 I receive commissions on referrals to LetsGetChecked. I only recommend services I know and trust.
My Affiliate link to Lebert for their Equalizer bars and more; https://lebertfitness.com/?ref=hmkesu... and use the discount code FITAND50 you will receive 20% off your purchase
Facebook; https://www.facebook.com/Fit-and-50-5...
My Amazon page link; https://www.amazon.com/shop/fitand50
When you first used an ab wheel or if you haven’t used one in a long time, what is the first thing you do when you grab one? You take it and try and see how far you can rollout. This is the wrong thing to do. Today we are going to take a look at how to advance from a basic kneeling rollout to a standing one.
But first, we need to make sure we are doing the kneeling one correctly. And to do this I am going to use this ab roller that was sent to me. It is a prototype and not yet for sale. So just to be clear this is not a sponsored video. Just a chance for me to try out a new product and it is actually a pretty cool design. Much higher in quality than my old ab wheel. The wheels are actually made of rubber and not plastic and it rolls much smoother with the ball bearing design. The wider handles are very comfortable with solid construction you can see and feel.
The handle actually turns sideways making it compact for easy portability.
The first thing we should do when we grab an ab wheel is to make sure we set up properly. One of the most common complaints about the ab wheel is that it can cause pain in your lower back.
This back pain comes from not properly engaging our abs and using our hip flexors.
When you first set up, you want to go onto your knees holding the ab wheel in front of you on the floor with your arms straight and curve your spine like your doing the cat position in yoga and your hips will be in a posterior pelvic tilt. It is important that you never lose this forward pelvic tilt it will elongate some, but as soon as you lose it that is when your hip flexors kick in and you start to feel it in your back.
So to keep this from happening you need to squeeze your glutes. Keeping your whole body from your knees on the floor through to your hands on the ab wheel being in tension and you have to keep this tension throughout the movement. Where most people lose tension is when they switch directions from the farthest position out to return back to the start.
So at first don’t roll all the way out. Find a spot where you are comfortable rolling out to and practice rolling out and back without losing tension when you switch directions. You can use a block so you don’t overshoot your mark or a stopper like the one I’m using here that came with this ab wheel.
Another thing to note before we start moving into some more advanced variations is when you roll back, your hips should stop in the same position as they were in when you started. If they go back farther this, that is a sign that you are using your hips to pull back and not your abdominals to curl back.
I should mention that once the wheel and your arms extend above your head you start to use your rear delts and lats in the exercise. So this exercise strengthens these muscles as well.
The next progression is to elevate your knees by putting them on a step. I find a 10 to 12” step to be the most comfortable. Otherwise, the movement is performed the same way as from the floor.
Now let’s talk about starting to advance to the standing position. This is a big step so don’t rush it. All the ques from the earlier progressions still apply to maintain a posterior pelvic tilt, squeeze the glutes and maintain tension throughout the body which will be more challenging as you no longer have the floor supporting your knees.
Just like before you don’t want to be rolling all the way out. You can use a stopper or if you don’t have a stopper you can use a wall. Slowly increasing the range of motion as you advance.
The next variation will help you develop core strength through the negative portion of the rep. Once you have mastered the first two progressions and have enough strength that you can roll all the way out under control from the standing position then you can give this one a try. What you do is roll out until you are fully extend then drop to your knees and rollback. You have to be very careful once you're extended out as when you lower down to your knees it is easy to lose tension. So as you lower to your knees again pay attention to squeezing your glutes to maintain this tension. What is super important is that your abs are engaged and you're not using your hip flexors.
-
 5:31
5:31
Fit and 50
2 years ago $0.07 earnedHow Much Food to Build Muscle and Lose Fat (Including What I Eat)
5902 -
![Mr & Mrs X - The [DS]/Dems Are Destroying Themselves, Defending The Indefensible, Game Over - Ep 4](https://1a-1791.com/video/fww1/14/s8/1/i/Z/E/b/iZEbz.0kob-small-Mr-and-Mrs-X-The-DSDems-Are.jpg) 55:57
55:57
X22 Report
1 day agoMr & Mrs X - The [DS]/Dems Are Destroying Themselves, Defending The Indefensible, Game Over - Ep 4
93.5K57 -
 LIVE
LIVE
Joe Donuts Live
54 minutes ago🟢 Loot Rats Unleashed: Arena Breakout Chaos! | Joe + Tony + Vlad
2,568 watching -
 11:18
11:18
Dr Disrespect
2 days agoDr Disrespect: THE BEST AND WORST OF GAMESCOM 2025
128K22 -
 LIVE
LIVE
Boxin
37 minutes agoGrounded! part 5
219 watching -
 2:10:12
Badlands Media
1 day agoDevolution Power Hour Ep. 383: Epstein, Durham, and the Dictator Narrative
95.6K74 -
 2:40:10
DLDAfterDark
11 hours ago $0.49 earnedDLD Live! Feat. Red Dawn Readiness! Glock FRT's - Striker Fire Safety Concerns - ACE Trigger
40.3K6 -
 2:40:21
BlackDiamondGunsandGear
10 hours agoAre ALL Striker Fired Pistols UNSAFE? // After Hours Armory
52.8K12 -
 LIVE
LIVE
TheSchleppy
5 hours ago✨TheSchleppy✨EWC COUNTER STRIKE 2 GRAND FINAL *MONGOLZ v AURORA*
31 watching -
 6:34:50
SpartakusLIVE
14 hours ago#1 Saturday Spartoons on RUMBLE PREMIUM
126K7