GIMP Channel Theme Creation Part 4 (Read Description)
(Update: I know these videos are quite outdated since you can no longer make backgrounds for your channel. Yet they aren't at the same time because you can apply these techniques for making channel art)
This was originally titled: "Adding Pictures in a Youtube Channel Template With GIMP". I renamed it so as not to confuse people.
-----
This is part 4 of a 4-part step-by-step tutorial on how to make YOUR own channel themes for free. Remember, You can do ANYTHING you want with your channel once you know how to make the boxes and stuff. This is just a general tutorial on how to customize things with my templates. A bonus tip is to put all of these boxes on their own layer as you go.
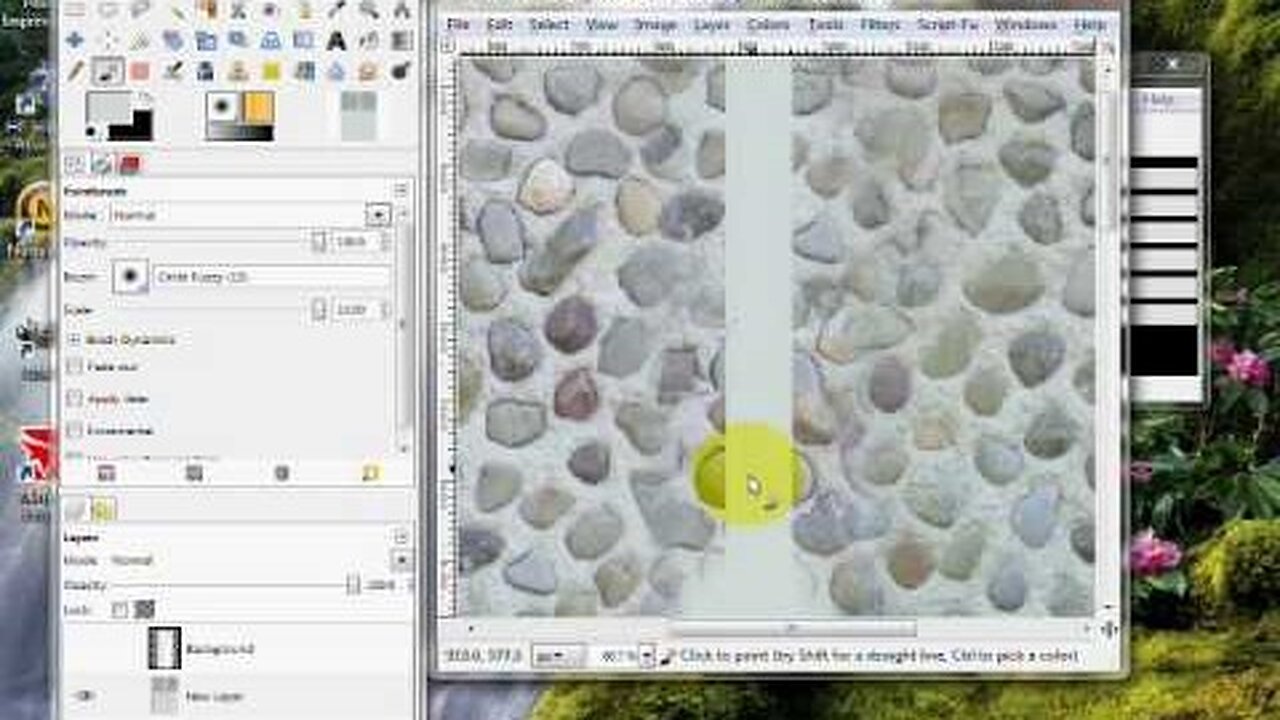
OK! This should be the end-all tutorial on how to add images into your channel themes. I thought it was obvious because it's JUST like when I added blood inside and outside the boxes by selection. The only thing different is that the image is the brush and you have to do things in a slightly different order for adding pics to boxes. I also show how to re-size images for any area of the theme. One thing I recommend though when re-sizing... don't make a image bigger unless you have to, it'll become blurry or pixelated. Smaller works fine though. Find a image that is huge and scale it down, it'll look better.
I forgot to also mention that if you want a "texture" like the cobblestone to not be so... "intrusive" so text can be viewed clearly... just tone the opacity down on the image layer until you can read text clearly.
My Deviantart where you can get the templates:
http://www.pkgam.deviantart.com
I apologize for the sound in the video. It's a little skippy and laggy because at this time I didn't know how to configure Camstudio properly yet. Side note: To fix the sound problem yourself if you have it, enable "MCI Recording" in the audio options.
Enjoy!
-
 LIVE
LIVE
Side Scrollers Podcast
2 hours agoSmash Pro DEMANDS “Woke Echo Chamber” + EA SOLD To Saudis + More | Side Scrollers
354 watching -
 LIVE
LIVE
Viss
2 hours ago🔴LIVE - How To Win in PUBG - PUBG 101 with Viss
64 watching -
 LIVE
LIVE
The Mel K Show
1 hour agoMORNINGS WITH MEL K - The Bow Has Broken: Justice is Coming 9-29-25
1,236 watching -
 1:01:09
The Rubin Report
2 hours agoCNN Liberals Go Silent as Guest Points Out Fact After Fact on Left Wing Violence
25K41 -
 2:04:17
Benny Johnson
3 hours agoChristianity Under Attack: Trump Declares 'Epidemic of Violence' on Christians As Church Shot,Burned
84.1K67 -
 1:23:24
Nikko Ortiz
2 hours agoChurch Shooting And Arson Attack In Michigan - Rumble LIVE
25.3K4 -
 1:00:21
VINCE
4 hours agoThe Left's "Mostly Peaceful" Terrorists + Guest Eric Trump | Episode 135 - 09/29/25
209K167 -
 LIVE
LIVE
LFA TV
15 hours agoBREAKING NEWS ALL DAY! | MONDAY 9/29/25
4,293 watching -
 1:23:09
The Big Mig™
4 hours agoPesticides & Herbicides, The Ugly Truth w/ Zen Honeycutt
47.4K10 -
 DVR
DVR
Bannons War Room
7 months agoWarRoom Live
38.5M8.93K