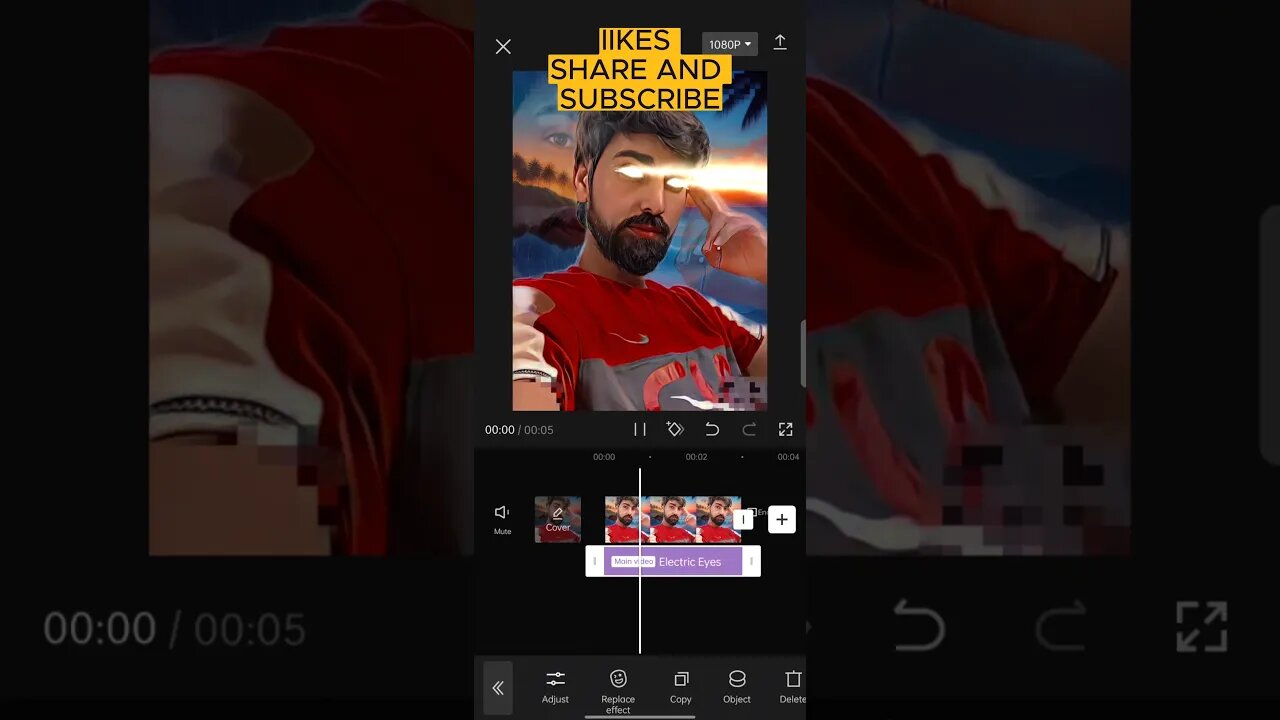
🔥 How to Create 🔥 Lighting Eyes & Eye Fire Effects in CapCut!
To create lighting eyes or eye fire effects in CapCut, you can follow these steps:
Open CapCut: Launch the CapCut app on your device.
Import footage: Import the video clip or image where you want to add the eye effects.
Duplicate layer: Duplicate the layer containing the eyes so that you have two identical layers.
Isolate the eyes: Use the masking or cropping tool to isolate the area around the eyes on the duplicated layer. This step ensures that the effects will only be applied to the eyes.
Add effects: Apply the desired effects to the duplicated layer, such as lighting, fire, or glow effects. You can explore the effects library in CapCut to find suitable options.
Adjust the effect settings: Fine-tune the effect settings to achieve the desired look. You may need to adjust parameters like intensity, color, size, or speed of the effect.
Blend modes: Experiment with different blend modes for the duplicated layer to blend it seamlessly with the original layer. Overlay or Screen modes often work well for eye effects.
Keyframe animation: If you want the eye effects to animate or change over time, use the keyframe animation feature in CapCut. Set keyframes for the effect properties, such as position, size, or opacity, to create dynamic eye effects.
Preview and refine: Preview the video to see how the eye effects look. Make any necessary adjustments to the effect settings, timing, or positioning.
Export the final video: Once you are satisfied with the eye effects, export the video from CapCut in your preferred format and quality.
#CapCutTutorial
#LightingEyes
#EyeFireEffects
#VideoEditing
#SpecialEffects
#CapCutTips
#VisualEffects
#CreativeEditing
#VideoTransitions
#TutorialVideo
#CapCutEffects
#EditingTechniques
#EyeAnimation
#CapCutApp
#DIYEffects
#FireEffects
#EyeGlow
#CapCutTricks
#CreativeVideoEditing
#StepByStepTutorial
-
 1:32
1:32
Memology 101
1 day ago $0.14 earnedTop Obama official SWEATING BULLETS over possible ARREST for his role in the RUSSIA COLLUSION HOAX
80210 -
sophiesnazz
3 hours ago $1.92 earnedTIME TO WIND PEOPLE UP !socials
12.4K -
 LIVE
LIVE
OhHiMark1776
4 hours ago🟢07-26-25 ||||| Halo Multiplayer Rumble: No. 16 ||||| Halo MCC (2019)
36 watching -
 LIVE
LIVE
GamerGril
3 hours agoThe E-Gril Within | First Time Play Through | Saturday Spookfest
165 watching -
 18:22
18:22
Liz Wheeler
4 hours agoWhat Ghislaine Maxwell Knows
13K23 -
 LIVE
LIVE
cosmicvandenim
7 hours agoWARZONE - Kenetik Energy Announcement - Discord Spy Bots
115 watching -
 1:05:51
Jeff Ahern
4 hours ago $18.47 earnedThe Saturday Show with Jeff Ahern
101K14 -
 LIVE
LIVE
Misfit Electronic Gaming
2 hours ago $0.11 earned"LIVE" RUMBLE HALO Spartans "Halo MCC" 23 Followers to go till we hit !000 RUMBLE TAKEOVER
16 watching -
 1:57:13
Film Threat
6 hours agoLIVE FROM SAN DIEGO COMIC-CON! (Saturday) | Film Threat Live
15.9K -
 31:40
31:40
Tactical Advisor
5 hours agoEveryone Talks About This AR15 Being The Best? | Vault Room Live Stream 034
62.4K4