Adding Overhead Lighting to the Soft Top, Part 2
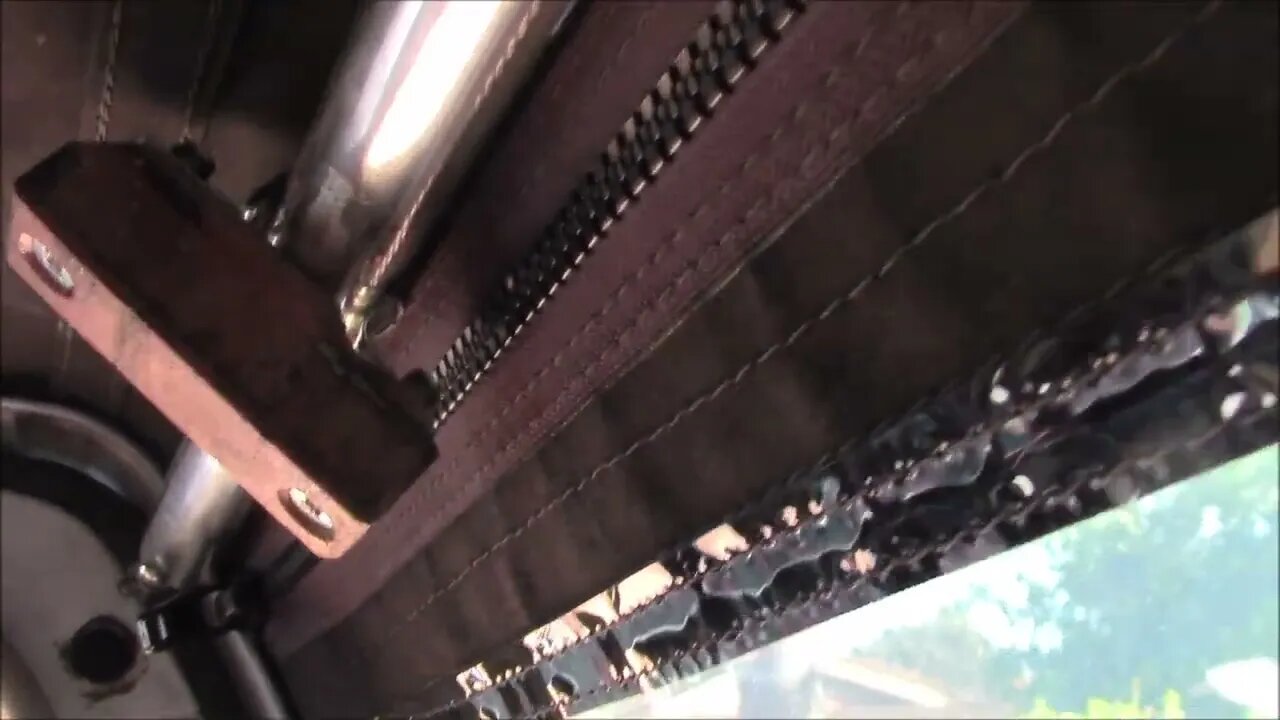
Working on the clamps that will be used to attach the LED rail lights to the support tubes inside the soft top. I didn't want to drill any holes in the thin aluminum tubes. I used some hardwood blocks cut from an old shipping pallet to screw the light end caps into and also to attach the conduit clamps to. It took a lot of back and forth trips from the shop to the soft top to work out how to fit these clamps in place without creating a wear point for the canvas.
Many years ago I had modified the factory deck light to improve it's usefulness. Originally, it had an incandescent festoon bulb and required the vehicle running lights to be on. You could then turn that lamp on with it's built-in switch or from the dash switch, wired up as a 3-way light circuit. I initially re-powered that switch to work off constant 12V power:
https://www.4crawler.com/4x4/CheapTricks/index.shtml#DeckLightMod
Later I changed that to accessory power but I think I'll return to constant power. I also tapped into the bulb wiring and ran that to a 12V power socket that I could plug the 12V LED trouble light into. Over time, that early design trouble light started to break down so I didn't use it a lot. When I pulled to Kayline top off, I removed that old light and looked for a new solution.
I found this linear "rail lights":
18.5" Pivoting LED Rail Light - Integrated Rocker Switch
https://www.superbrightleds.com/
I wanted something that could be attached to the support tubes of the soft top without drilling, be adjustable in angle and have a built-in switch. One will be placed across the back of the bed and connected to the old deck light wiring. The other two will be up front on either side of the bed. My 12V fridge will be placed on the driver's side so one light will be over that. The other one will be over the area behind the passenger seat where I have gear stored below.
I found some 3/4" conduit clamps were the right size and shape to clamp to the support tubes. I added some heat shrink tubing to the center of the clamps to grip the tubes tighter and to help protect the canvas top where it made contact with the clamps.
In the next video, we'll get the lights installed and at least one wired up...
Killer Toy Tops:
https://killertoytops.com/
More to come...
Subscribe for more content like this
Comment, like, share & click the bell icon
And as always, thanks for watching
-
 LIVE
LIVE
The Bubba Army
23 hours agoIS FETTERMAN GOING REPUBLICAN? - Bubba the Love Sponge® Show | 11/04/25
2,362 watching -
 2:05:08
BEK TV
1 day agoTrent Loos in the Morning - 11/04/2025
8.92K -
 21:38
21:38
Professor Nez
21 hours agoTrump JUST BROKE the INTERNET with SAVAGE Line on Ilhan Omar!
42.3K58 -
 1:17:52
Dialogue works
3 days ago $10.17 earnedMartin Armstrong: This Is How World War III Starts… And It Already Has
36.4K19 -
 38:16
38:16
daniellesmithab
3 days agoAlberta Update: Getting Kids Back to the Classroom
28.4K11 -
 20:48
20:48
BlaireWhite
5 days agoTrans TikTokers Are Crashing Out (Over Nothing)
32.6K12 -
 2:07:06
Side Scrollers Podcast
22 hours agoHasan Piker CAUGHT LYING AGAIN + Twitch URGES LEFTIST IDEOLOGY + More | Side Scrollers
74.8K11 -
 8:40
8:40
MattMorseTV
18 hours ago $14.34 earnedSchumer just KICKED OFF the Left-Wing CIVIL WAR.
35.8K35 -
 21:39
21:39
Nikko Ortiz
2 days agoI Take A North Korean Shooting
33.5K6 -
 1:46:26
The Michelle Moore Show
21 hours ago'The Religion Invasion In the U.S. and the Deep State Agenda' Guest, Mark Taylor: The Michelle Moore Show (Nov 3, 2025)
41.9K43