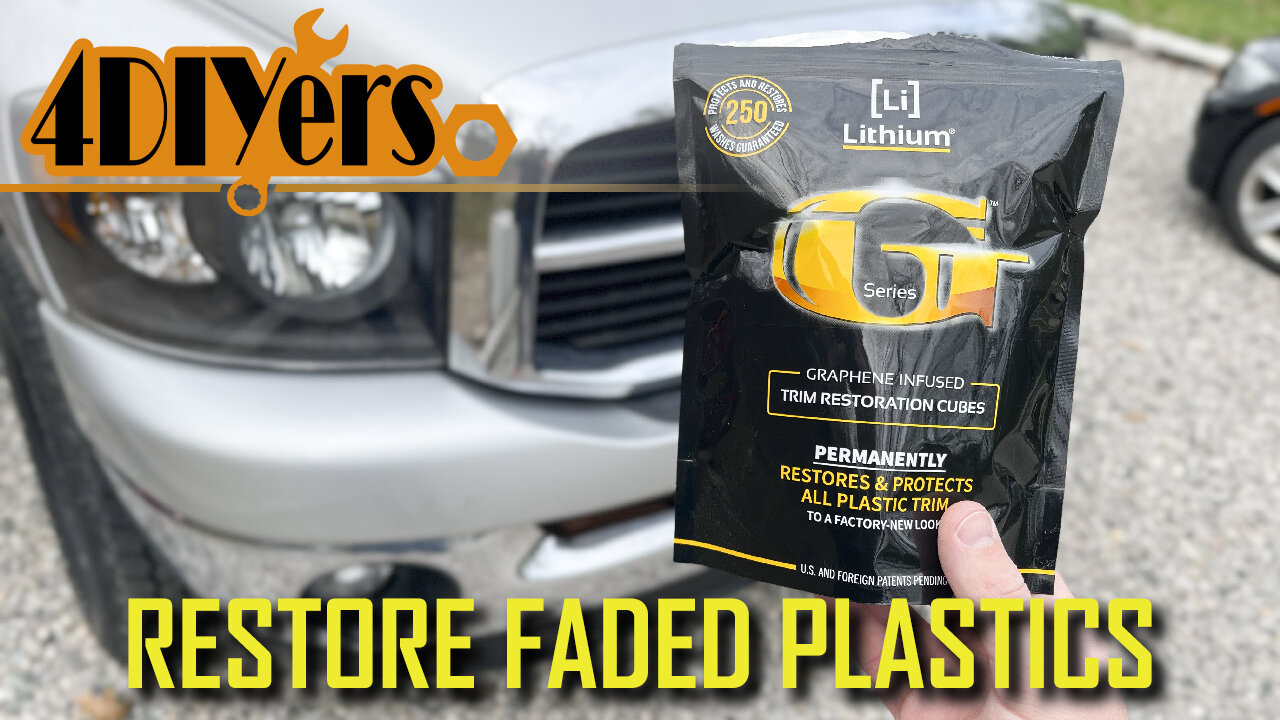
How to Restore Faded Plastic Trim on Your Car Using Lithium
How to restore faded trim on your vehicle using these graphene infused trim restoration cubes from Lithium. This will permanently restore faded plastic to that factory look. The kit comes with everything you need to restore your trim. This includes the graphene ceramic infused trim cubes, one spray bottle of pre-applicator cleaner, a pair of gloves, and the instructions. #lithium #lithiumautocare #autodetailing
Lithium Graphene Trim Cubes: https://lithiumautocare.com/products/graphene-trim-coating
Website: http://4diyers.com
Patreon: https://www.patreon.com/4diyers
Facebook: https://www.facebook.com/4diyers
Twitter: https://twitter.com/4DIYers
Instagram: https://www.instagram.com/4diyers/
Tumblr: http://4diyers.tumblr.com
Pintrest: https://www.pinterest.com/4diyers/
Tools/Supplies Needed:
-hose and water
-carwash soap and a bucket
-compressed air
-microfiber towel
-Lithium trim restoration kit
Procedure:
I gave the vehicle a full wash so we’re working with a clean base and there is minimal chance of contaminants. Then I followed up with compressed air and a microfiber towel to remove any pooling water under and around the trim where it may cause application issues.
Then using their pre-application spray, it’s applied to the door handle and then wipe the surface using a microfiber cloth. This will remove any contaminants or oils on the surface which may prevent the product from working properly. Furthermore I have also washed the vehicle before doing the application process.
Next going to the rear bumper trim, I Again the pre-applicator spray is applied to remove any contaminants, the surface is then cleaned using a microfiber towel. It’ll take a few minutes to dry which is why I go around with the cleaner first.
Now back to the door handle. Here is the trim cube package, there is one cube per package. Open the package and watch the cube is saturated with cleaner. It’s important to wear gloves during the cleaning and application processes. Then gently rub the plastic with the trim cube. Go over the full surface, working in different directions to ensure it is sufficiently covered.
When done follow up with a clean microfiber cloth to remove any excess amount of restoration product. If you missed any spots, go over it again and then follow up with a microfiber cloth.
After that you will be required to let the product dry.
Now going back to the bumper trim, again using the same process. Try not to squish the cube where a bunch of conditioner drips out. Work in different directions, evenly covering the plastic. In this situation try not to get it on the chrome bumper.
Then follow up with a microfiber cloth to remove the excess amount of restoration product, providing an even finish throughout the plastic trim.
Again other areas of the vehicle also have the product applied as well. This can be applied on any plastic trim such as the door handles, fender flares, box protectors, license plate frames, rocker panel covers, light bezels, bumper valances, etc. this can even be used on your boat, yard equipment, motorcycle, ATV, etc.
Once done as you can see the trim is restored to its new original finish. I will be extensively testing this product to see how it holds up. This was applied before winter so be sure to keep an eye out for a review in the upcoming months.
Thank you to all those who watch my videos and support my content. Don't forget to subscribe to my channel for future tutorial videos and like my video if you found it helpful. New videos are always being uploaded every week!
© 4DIYers 2013
All Rights Reserved
No part of this video or any of its contents may be reproduced, copied, modified or adapted, without the prior written consent of the author.
-
 2:43:18
Nerdrotic
11 hours ago $56.81 earnedKarahan Tepe with Andrew Collins | Forbidden Frontier #080
107K11 -
 1:19:14
Josh Pate's College Football Show
13 hours ago $29.13 earnedOhio State & UGA Survive | Clemson Implodes | South Carolina & Ole Miss Roll | AP Poll vs JP Poll
65K2 -
 3:12:21
Tundra Gaming Live
11 hours ago $11.70 earnedBetter Dead Than A Zed 🧟 ♀ 🧟 ♀ Amiright???
52.1K2 -
 7:43
7:43
Guns & Gadgets 2nd Amendment News
14 hours agoFBI Arrests "AK Guru"
83.4K52 -
 2:44:36
vivafrei
20 hours agoEp 235: THE LAST SUNDAY SHOW BEFORE THE ELECTION! Breaking Down What is on the Ballot! Viva & Barnes
225K155 -
 7:47:12
Vigilant News Network
15 hours agoBiden-Harris, Pfizer & Moderna SUED for Depopulation Crimes - Media Blackout
124K7 -
 4:22:46
Right Side Broadcasting Network
1 day agoLIVE REPLAY: President Trump Holds a Rally in Kinston, NC - 11/3/24
340K25 -
 1:30:19
Professor Nez
17 hours ago🚨SPECIAL GUEST: Trump HANDPICKED Him from CROWD Leaving Secret Service STUNNED!
122K336 -
 1:31:39
ACTIVE MEASURES
17 hours agoACTIVE MEASURES Ep. 20: Smell-ection Special
94.7K6 -
 17:16
17:16
DeVory Darkins
1 day agoSwing Voters BLOW UP on Kamala with BOMBSHELL Warning
90.4K111