How to Install a Trailer Hitch on a Mazda CX9
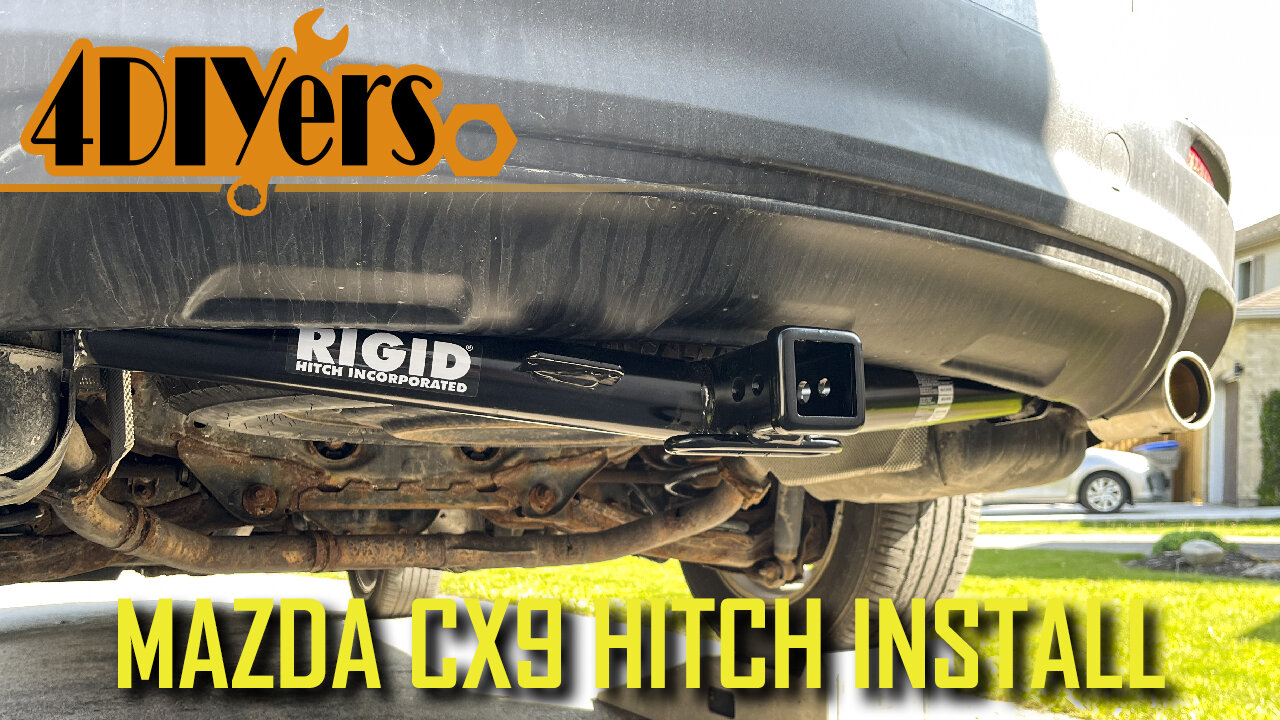
How to install a hitch on a first-generation Mazda CX9. This particular model is a 2015 and a similar procedure may apply to other models which share the same platform like Ford or Lincoln. Rigid Hitch has supplied me with the hitch for this installation. This is their class 3 tubular hitch, it has a 2” receiver and is rated for a 4000 lbs trailer with 400 lbs of tongue weight. #rigidhitch #hitch #mazdacx90
Hitch: https://www.rigidhitch.com/draw-tite-75531.html?find=2015-mazda-cx-9-rear-mounted-receivers-all-models-560752
Wiring Kit: https://www.rigidhitch.com/rigid-re-62070.html?find=2015-mazda-cx-9-trailer-hitch-electrical-all-models-538686&sid=aaAFjKPEHq
Website: https://www.rigidhitch.com/?utm_source=matthewromagnoli&utm_medium=influencer&utm_campaign=4diyers
Website: http://4diyers.com
Patreon: https://www.patreon.com/4diyers
Facebook: https://www.facebook.com/4diyers
Twitter: https://twitter.com/4DIYers
Instagram: https://www.instagram.com/4diyers/
Tumblr: http://4diyers.tumblr.com
Pintrest: https://www.pinterest.com/4diyers/
Tools/Supplies Needed:
-19mm socket with ratchet and 19mm wrench
-medium grade threadlocker
-M12x1.25 tap (not manditory)
-vehicle ramps
-new hitch kit
Procedure:
The kit comes with everything you need for the installation, you’ll also find mounting hardware and instructions included with this hitch.
Each of the bolts had a medium grade thread locker applied to ensure the bolts don’t come loose.
The vehicle was also driven up on ramps in the rear to make the installation easier. This can all be done in your driveway.
The hitch is extremely straightforward to install. There are already threaded holes pre-installed by Mazda on the structure. The spare tire can be removed and I will show you that in a moment. As you can see there are the holes on each side.
To install the hitch, tip the receiver down and then feet it up behind the bumper around the heat shield. The threaded holes can be chased with a top to remove any rust to make the installation of the bolts easier. The top that would be used would be an M12 x 1.25 tap. This isn’t needed on all vehicles depending on your climate. As mentioned earlier, the rigid hitch has supplied the components for the installation, be sure to check them out by the link in my video description.
After that is installing each of the bolts. Before tightening any of them, make sure they are started by hand first.
To get a better view of the installation, I did end up dropping the spare tire. This is done by pulling the carpet floor up in the trunk space, Mazda does have a tool to drop the tire. Rotate the nut in the floor and this will lower the tire.
All of the bolts are 19 mm and make sure you do install a washer with each of them. Tighten each of the bolts to 76 ft lbs or 105 nm.
Once done, the spare tire can be retracted back into place.
You may need to direct it by hand ensuring it’s properly seated and not caught up on anything underneath. I still have the trunk liner out as I will be installing the wiring, so be sure to stay tuned for that video.
After that, the hitch installation is finally done, and as you can see it tucks up underneath the vehicle nicely.
Thank you to all those who watch my videos and support my content. Don't forget to subscribe to my channel for future tutorial videos and like my video if you found it helpful. New videos are always being uploaded every week!
© 4DIYers 2013
All Rights Reserved
No part of this video or any of its contents may be reproduced, copied, modified or adapted, without the prior written consent of the author.
-
 LIVE
LIVE
LFA TV
15 hours agoTHE ARK ENCOUNTER LIVE EVENT! 7.26.25 9AM EST-12PM EST
16,147 watching -
 8:10
8:10
MattMorseTV
1 day ago $36.77 earnedThey just CAVED.
87.6K130 -
 LIVE
LIVE
RG_GerkClan
2 hours ago🔴LIVE - Lets PvP and Dominate - Escape From Tarkov - Gerk Clan
381 watching -
 15:54
15:54
DeVory Darkins
1 day ago $25.95 earnedDemocrats desperately COPE as Paramount Merger APPROVED
54.1K95 -
 LIVE
LIVE
Sgtfinesse
1 hour ago✅ Dune: Awakening | Arrakistan Life
137 watching -
 LIVE
LIVE
FyrBorne
21 hours ago🔴Warzone M&K Sniping: Why Can't Dinos And Zombies Just Get Along?
25 watching -
 2:02:18
Side Scrollers Podcast
23 hours agoVShojo COLLAPSES, Unhinged CELEBRATE Hulk Hogan’s Death, Chuck E Cheese ARRESTED | Side Scrollers
46.2K7 -
 LIVE
LIVE
BatDude Gaming
2 hours ago🦇 RUMBLE GAMING 🦇 ⚡⚡ TALES from the BORDERLANDS (Continued) ⚡⚡ STORY BASED GAME 🦇
22 watching -
 LIVE
LIVE
Rotella Games
3 hours agoSaturday Morning Family Friendly Fortnite
88 watching -
 2:17:51
HartZA92
2 hours agoGenesis Alpha One: Build, Blast & Survive the Final Frontier!
16.9K1