Total Connect 2.0 - Creating a Scene Using a Phone
In this video, Dylan from Alarm Grid shows you how to create a scene using a phone and the Total Connect 2.0 app. This video showcases this process using an iPhone, but the process for creating a scene on an Android phone is very similar. The FAQ linked at the bottom of this description shows screenshots from both Android and iOS devices.
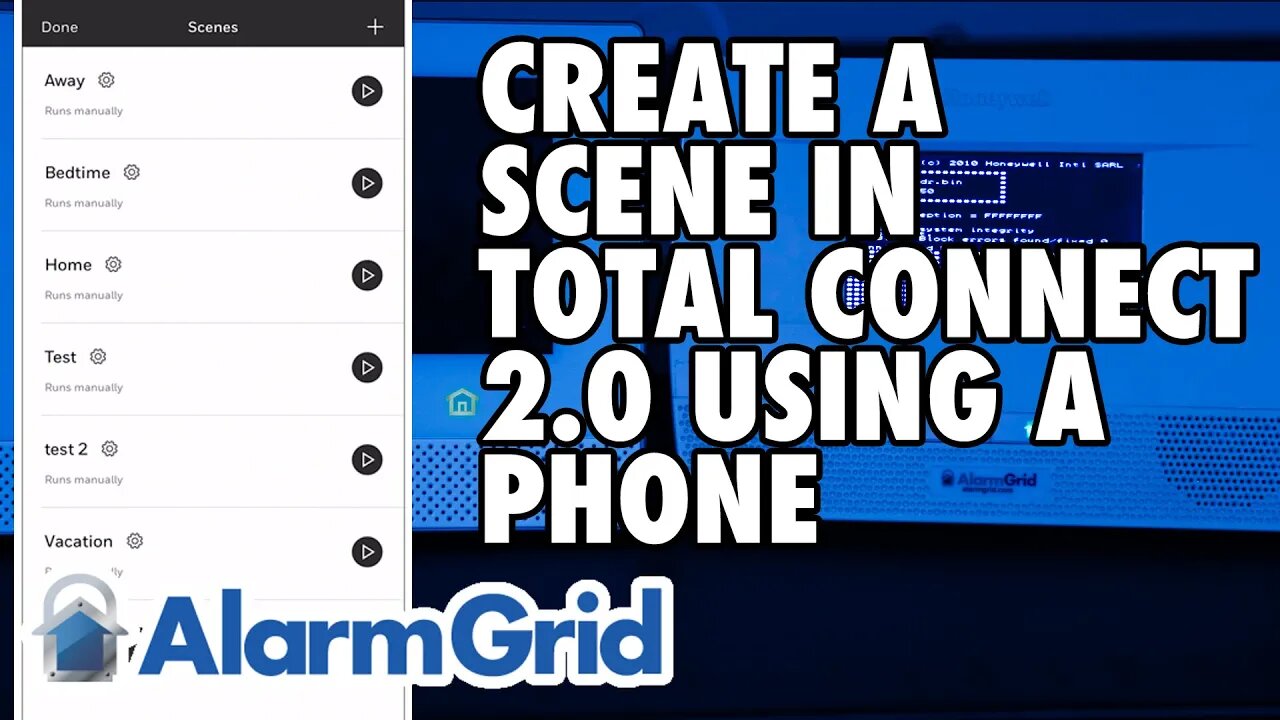
This video assumes you have an alarm system with a Total Connect 2.0 account already set up. Open the app and log in using your TC2 credentials. If you're not sure what the proper credentials are, contact your alarm dealer. Once you have logged in, click the "More" option at the lower right. The icon for this looks like (...). In the More screen, you'll see "Scenes" at the top. Tap this option, and you will see a list of any previously created scenes. Some scenes exist by default but don't have any actions associated with them. You can edit one of these existing scenes or you can click the "Create Scene" button.
The first step in creating a new scene is choosing a name. We recommend you choose a name that will help you to recall what the scene will do. Particularly if you plan to have a large number of scenes. After creating a name, click "Next" at the lower right of the keypad screen.
On the next screen, you'll choose what you want to trigger your scene. You can trigger based on a schedule, based on a system event such as arming or disarming, or the fault or restore of a zone, or you can choose to manually trigger the scene. When you tap on each option, you'll see any further programming choices based on that option. For example, if you choose to trigger "During this time" you'll then have to choose the time and the day or days on which you want this scene to trigger. You also have the choice of Sunrise or Sunset on particular days. Choosing "Trigger by some device" will then allow you to choose a device, and the state of that device that will cause the scene to run. It could be when the system arms away, or it might be when the front door opens (faults). Choosing "Manual" means that you will have to manually trigger the scene either through the TC2 app, or at the Lyric panel itself. Once you have selected a trigger, click "Next".
Next you'll choose what device or devices you want to automate with this scene. You can also automate the security system itself. For example, you could set this scene to arm the system, but in our case, we're automating a Z-Wave device, and our system is very simple with only one device to work with. So, we're selecting the Z-Wave switch for this scene. Then click "Next". Now we have to set what state we want to put the switch into when the scene is run. Our switch only has two (2) options. On, or off. We're choosing On for this scene. Then click "Next" and you'll be shown a summary screen. In summary, when we manually trigger this scene, Switch 001 will turn on. If any portion of this programming is incorrect, you can click the pencil icon to the right and edit it from here. If everything is correct, click "Save Scene".
In the video, we then test the scene and show it working after a successful automation sync between Total Connect 2.0 and the Lyric panel. This sync is important as we can't tell the Lyric panel to run a scene it doesn't know about yet. Since the scene was created in TC2, it has to be synced with the Lyric panel before it can actually do anything.
In the video we create another manually operated scene to turn the same Z-Wave switch back off, and the steps are the same as those above. After a sync, this scene is also demonstrated.
https://www.alarmgrid.com/faq/how-do-i-create-a-scene-in-total-connect-2-0-via-a-phone
-
 4:37
4:37
Alarm Grid Home Security DIY Videos
2 years agoQolsys IQ Panel 4: Change the Master Code
35 -
 8:19
8:19
Millionaire Mentor
16 hours agoATC Whistleblower EXPOSES Obama’s Dirty FAA Secret
4.38K4 -
 LIVE
LIVE
BEK TV
22 hours agoTrent Loos in the Morning - 11/21/2025
206 watching -
 LIVE
LIVE
The Bubba Army
21 hours agoCHICAGO SUBWAY FIRE ATTACK - Bubba the Love Sponge® Show | 11/21/25
2,459 watching -
 57:31
57:31
Side Scrollers Podcast
16 hours agoBlabs VS DuckTales
5.98K10 -
 8:52
8:52
MetatronGaming
13 hours agoOverwatch 2 New Hero Vendetta La Lupa
109K10 -
 1:37:16
omarelattar
22 hours agoEx-Mafia Boss: I Made $8 Million Every Week Until The FBI Destroyed My Life! What I Learned...
23.9K2 -
 16:18
16:18
Actual Justice Warrior
14 hours agoJasmine Crockett DESTROYED For Epstein Lies
9.46K16 -
 38:25
38:25
Coin Stories with Natalie Brunell
19 hours agoBlackRock's Robbie Mitchnick on Bitcoin ETF Inflows, Risk-On vs Risk-Off & Digital Gold's Future
16.2K5 -
 15:56
15:56
itsSeanDaniel
2 days agoMarjorie Taylor Greene Finally WENT TOO FAR (Career Over?)
24.3K58