Total Connect 2.0 - Creating a Scene via Website
In this video, Dylan from Alarm Grid shows you how to create a scene in Total Connect 2.0 using the website at www.totalconnect2.com. Start by logging into the page using your TC2 credentials. Once you've logged in, follow these steps to create a scene.
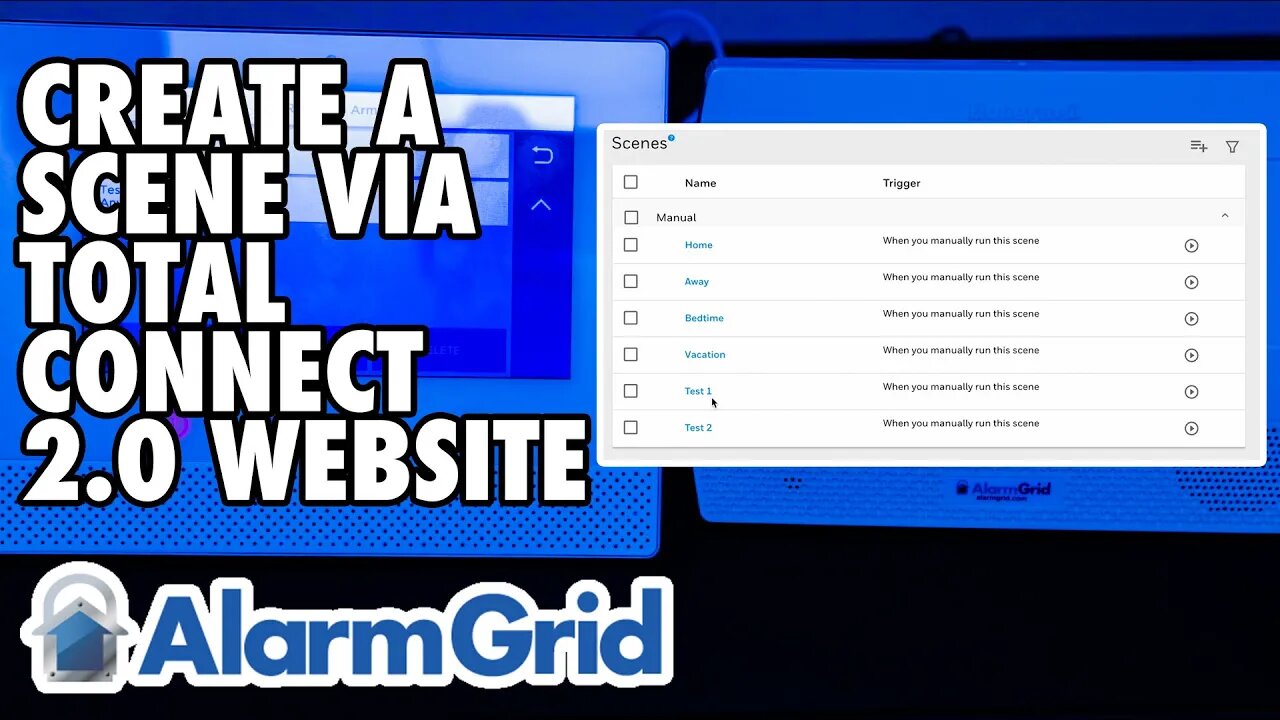
From the menu on the left, choose Scenes. If you have the menu minimized, you'll just see an icon with a movie clapperboard rather than the word Scenes. When you first enter scenes, you'll see some scenes that exist by default within TC2. You are free to customize any of these scenes you like, but for demonstration purposes, we're going to choose the Add Scene button at the upper right. It looks like a hamburger menu with a + symbol next to it.
The first step is to choose a name for the scene. The name you choose should help you to remember what the scene will do. The scene name will hold up to 15 characters. Next, choose when the scene will trigger. This can be based on a schedule, based on the state of a security system device, or by manually triggering the scene.
If you choose to run at a scheduled time, you can choose a specific time, and then you can choose to repeat at the same time on subsequent days. You could choose 8:00 PM and then repeat every day, Monday - Friday. This setup will repeat on the selected days until you make a change to the scene or delete it. You also have the options of Sunrise and Sunset, which will occur based on the zip code for the system.
If you choose to activate the scene based on a security system device, you'll choose which device, and what state causes the scene to run. It could be arming or disarming of the security system itself that triggers the scene, or a fault on a particular device. It can also be based on another automation device, such as a door lock being locked or unlocked that causes the scene to run. Manually means that you will manually trigger the scene either through the panel touchscreen or through the TC2 app or webpage. Once you choose a trigger, click "Continue".
Next, you'll choose the scene's action. This is what you want to automate when the trigger occurs. In our example, we have a Z-Wave device listed under "Others" and we have the security system that is available to act once our trigger occurs. The options you will see here depend on the number and type of automation devices you have in your system. If you have Z-Wave locks, you'll have a section titled Locks. If you have lights, you'll have a section titled Lights. Our device is a switch/outlet, so it shows up under the title Other.
In our example, we want to set the switch to turn on when we manually run the scene. So, we hit the dropdown for Other and select the Switch by clicking on it, this will put a checkmark in the box by the device name. Then, we want to toggle the icon to On. This means when this scene runs, it will turn on the switch. This is the only action we want to include, so next click "Continue" in the lower right.
You'll be provided with a summary screen showing you the programming you've selected. If anything is wrong, or you want to add to the scene, you can click the "Edit" button in the lower right. Otherwise, click "Save". This saves your work. Now you can test the scene by manually running it. You can run the scene from the main "Scenes" screen by clicking the right-arrow to the right of the scene name. If you are using a touchscreen panel, such as a Lyric system, you will also have an option to manually run the scene through the touchscreen once the panel and Total Connect 2.0 have synced.
https://www.alarmgrid.com/faq/how-do-i-create-a-scene-in-total-connect-2-0-via-website
-
 4:37
4:37
Alarm Grid Home Security DIY Videos
2 years agoQolsys IQ Panel 4: Change the Master Code
35 -
 30:49
30:49
MetatronHistory
15 hours agoThe Truth about Women Warriors Based on Facts, Evidence and Sources
1333 -

Chad Prather
18 hours agoWhen God Shakes the Room: Bold Faith in a Fearful World
52.7K32 -
 LIVE
LIVE
LFA TV
12 hours agoLIVE & BREAKING NEWS! | FRIDAY 11/21/25
2,573 watching -
 58:40
58:40
Julie Green Ministries
3 hours agoLIVE WITH JULIE
61.7K112 -
 1:01:10
Crypto Power Hour
11 hours ago $2.34 earnedAnimus Bitcoin Technology
20.7K8 -
 LIVE
LIVE
Game On!
18 hours ago $2.87 earnedAnother FOOTBALL FRIDAY! Weekend Preview And BEST BETS!
19 watching -
 31:55
31:55
ZeeeMedia
19 hours agoHow Gold & Silver Fight Against Digital ID ft. Bill Armour | Daily Pulse Ep 148
15.9K9 -
 13:29
13:29
Clintonjaws
15 hours ago $17.94 earnedCNN Host Stops Show & Plays Surprise Clip Forcing Democrat To Correct Lie
44.7K25 -
 14:55
14:55
World2Briggs
19 hours ago $2.61 earnedThe 10 U.S. Cities Americans Can No Longer Afford — 2025 Edition
20.4K