"Creative Wrapping: Unleashing Photoshop Magic!"
To create a wrapping effect in Photoshop, you can follow these steps:
Open Photoshop and create a new document or open the image you want to apply the wrapping effect to.
Select the object or area of the image that you want to wrap. You can use any selection tool available in Photoshop, such as the Rectangular Marquee Tool, Lasso Tool, or Quick Selection Tool. Make sure to refine your selection for better results.
Once you have the desired selection, right-click on it and choose "Layer via Copy" or press Ctrl/Command + J to duplicate the selected area onto a new layer.
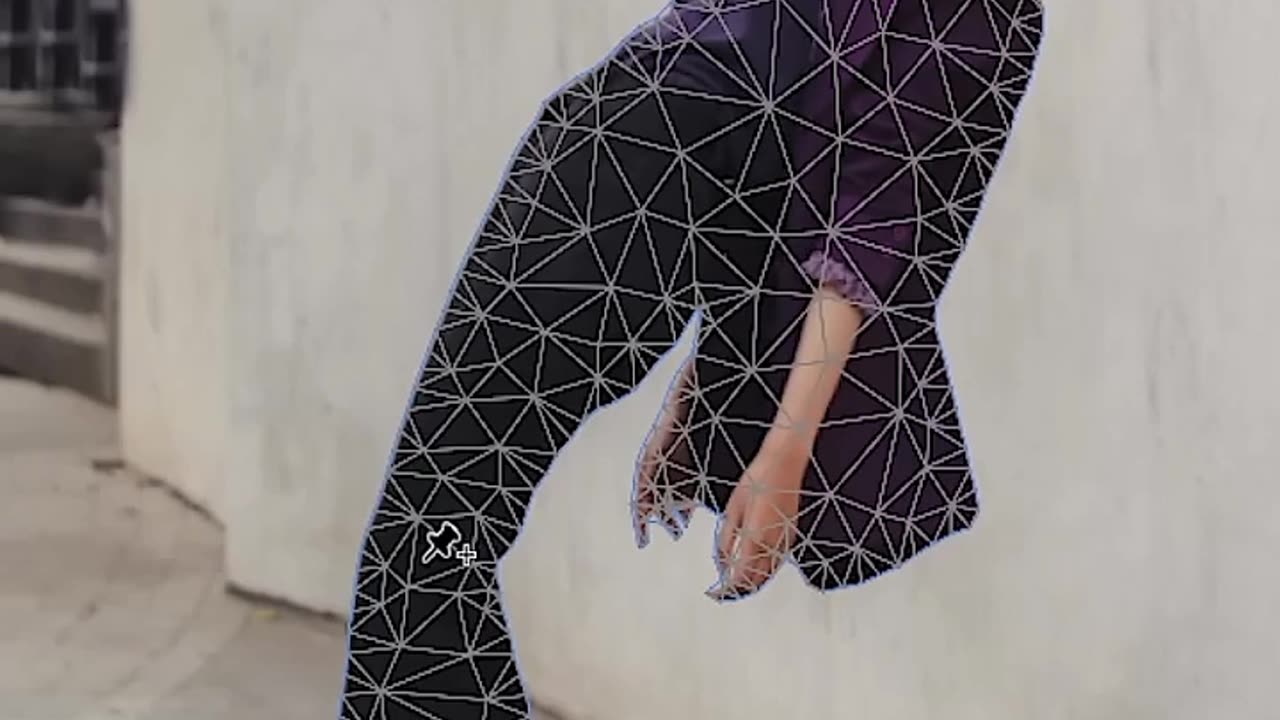
With the duplicated layer selected, go to Edit > Transform > Warp. This will activate the Warp tool, which allows you to manipulate the shape of the layer.
In the options bar at the top of the screen, you'll find various warp presets to choose from. These presets provide different warp styles like Arc, Flag, Rise, etc. Select the one that best suits your desired wrapping effect.
Click and drag the control points on the edges of the layer to adjust the shape and create the wrapping effect. You can add or remove control points by clicking on the edge of the layer with the Warp tool active.
Experiment with different control point adjustments to achieve the desired wrapping effect. You can create bends, folds, or curves depending on the effect you're aiming for.
Once you're satisfied with the result, press Enter/Return to apply the transformation
-
 2:40:10
DLDAfterDark
12 hours ago $0.51 earnedDLD Live! Feat. Red Dawn Readiness! Glock FRT's - Striker Fire Safety Concerns - ACE Trigger
46.4K8 -
 2:40:21
BlackDiamondGunsandGear
11 hours agoAre ALL Striker Fired Pistols UNSAFE? // After Hours Armory
56.8K16 -
 LIVE
LIVE
TheSchleppy
6 hours ago✨TheSchleppy✨EWC COUNTER STRIKE 2 GRAND FINAL *MONGOLZ v AURORA*
63 watching -
 6:34:50
SpartakusLIVE
15 hours ago#1 Saturday Spartoons on RUMBLE PREMIUM
131K7 -
 1:04:59
Man in America
16 hours ago“Summoning the Demon” — The AI Agenda Is FAR WORSE Than We Know w/ Kay Rubacek
67K49 -
 2:16:48
Tundra Tactical
14 hours ago $0.15 earned🎯💥 The World’s Okayest Gun Show 🔫😂 | LIVE Tonight on Rumble!
49.2K1 -
 3:36:03
Mally_Mouse
1 day ago🌶️ 🥵Spicy BITE Saturday!! 🥵🌶️- Let's Play: Tower Unite!
70.2K3 -
 58:59
58:59
MattMorseTV
14 hours ago $1.82 earned🔴Trump just BROKE Newsom.🔴
94.7K106 -
 18:14
18:14
Her Patriot Voice
14 hours agoWho Is WORSE for NYC: Trump Girl or Socialist?
69.7K36 -
 3:39:42
SavageJayGatsby
14 hours agoSpicy Saturday with Mally! | Road to 100 | $300 Weekly Goal for Spicy Bites!
60.9K1