Fixing Uneven Floors 100-Year-Old Building Gets A Make Over
Phil repairs the floor and stabilizes the upper levels of our shop.
⏱️⏱️Chapters⏱️⏱️
00:00 106-year-old building
00:20 Weight on the floor was so heavy it did something to the floor
00:45 We're going to cut and repair it
01:10 Wanting to use 16' boards
02:00 100 years ago a one by was one inch
02:30 Not near as much room under as he thought
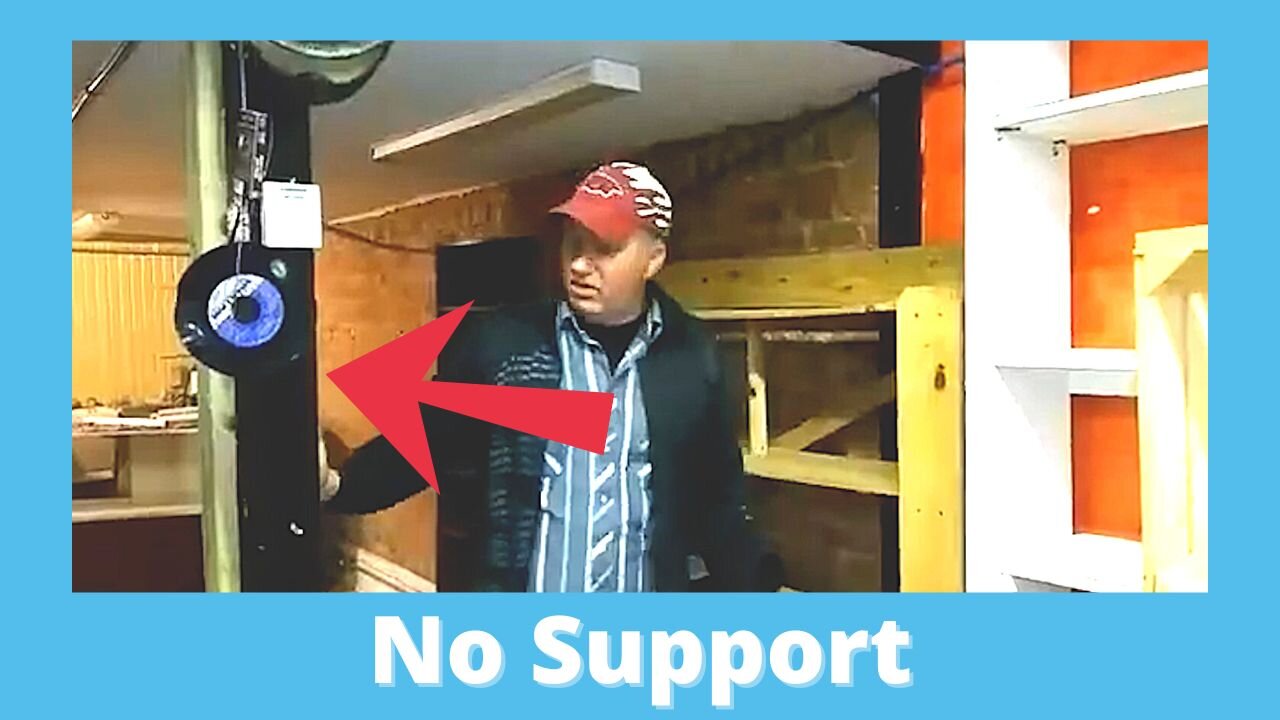
03:35 Floor is bowing because the 4x4s are in the wrong place
04:30 Taken the floor up
04:45 We're going to put 4x4s on the floor joists to support the upper floors
05:05 Pre-drilling holes and securing it all with 3" screws
05:25 This wouldn't be possible in 1914 when the building was built
06:05 End of the job
🙏 Subscribe, 👍, it helps a lot!!
➤❓/ 💬: [email protected]
➤ Follow https://straightarrowrepair.com/pipf
➤➤I get a little for the channel-no charge for you if you use the links:
➤➤Shop Amazon https://amzn.to/3CxD1T4
➤➤Tool lists & recommended products🧰 https://straightarrowrepair.com/0lvf
➤➤Services We use
➤➤MORNINGFA·ME https://morningfa.me/invite/StraightArrowRepair
➤➤A2 Hosting http://www.a2hosting.com/refer/140244
➤➤Tubebuddy https://www.tubebuddy.com/StraightArrowRepair
➤➤Apsumo http://fbuy.me/v/philbridges
➤➤VidIQ: https://vidiq.com/straightarrowrepair
#floorsupport, #floorrepair, #woodenfloor
Transcript:
Hello, here we are with another problem that we're trying to take care of. This is a 106 year old building. First use was the World War One draft board, 1914. Anyway, the weight on this wall was so heavy that it did something to the floor, if you notice, the floor’s got a pretty good size hump, say three or four inches goes all the way down here, pretty thick floor, and we're going to cut over here and make a doorway that you can get rolling in and out.
Because there's no way to get under here. We'll see what we got. So we'll mark out the doorway area and and we'll cut a door that will fit. I need to make sure I can get pretty good sized boards say, 16 foot. So that's why I chose to be right here. This is 1012, so I can almost hit 16 foot.
I go all the way to right here. I want like a four foot area. So, we’re going to mark maybe from this are here to straight you go about a foot and then go four foot. And that way we get longer boards, beams in here. So first thing we do is measure the width of this walkway, which is quite thick. It is straight up one and an eighth inches.
So a one inch then, was one inch and more. Let’s see how far down, it doesn't look that's very far down, not very far down to dirt. Oh, I was thinking there's going to be a lot more room. Well, now we can tell where the floors joists are. And go from there.
So what we determined was the floor joists and moving, not moving, the floor covering, which is actually an inch and an eighth thick is moving because these 4x4s, they put them in with no idea that they needed to sit on top of the floor joints. So all the weight sitting in between the floor joists is here, and it's right here. And it was kind of...
The floor joists are not particularly running square and there's no support through the middle here. So what we're going to do is cut the floor out here to here. We're going to support underneath that side because we can reach it and we're going to put support down through the middle and we'll probably put some support on this side. And then I'll talk to the owner and see if he's okay with me moving the post where it sits on the floor joists. Getting another post, and putting it there. That would probably support a lot of weight.
Now, we've taken the floor up and we found out, like I said before, that the 4x4’s are in the wrong place, are in between the floor joists. We're going to end up putting 4x4 on the floor joists, here and over there.
And before we do that, we're going to support a line of blocks from between the 4x4s here and along that side and along this side, just because we can, well, we'll make things better. So that's what we're doing. We're digging it out. We're going to wedge it up tight.
We're pre drilling holes after wedging up everything and blocks. We’re pre-drilling the holes into this hardwood. And then we're putting three inch screws. Which it did not have. It just had one nail on each end tongue groove to hold it together. So we're making things better. Not the same as it was. In 1914, they didn't have battery power, didn't have very much in the way of screws. So this would have been something that really wasn't possible. You need a pry bar there?
Probably, yeah. But we have one over here. Did we find a board to fit that Tim? I sure did. But I was going to say who knows where it went. There it is. Ok Drew.
Everything is fastened now we put in a new 4x4s, where... On the top of the floor joists. So, it won't let the floor buckle up. We put two of them because both of those 4x4s were in between floor joists. And it was buckling up the floor, all the floors are now fastened with screws and all in this area anyway.
-
 LIVE
LIVE
Drew Hernandez
20 hours agoMIKE HUCKABEE EXPOSED FOR OFF RECORD MEETING WITH CONVICTED ISRAELI SPY?
1,071 watching -
 LIVE
LIVE
SynthTrax & DJ Cheezus Livestreams
13 hours agoFriday Night Synthwave 80s 90s Electronica and more DJ MIX Livestream SYNTHWAVE / ANIME NIGHT
217 watching -
 14:25
14:25
Tactical Advisor
11 hours agoReal Life John Wick Suit | Grayman & Company
4911 -
 LIVE
LIVE
I_Came_With_Fire_Podcast
11 hours agoAlien Enemies Act | Dismantling the Department of Education | Valhalla VFT & America First
156 watching -
 19:53
19:53
MetatronHistory
2 hours agoRome VS Greece - Ultimate Clash of Civilizations Explained
5 -
 33:09
33:09
Exploring With Nug
4 hours ago $2.81 earnedThey Weren’t Ready for Nightfall on Blood Mountain… So I Helped Them Down
13.7K1 -
 1:16:42
Sarah Westall
2 hours agoBoardroom and Government Infiltration: The Silent Erosion of American Power w/ Mike Harris
2.83K -
 LIVE
LIVE
JahBlessCreates
44 minutes ago🎉WE BACK!! MUSIC | VIBES | GAMES
20 watching -
![R.E.D FRIDAY!! TIME FOR WAR! [RGMT CONTENT Mgr. | RGMT GL | GZW CL]](https://1a-1791.com/video/fwe2/cb/s8/1/c/f/6/B/cf6Bz.0kob-small-R.E.D-FRIDAY-TIME-FOR-WAR-R.jpg) LIVE
LIVE
XDDX_HiTower
49 minutes agoR.E.D FRIDAY!! TIME FOR WAR! [RGMT CONTENT Mgr. | RGMT GL | GZW CL]
10 watching -
 LIVE
LIVE
Cewpins
1 hour agoFRIDAY CrossFade PARTY!!🔥weed + dabs + prosecco🍃420💨!MJ
47 watching