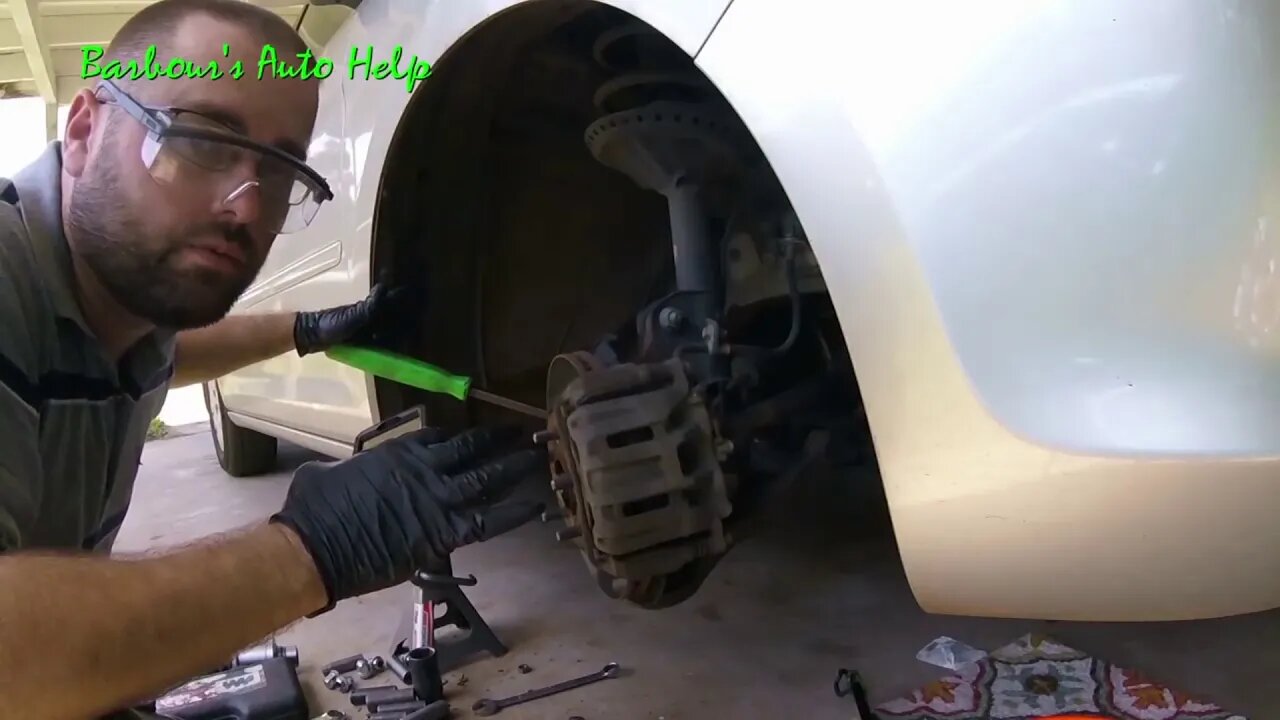
CV Axle Replacement 05 Honda Odyssey
In this video I replace the CV axles on my 2005 Honda Odyssey. I mostly work on the passenger side and do not show the removal and installation of the drivers side. However, the drivers side doesn't differ from the passenger side too much and I do go over those differences in this video.
While this video is somewhat detailed and does go over the basic steps of axle replacement it is lacking in some respects. For instance: I don't show the removal and installation of the axle seal on the drivers side or the removal and installation of the bearing seal on the passenger side (I don't believe this seal is serviceable apart from the carrier bearing). I also, do not show the removal and installation of the circlips and I do not provide torque specifications. You gotta have a repair manual.
If you chose not to replace your axle seals I would suggest using great care not to damage the seals when removing and installing your cv axles. If the seal is grazed or stabbed by the cv axles then the seal could be damaged. Also, check for leaks at the axle seal a week or two after replacing the axles. Repair leaks.
You may loose transmission fluid when replacing the axles. Check and top off your fluid using the procedure outlined in a reputable repair manual for your vehicle. If the fluid is low transmission damage could result. So be sure it the fluid level is correct after the repair.
⚠️ At the 8:02 mark in the video. Use care not to stretch rubber brake hose between the strut and body while removing axle from wheel bearing. Damage an occur.
*Replace all fasteners. Use new cotter pins.*
A note on beating the CV axle out of the hub bearing: I used a metal hammer in this situation. But, a plastic hammer is actually recommended as a plastic hammer will not cause damage to the lug nuts or the surfaces of the wheel bearing. If a metal hammer is used, and in some situations a metal hammer will have to be used, extreme care should be taken not to hit anything other than the cv axle. Damaging other components could result in improper mating and installation which, in a worst case scenario, could result in your tire falling off. If a lip is created, by impact with a hammer, on the bearing surface where the rim fits over it, it could result in the wheel working it's self loose over time. Note there are probably other scenarios I cannot predict that can occur as a result of damage caused by a hammer.
Also, a note of the method I used to tighten down my axle nut using the pry bar through the lug studs, this method could potentially be dangerous as the pry bar could slip off. The axle nut requires lot of torque so a lot of force will need to be used to tighten this nut. If the pry bar slips then all that "static" force is going to be transformed into "kinetic" energy. In other works you could bust your knuckles, fall and hurt yourself(if you are pushing down on the torque wrench like I am). I should not have been pushing down on the torque wrench. I've always been taught that it is safer to pull a wrench than to push a wrench. I would advise pulling he torque wrench. Either way, do this at your own risk. Be careful.
Note: In regard to the method shown to separate the outer tie rod end. It is not recommended to use this method. There is a special tool made for this called an "outer tie rod end separator". Using this tool would reduce the risk of damaging your tie rode end. link video showing this tool: https://youtu.be/TYIDzXxeNwk
If you do not own this tool and can't afford it the method shown in the next video is the next best thing. : https://youtu.be/LDsci-izhhc
Vibration diagnosis video link:
https://youtu.be/OyXtBqExkec
DISCLAIMER
Barbour's Auto Help is not responsible for any damage or personal injury incurred in the process of performing any auto repairs done by you the viewer. Automotive repair is extremely dangerous. Repair your vehicle at your own risk. It is the viewers responsibility to verify all information and procedures as outlined in YOUR REPAIR MANUAL AND OWNERS MANUAL FOR YOUR VEHICLE. Owning and using a repair manual suited for your vehicle is essential for correctly and safely performing ANY repair to your vehicle. Always wear safety glasses and heed all instructions for use applicable to any piece of equipment you may use. Due to circumstances out of the control of Barbours Auto Help, Barbours Auto Help makes no guaranty that by the use of the information given in this video a quality repair will be made. Barbour'sAutoHelp makes no guaranty that the information provided is totally complete, syncronized and accurate. Verify everything using an appropriate repair manual.
Repair your vehicle at your own risk! Barbour's auto help does not guaranty a proper repair using these techniques.
Zombie Rock by Audionautix is licensed under a Creative Commons Attribution license (https://creativecommons.org/licenses/by/4.0/)
Artist: http://audionautix.com/
-
 0:46
0:46
Dr Disrespect
10 hours agoIt's not just a stream... it's an experience
271K1.62K -
 5:45:38
80sKiid
5 hours ago $9.77 earnedFirst stream on RUMBLE!!!!!
49.3K2 -
 3:56:31
JakeParker
5 hours ago $7.28 earnedJakeParker is LIVE on Rumble
37.3K -
 LIVE
LIVE
SpartakusLIVE
7 hours ago $13.53 earnedThe Duke rallies squad for LAUGHS into the night with a SMATTERING of TOXIC banter
2,006 watching -
 1:03:51
Flyover Conservatives
1 day agoGeneration Z’s Revolution: 17 Year Old Author on the Return of Faith, Family, and the End of Feminism - Hannah Faulkner; Economic Update - Dr. Kirk Elliott | FOC Show
27.5K2 -
 1:12:43
Adam Does Movies
9 hours ago $6.48 earnedMoviegoers Are Singing Now! + Lilo & Stitch + Sonic 3 - LIVE!
55.8K7 -
 1:26:05
Donald Trump Jr.
12 hours agoRegime Media Imploding: What’s Next for MSNBC? Plus Michael Knowles & Alex Marlow | TRIGGERED Ep.194
209K201 -
 37:26
37:26
Glenn Greenwald
9 hours agoGlenn Takes Your Questions: On Trump's Cabinet, The G20 Summit, and More | SYSTEM UPDATE LOCALS SPECIAL
77.9K31 -
 2:10:20
We Like Shooting
16 hours ago $1.19 earnedWe Like Shooting 586 (Gun Podcast)
16K -
 52:14
52:14
Uncommon Sense In Current Times
11 hours ago $0.33 earned“Pumpkin Pie Politics: Bridging the Thanksgiving Divide to Protect The Family"
12K