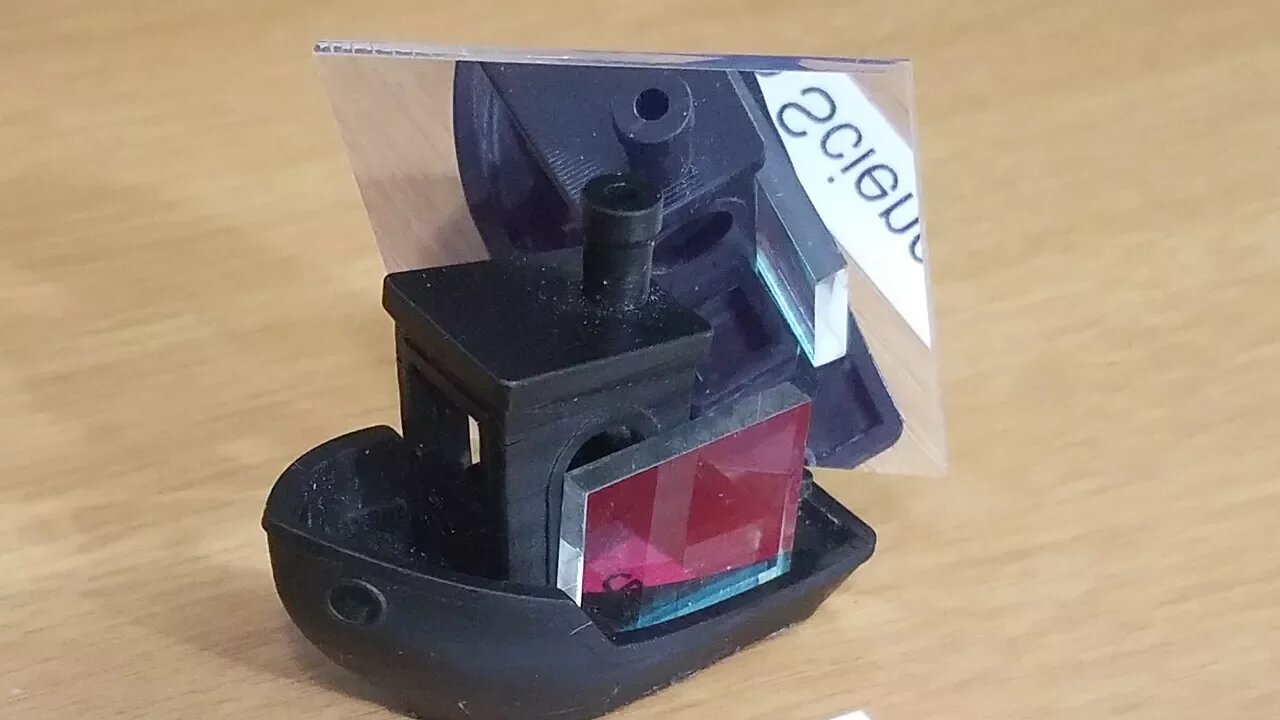
DLP Projector UV Pass Filter Installation Guide
This is a follow up video to my guide on removing the hot mirror (IR and UV Blocking mirror) from my DLP Projector to reduce cure times in my DLP 3D Printer.
If you do remove your hot mirror, installing a UV pass filer is a must. The Halogen lamp in your DLP Projector emits enormous amounts of light in an array of wavelengths from UV to Infrared. Since most resins cure between 385 and 405nm there are only a few wavelengths that actually need to be emitted from the projector. The UV pass filter protects your optics and DMD chip from unnecessary light exposure and heat.
#garagscience #engineering #maker
You can watch the first part on how to remove the hot mirror here:
https://youtu.be/0ep6uho9GXI
DLP Printers are a subset of SLA (Stereolithographic) 3D Printers, except instead of a laser they use High Definition Projectors to cure each layer of resin. If you want to learn more about DLP 3D Printers you can watch my overview video here: https://youtu.be/hQ21gbeYFYQ
The resin used in this video is Autodesk Magenta. Before modifying my projector at all I needed cure times of about 30sec and that was with gamma settings at their brightest and not being in Eco Mode. Since making the modification I've been able to turn my gamma settings almost all the way down and put the projector in ECO mode, and I still have gotten cure times reduced to 16sec.
If you have questions or suggestions be sure to leave them in the comments and like this video if you enjoyed watching.
Be sure to check out my FB page as well: https://www.facebook.com/GarageScience/
-
 LIVE
LIVE
Major League Fishing
2 days agoLIVE Tackle Warehouse Invitationals, Stop 6, Day 3
9,492 watching -
 LIVE
LIVE
LumpyPotatoX2
1 hour agoKilling Floor 3 + SoulFrame: Co-op Showcase - #RumbleGaming
163 watching -
 LIVE
LIVE
TheItalianCEO
1 hour agoPlaying video games on a Sunday since 1989
457 watching -
 28:43
28:43
Liberty Hangout
3 days agoAnti-Trumpers Don't Know What They're Protesting
16.4K141 -
![[GB]Long Stream?!?! ✨ Turtle Beach Partner !TB](https://1a-1791.com/video/fww1/20/s8/1/K/9/Z/5/K9Z5y.0kob-small-GBLong-Stream-Turtle-Beach-.jpg) LIVE
LIVE
OneRandomDolly
51 minutes ago[GB]Long Stream?!?! ✨ Turtle Beach Partner !TB
92 watching -
 20:33
20:33
Sideserf Cake Studio
1 day ago $1.99 earnedI Built A Bikini Bottom Fish Tank CAKE!
10.6K11 -
 LIVE
LIVE
Atarithepaladin
12 hours agoPaladin Playthrough Ep 17
101 watching -
 10:35
10:35
Warren Smith - Secret Scholar Society
1 day agoExposing the Illusion of Gary's Economics
46.7K11 -
 13:14
13:14
Michael Button
1 day ago $2.12 earnedThere’s a Giant Hole in Human History
10.3K13 -
 9:23
9:23
Russell Brand
21 hours agoThe TRUTH Behind Stephen Colbert's Downfall
52K73