Episode 12 - How To Wire For A Switch Loop
00:00 Intro
03:10 Rolling out wire to begin
06:12 Joining grounds together
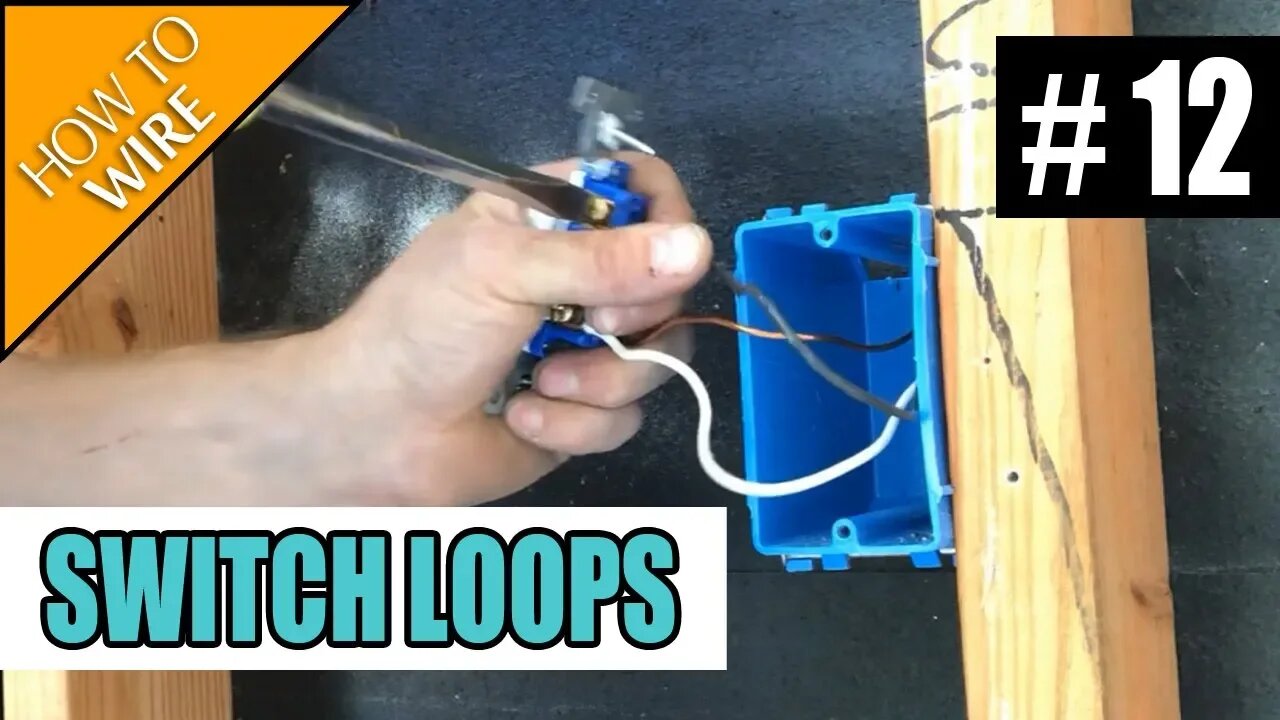
09:42 Hooking up switch
12:56 Competed switch loop
13:40 Outro
This episode is something a lot of green apprentices need to watch. Switch-loops are very difficult to grasp when you're new to the trade, and in this show I break down how to install and wire for these bad boys.
First of all the reasons why you would do a switch loop are plentiful. Most of the time there is a specific reason why you'd need to do one of these, but all of them revolve around there being a hot run to a junction box or a light fixture, and you need to get that hot down to a switch box to control the light.
Normally we would run a hot and neutral TO a switch box, then run a switch leg (and neutral) up to a light. This is how 90% of switches are wired. In a switch loop this is not how it's done. Switch loops work by "stealing" a hot that's in an attic or maybe in a light fixture box in the ceiling, and sending that hot down to the switch on a white wire, then sending the switched side (black wire) back up to that same box to turn a light fixture on. A lot of older homes are wired this way. Old-school electricians used to run their "home-runs" from the panel to various ceiling boxes throughout the house. From there they would spider out to all the switches and plugs. Now days most of us run our "home-runs" from the panel to switches or plugs, then run switch legs up to the lights.
The idea of a switch loop is that we take our incoming hot in the ceiling and tie it together with the white wire that goes down to the switch. Then we tie the black wire coming from that switch to the light fixture that you're hanging in the ceiling. The neutral wire in the ceiling box just stays there to be hooked up to the light fixture's neutral wire. So at the end of it all you'll have hanging out at you: a black switched wire, a white neutral wire, and a black wire tied together with a white wire under a wirenut that you will simply push in the back of the box.
Finally when you go to install the switch, you put the white on the switch, and the black on the switch. Pretty simple right? Please leave a comment below if you have any questions, or if you just want to reach out.
Please check out the Electrician U Facebook page and subscribe to the YouTube Channel if you like these videos!
**Disclaimer - These videos are for training purposes alone, all work done on electrical systems should be done by a licensed and insured electrical contractor. If you are not an electrician, do not attempt any of the work you are seeing in these videos.**
#electricianclasses #electricaltraining #electriciantraining #howtoswitchloop
-
 6:27
6:27
Electrician U
1 year ago💡 Watts vs Lumens: The New Lighting Standard You Need to Know! 💡
7.67K6 -
 19:12
19:12
Robbi On The Record
19 hours ago $22.59 earnedThe Loneliness Epidemic: AN INVESTIGATION
83.1K104 -
 14:45
14:45
Mrgunsngear
1 day ago $144.91 earnedFletcher Rifle Works Texas Flood 30 Caliber 3D Printed Titanium Suppressor Test & Review
143K34 -
 17:17
17:17
Lady Decade
1 day ago $12.09 earnedMortal Kombat Legacy Kollection is Causing Outrage
94.4K24 -
 35:51
35:51
Athlete & Artist Show
1 day ago $14.16 earnedIs Ryan Smith The Best Owner In The NHL?
101K17 -
 22:56
22:56
American Thought Leaders
2 days agoCharles Murray: I Thought Religion Was Irrelevant to Me. I Was Wrong.
82.6K61 -
 36:22
36:22
Brad Owen Poker
20 hours agoGIGANTIC $17,000+ Pot In BOBBY’S ROOM! TRAPPING Top Pro w/FULL HOUSE!! Big Win! Poker Vlog Ep 326
85.2K16 -
 3:53
3:53
GreenMan Studio
1 day agoRUMBLE RUNDOWN: DREAM HACK SPECIAL W/Greenman Reports
68.1K17 -
 1:28
1:28
Damon Imani
2 days agoThey Laughed at Trump’s Cognitive Test — Damon Made Them REGRET It!
64.5K46 -
 9:14
9:14
Freedom Frontline
1 day agoAdam Schiff PANICS As Eric Schmitt Exposes His Dirty Lies LIVE
43.6K88