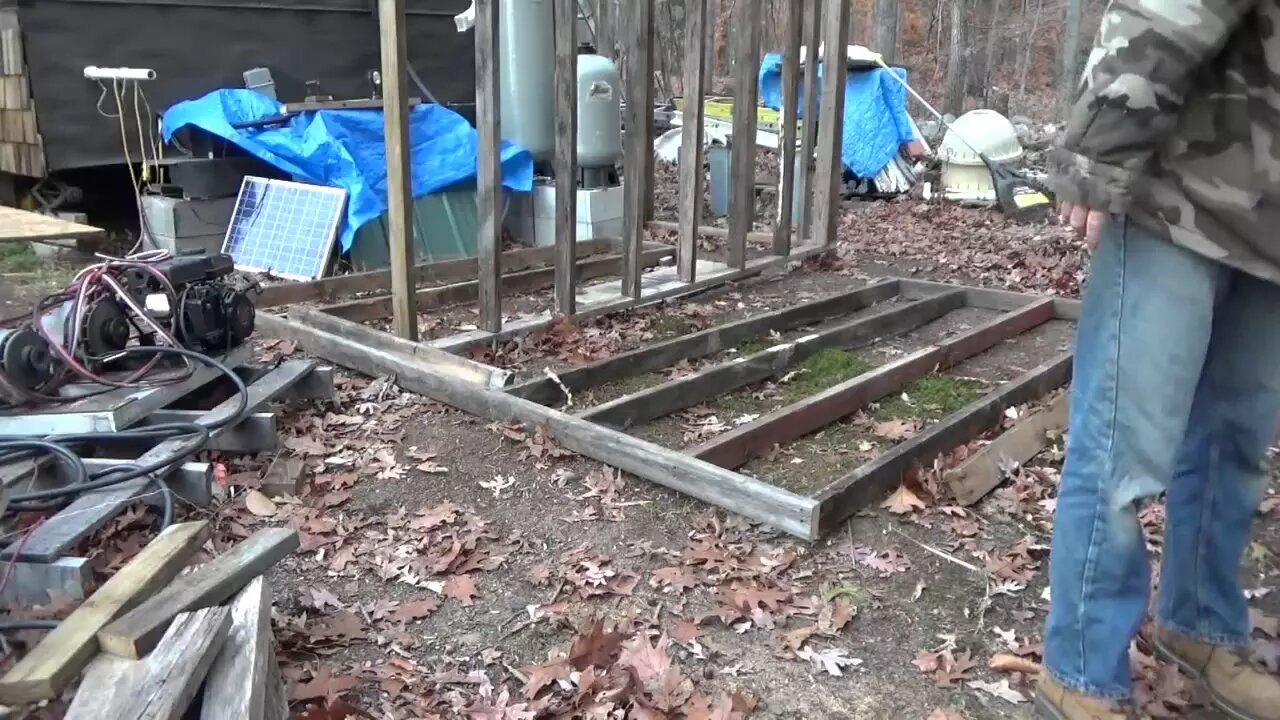
Framing Last Wall Of Off Grid Battery & Water Shed
I finished framing the walls of the off grid solar battery and rain water shed. This will be an insulated shed to keep my solar battery bank and rain water collection tanks from freezing this winter.
It was a tough job because I had to go out to the barn wood pile in the woods and sort through the wood until I found a suitable board for the wall framing. Then keep digging until I found another.
I have 8 semi truck loads of barn wood dumped into piles out in the woods on my property.
This is a jumbled mess of mixed broken and some good wood. I have to sort though it as I work until I get enough usable lumber for a wall.
Then I cut it, pull out nails and put it into place in the wall frame.
It took me an entire day to get one wall done in this manner. But it did not cost me a single cent to frame the entire shed so far.
The last wall was tough for me to frame because I did not have much space to work in between the shed walls and the storage tent nearby. There is a boulder that forms a hump underground in front of the shed so the ground there is very uneven.
So I did the best I could with what I had and framed the wall backwards on the ground.
This meant I had quite a job putting the wall into place. Especially since I did it all alone. But I eventually got the last wall into place for my storage shed.
My framing nailer is such a time saver out here. Nailing boards together with a hammer and nails on uneven ground is hard work and nearly impossible to get the boards square. But with the framing nailer the job goes smooth and easy.
It was dark by the time I got the final wall fastened into place and leveled off.
I hope to get the roof on during the following days so I can connect my water heater and have hot running water in my tiny house on wheels.
Thanks for watching. Please Subscribe, Like and Share.
Troy
The Off Grid Project
The Do It Yourself World
-
 53:47
53:47
Matt Kohrs
3 hours agoLIVE! Nvidia Earnings Call || NVDA Stock Reaction
18K1 -

Tudor Dixon
1 hour agoKarol Markowicz on Freedom, Immigration, and Saving the American Dream | The Tudor Dixon Podcast
51 -
 2:03:25
The Quartering
5 hours agoFlag Burning, Free Speech, Church Attack & More With Andrew Wilson
187K285 -
The Robert Scott Bell Show
19 hours agoDr. Peter McCullough, Vaccines: Mythology, Ideology, and Reality, Dr. Dan Sullivan, Chiropractic - The RSB Show 8-27-25
18K -
 1:21:03
Darkhorse Podcast
4 hours agoFreedom, Tyranny, and Childhood Lost: The 291st Evolutionary Lens w/ Bret Weinstein & Heather Heying
34.2K17 -
 LIVE
LIVE
LFA TV
11 hours agoLFA TV ALL DAY STREAM - WEDNESDAY 8/27/25
1,359 watching -
 2:34:01
Steven Crowder
4 hours agoBREAKING: Minnesota Catholic School Shooting Update - Shooter & Manifesto
319K441 -
 42:22
42:22
Stephen Gardner
2 hours ago🚨CHICAGO Mayor PISSED as Residents BEG Trump to send National Guard
23.4K7 -
 1:17:28
The HotSeat
2 hours agoChristian School Shooting in Minnesota – Faith Under Fire & Prophecy Being Fulfilled
15.6K12 -

Film Threat
18 hours agoPEACEMAKER BLOWS GUNN'S DC! PLUS ALIEN: EARTH AND DEXTER RESURRECTION | Hollywood on the Rocks
9.5K