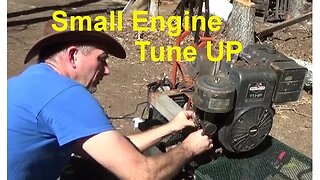
Cleaning Carburetor On Old 11 HP Briggs & Stratton Engine
I have an old Briggs & Stratton 11 HP gas engine that I want to clean up and put on my antique log splitter. The engine has been sitting around for a while and needs some care to get running.
Read the full article here: http://www.thedoityourselfworld.com/blog/?p=2089
I bought this engine last year at a garage sale to put on the log splitter. It had older gas already at that time and when I got it home I put it aside for a future date. The time has come. I am splitting logs all over the place now that we are clearing trees to make space for our homestead on the 56 acres of land we own.
Trees equal fire wood so we cut them up into log size and then split them to cure for the next year.
I got this antique log splitter a couple years ago for free. It was rusted up and had an old cast iron 12 HP Wisconsin engine on it. I still have the hand crank starter handle for it and the engine is not seized up and turns well. But I want a more modern engine on the log splitter for now. I will either sell the Wisconsin or restore it one day.
I had a little Harbor Freight 3 HP engine on the log splitter last year. It works but it is too weak for larger logs. So when I got this 11 HP engine I figured it is perfect for the job.
I first studied how the carburetor linkage is connected. Just about every engine is different and you want to remember how it goes back together. This one has a throttle plate under the carb where all the connections go. There is one throttle connection on the carb. The choke cable is long gone.
There is also a breather tube between the crankcase and the carburetor which had to be removed.
I took off the air filter and then the three screws which hold the carburetor onto the engine. Then I took the carb over to the work bench for cleaning.
The first thing I do with any carburetor is to clean the outside before I open it up. This prevents any dirt from falling into your clean carb when you are finished cleaning it and putting it all back together.
I sprayed it down with some carburetor cleaner to loosen the dirt and then used a soft brush to remove the dirt from the outside of the carb.
A small flat head screw driver helps remove dirt from crevices and hard to reach places. Just gently scrape off the dirt and spray again with carburetor cleaner.
I used an air compressor to spray off any loose residue and dirt before proceeding to the inside of the carb.
Opening the carburetor was a challenge because the fuel bowl and the top of the carb fit snugly together. Plus there is a long brass tube which runs from the bottom of the fuel bowl to inside the top section of the carb. This makes it tricky to open up an older gummed up carb. But I got it.
There was some rust in the bowl but it was not very dirty really. I soaked everything up in carburetor cleaner to make cleaning it out easier.
Stay tuned for the second part of this video.....
Thanks for watching. Please Subscribe & follow my daily videos.
Troy
http://www.thedoityourselfworld.com
http://www.theoffgridproject.com
Note: Copying this video, in part or in full, is a violation of copyright unless the user has express permission from the owner. Violation of this copyright will be pursued to the fullest extent of the law.
-
 20:59
20:59
The Do It Yourself World
7 years agoCleaning Old Small Engine Carburetor & Tune Up PT2
78 -
 17:40
17:40
Garage Gear
2 years agoHOW TO CLEAN A TROY BILT SQUALL 2100 SNOWBLOWER CARBURETOR
45 -
 12:06
12:06
Garage Gear
1 year agoHOW TO CLEAN A CARBURETOR ON A CRAFTSMAN 179CC SNOWBLOWER FOR BEGINNERS
35 -
 6:18
6:18
Apache Ranch
3 years ago675EXi Plastic Carburetor ● Fix and Winterize the Briggs And Stratton Lawnmower Edger Trimmer
561 -
 9:04
9:04
Garage Gear
2 years ago $0.02 earnedHOW TO CLEAN A CARBURETOR ON A CRAFTSMAN 21" LAWN MOWER FOR BEGINNERS
103 -
 20:31
20:31
Garage Gear
2 years agoHOW TO CLEAN AN MTD YARD MACHINES CRAFTSMAN TROY BILT SNOWBLOWER CARBURETOR FOR BEGINNERS
36 -
 10:11
10:11
Garage Gear
2 years agoHOW TO CLEAN A CARBURETOR ON A TORO SUPER RECYCLER
52 -
 6:33
6:33
Barbour's Auto Help
3 years agoFord Electronic Throttle Body Cleaning
57 -
 11:42
11:42
Garage Gear
3 years ago $0.01 earnedKOHLER - TORO TUNE UP - Lawnmower Won't Start. Will It Run? Quick Carburetor Cleaning.
39 -
 7:46
7:46
Cameron Niemela
7 years agoEverything You Need To Know About Carburetor Cleaning