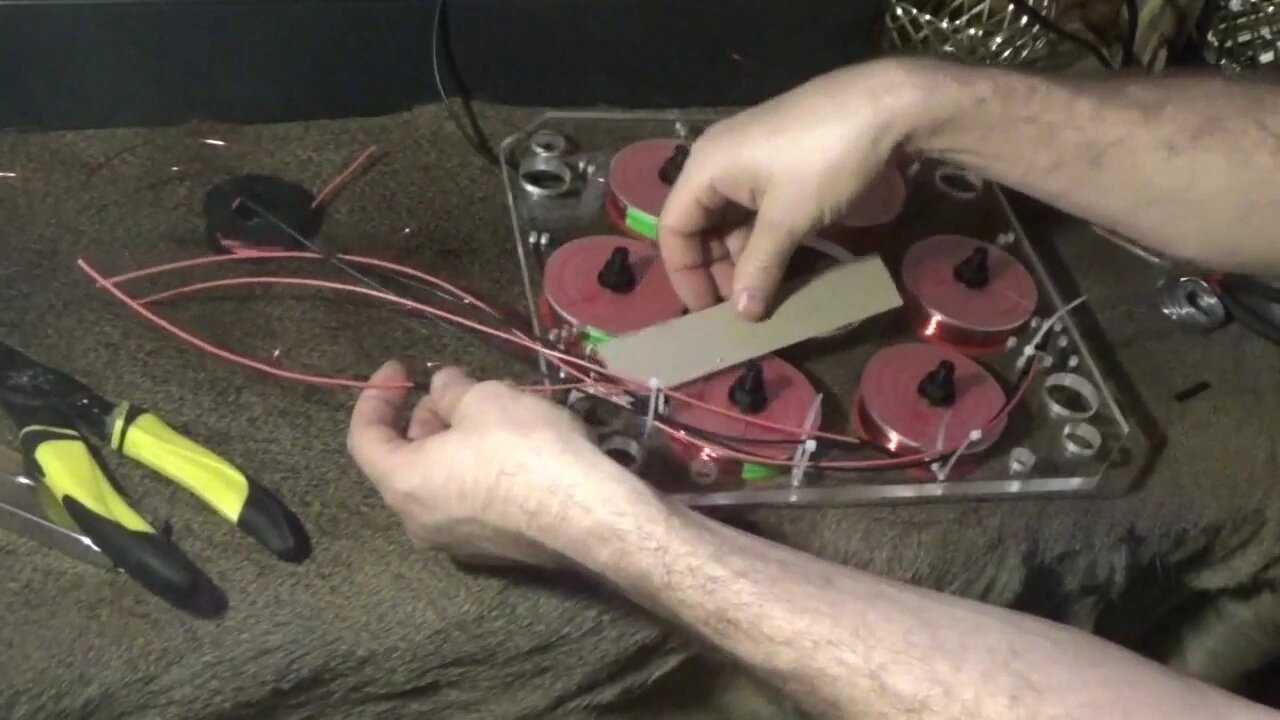
Soldering Wires On Charge Accelerator Stator Half
I have finished soldering the wires onto one half of the Q3 charge accelerator stator assembly. Read the full article here: http://www.thedoityourselfworld.com/articles/article.php?id=11401
I used two different colors, red and black, for the assembly of the stator half. This will help me to better identify the coil start and end wires easier when connecting them to the bridge rectifier sets later on.
I ran the coil wires through the small holes in the stator frame so that all the wiring will be on the back side of the coils and away from the spinning magnets.
I used plastic zip ties to hold all the wires neatly in place and out of the way.
The red wire was for the outside wire, or end wire, of the coil. The black wire was for the inside wire, or start wire, of the coil.
When wiring these coils up to the power supply and the output bridge rectifiers it will be important to keep the same orientation of all the coils.
I left about six inches of wire extending past the stator assembly so that I can work with it easier later on.
I routed all the wires neatly around the coils and zip tied them into place. Then I cut the zip ties close so that everything looks nice.
Thanks for watching. Please Subscribe & follow my daily videos.
Troy
http://www.thedoityourselfworld.com
http://www.theoffgridproject.com
Note: Copying this video, in part or in full, is a violation of copyright unless the user has express permission from the owner. Violation of this copyright will be pursued to the fullest extent of the law.
-
 16:39
16:39
The Do It Yourself World
8 years agoThruNite Neutron 2C 1100 Lumen USB Chargeable LED Light
42 -
 23:42
23:42
The Kevin Trudeau Show Limitless
2 days agoThe Brotherhood’s Ancient Mirror Code Revealed
21.9K10 -
 10:18
10:18
Colion Noir
3 hours agoViral TikTok Proves Gun Owners Wrong?
22.3K29 -
![MAHA News [11.28] Team MAHA Dropping Bombs, Pesticide Fight, Campbell's Soup Outed, Save Ranchers](https://1a-1791.com/video/fwe2/11/s8/1/O/6/L/D/O6LDz.0kob-small-MAHA-News-11.28.jpg) UPCOMING
UPCOMING
Badlands Media
14 hours agoMAHA News [11.28] Team MAHA Dropping Bombs, Pesticide Fight, Campbell's Soup Outed, Save Ranchers
7.57K1 -
 1:01:18
DeVory Darkins
3 hours agoBREAKING: Trump issues fatal update to National Guard shooting
104K68 -
 49:57
49:57
The Quartering
2 hours agoTrump UNLOADS, Walmart Black Friday Madness & Trans Taco Bell Attack
17K28 -
 39:51
39:51
Tucker Carlson
2 hours agoGeorge Galloway Speaks Out on Being Forced Into Exile After Criticizing Ukraine War
27.8K82 -
 21:23
21:23
Neil McCoy-Ward
1 hour ago🔥 While You're Working Hard... They're Planning To Take EVERYTHING From You!!!
6.15K2 -
 2:13:37
Side Scrollers Podcast
5 hours agoTwitch CONTROVERSY Hit New Low + Reddit Mods QUIT + FireMAN is Now Sexist + More | Side Scrollers
66K5 -
 5:31
5:31
John Rich Official
13 days agoThe Righteous Hunter by John Rich
23.4K10