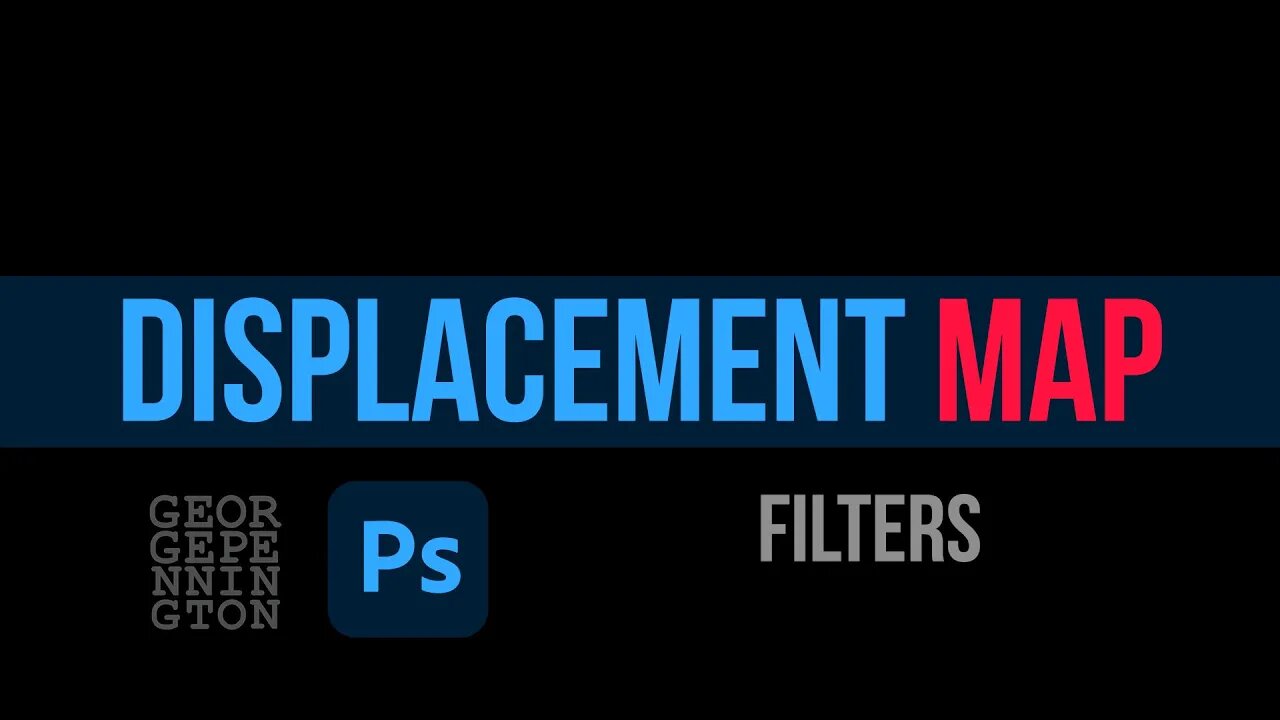
Displacement Map
“Porcelain” starts with a diffused sunlight through a window portrait. A displacement map in Adobe Photoshop adds this fitted porcelain pattern. This technique might be used to add a tattoo or other form fitting layer to your original image. Filter Distort Displace brings us to a tool that allows users to shape a layer to fit another layer. We will do an advanced tutorial if there is interest but the simple explanation is as follows: Dark areas on the map get closer. Light areas on the map are further away. 50% Grey is neutral and the map benefits from a little Gaussian blur. Too many details on the map cause distractions. Duplicate the layer you want to use for a map. Make sure it is 8 bit. Make it black and white, adjust contrast for more or less effect and add Gaussian blur to reduce unwanted detail. Save as a .psd you can find easily to use as your map when applying the displacement filter. In this image a porcelain pattern layer is placed above the original portrait. A displacement map is applied to the distortion filter to “wrap” the pattern layer on the original portrait. Use of “smart filters:” makes all of these adjustments remain adjustable. Opacity and blend mode adjustments make those new tattoos look absolutely real.
#photoshoptutorials #adobe #adobephotoshop #digitalart #photography #filter #displacement #portrait #portraitphotography #emotiveimaging #fineartamerica
-
 LIVE
LIVE
Right Side Broadcasting Network
4 hours agoLIVE: Task Force on the Declassification of Federal Secrets: JFK Files - 4/1/25
2,742 watching -
 LIVE
LIVE
The HotSeat
1 hour agoPam Bondi seeks Death Penalty + Booker is still going and Hot Seat Calls LIVE!
602 watching -
 LIVE
LIVE
Jeff Ahern
1 hour agoTrending Tuesday with Jeff Ahern (1pm Pacific)
142 watching -
 21:10
21:10
Talk Nerdy Sports - The Ultimate Sports Betting Podcast
39 minutes ago4/1/25 - No Jokes. Just Units.
-
![[Ep 640] Judicial Treason! | Trump Targets Ticketmaster | Guest Sam Anthony [your]NEWS](https://1a-1791.com/video/fww1/b8/s8/1/F/g/s/y/Fgsyy.0kob-small-Ep-640-Judicial-Treason-Tru.jpg) LIVE
LIVE
The Nunn Report - w/ Dan Nunn
1 hour ago[Ep 640] Judicial Treason! | Trump Targets Ticketmaster | Guest Sam Anthony [your]NEWS
154 watching -
 1:18:55
Russell Brand
4 hours agoTRUMP VS OBAMA 2028?! JD Vance Proven RIGHT On European DICTATORSHIP! – SF558
123K43 -
 1:36:42
Sean Unpaved
4 hours agoAre The Torpedo Bat's Gaining Popularity? with Former MLB Manager Clint Hurdle To Join!
20.1K -
 11:47
11:47
World2Briggs
1 year ago $0.77 earned10 Most Liberal Woke States. Progressive Utopias!
7.9K2 -
 14:36
14:36
Misha Petrov
1 hour agoChoosing My Mental Illness!
7317 -
Film Threat
5 hours agoROADCAST! ON THE ROAD TO CINEMACON IN LAS VEGAS | Film Threat Live
1.07K1