Johnson Outboard Lower Unit Crack Repair/Rebuild #5
Video #5 of the Johnson GT 150 lower unit crack repair/rebuild is on straightening and repairing the skeg.
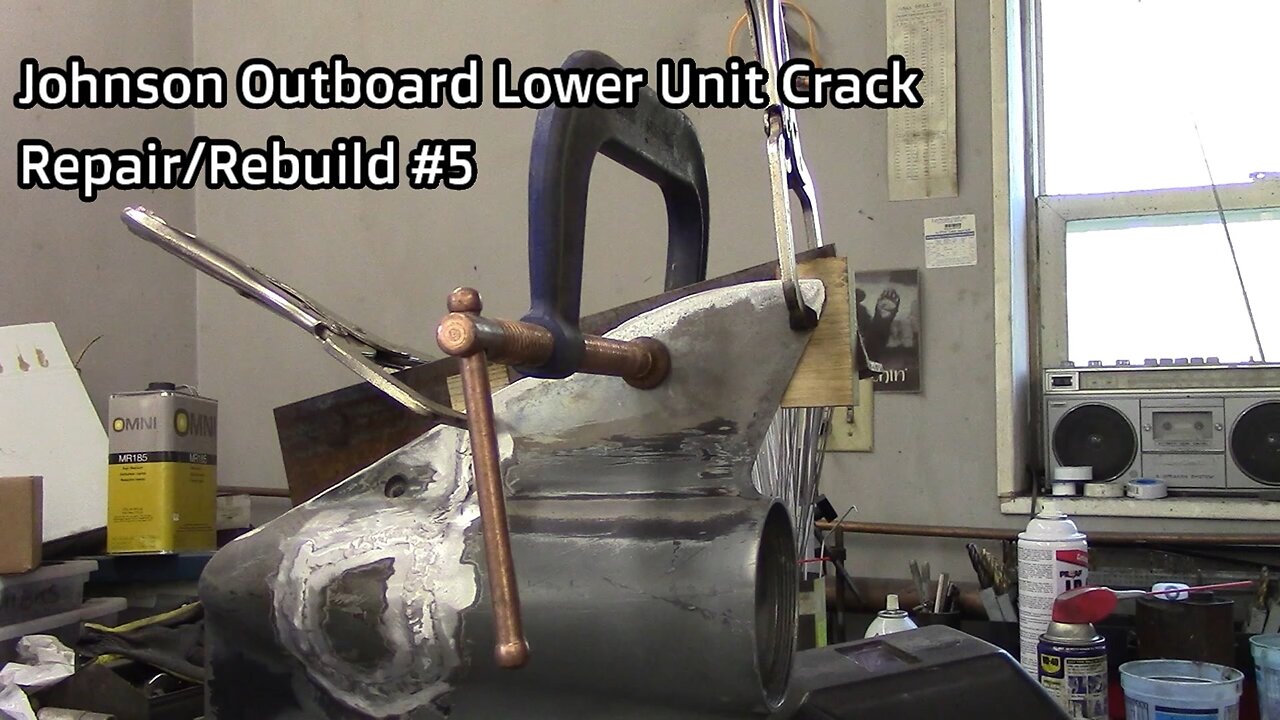
First clean up the area of the skeg you want to weld repair, assess the skeg straightness, and how you want to go about straightening it, every situation is a little different. Check the skeg with a straight edge to see exactly where it is bent. This skeg has a bow in the middle. I have a piece of ¼” x 3” x 3” steel angle, with a section of wood on each side c-clamped to the skeg on each end which leaves a void in the center, so now putting a c-clamp in the center allows me to pull the center straight. Things to remember: this is cast aluminum it will break! Do put too much stress on the c-clamp while straightening, a little at a time while adding heat, aluminum melts at 1221 degrees F, move the heat around as to not heat any one specific area too much. Heating the area you want to straighten and “slowly” adding pressure with the c-clamp is the key to success. You can also do this with the drive still attached as long as it is at its full level of grease. You can also do this with the drive still attached as long as it is at its full level of grease. The grease will dissipate the heat so you don't ruin the seals & O-rings. Notice how my torch is at least 2” away from the section to be heated, and I do not concentrate heat for long in any single area. You could use a temp stick, or a pyrometer to verify you never get close to the 1221 degree melting point. You will need to take it a little beyond straight to get it to stay there after you release the C-clamp, and this is trial and error. But don’t go too far or you’ll get to start over again going the opposite direction, or worse you could break the skeg. Have patience just a little at a time, it may be a slow process but that is what it takes. Always look down the skeg from the end to see/verify your progress. I realize this may be long and boring but I felt you need to see the whole thing. This also created a terrific preheat for the skeg weld repair. I am building up the low areas of the skeg so I can grind the edge straight. I am using 1/16” 5356 aluminum filler wire. I am still not happy with straightness so I will go back again. Now remove the clamp and verify straightness, if it is not yet there you will have to continue, I am satisfied! Ever since I was a kid when I concentrate my damn tongue is hanging out, some day I’ll bite it off! I am now feathering/melting the back side of the weld in with the skeg. Now I can grind off the excess weld and see if I need to add more weld anywhere. I am using a 60 grit sanding disc, and will take it down to a medium cloth disk to remove any deep scratches. Please come back for video 6 grinding the inside of the case, and preparing for reassembly.
https://www.youtube.com/@HRIservicesllcSturgeonBay
https://www.instagram.com/hri_services/
https://www.facebook.com/HRIServicesllc/
https://www.millerwelds.com/
-
 LIVE
LIVE
Eternal_Spartan
10 hours agoThe Legend of Zelda: Majoras Mask Ep. 5 | USMC Vet | Come Join the Best Chat on Rumble!!!!
92 watching -
 3:44:24
Barry Cunningham
5 hours agoBREAKING NEWS: LIVE COVERAGE OF NEW YORK POLICE OFFICERS UNDER SIEGE!
75.7K58 -

The Pascal Show
3 hours ago $0.34 earnedBREAKING! Active Shooter In Midtown Manhattan NYC Multiple People Shot!
11.7K -
 10:25
10:25
MattMorseTV
8 hours ago $2.05 earnedVance just DROPPED a NUKE.
27.1K34 -
 LIVE
LIVE
Jokeuhl Gaming and Chat
6 hours agoDARKTIDE - Warhammer 40k w/ Nubes and AoA
111 watching -
 LIVE
LIVE
Shoriantrax
2 hours agoLIVE: Hardcore Chaos in Tarkov – Loot, Die, Repeat!
14 watching -
 LIVE
LIVE
John_Goetz
3 hours agoJohn Gets Gaming - Medal of Honor Vanguard Part 2
16 watching -
 1:29:09
RiftTV
4 hours agoSydney Sweeney Spreading RACIST Propaganda? | The Rift | Guest: Braeden Sorbo + Sarah Stock
36.2K9 -
 LIVE
LIVE
VapinGamers
3 hours ago $0.01 earnedDestiny 2 - The Premium Destiny 2 Experience with the Community! - !rumbot !music
9 watching -
 LIVE
LIVE
We Like Shooting
16 hours agoWe Like Shooting 621 (Gun Podcast)
71 watching