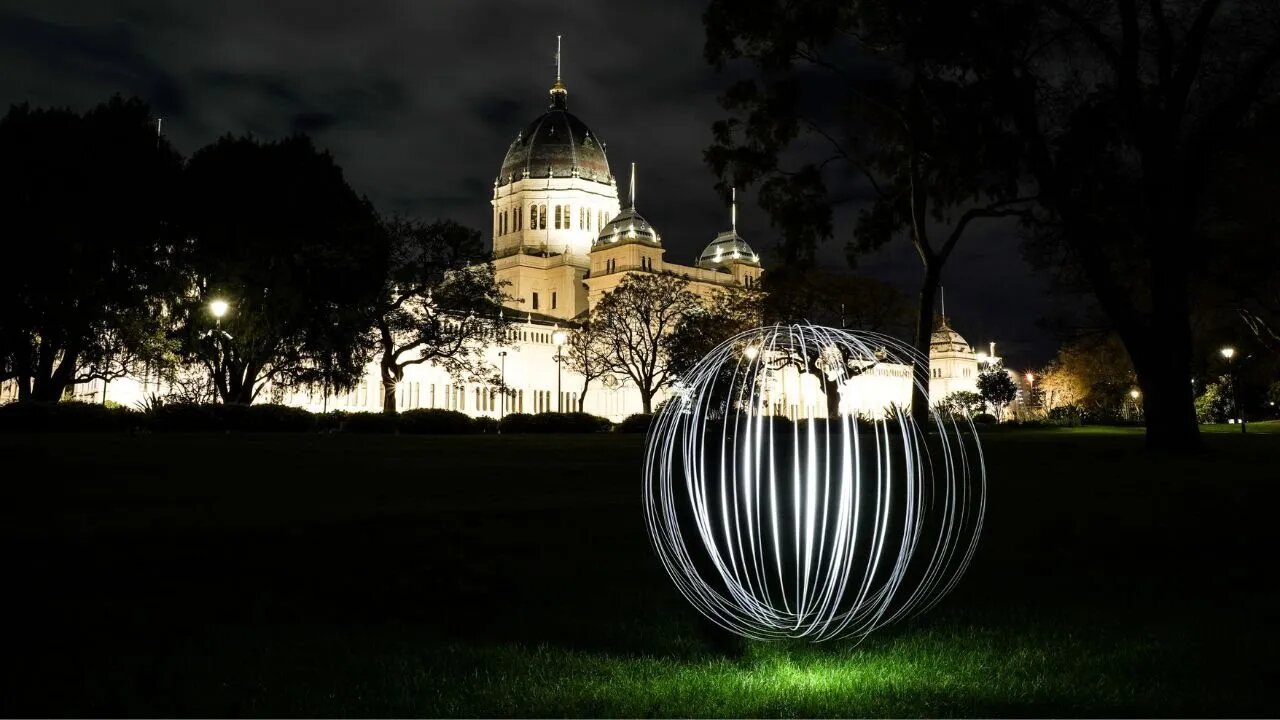
Light Painting Photography Tutorial | Simple Orb in 1 Minute!
So I decided to experiment with another type of painting… light painting! What do you think? You can learn how to create amazing light paintings in this short tutorial I made. I'll show you how to paint a simple orb effect in a minute and add some vibrant colour to the surround areas.
I posted the final photos here: https://watercolourmentor.com/from-watercolour-to-light-painting/
Since I was a kid, I’ve had an interest in electronics and flashlights. I remember my mum taking me to Dick Smith Electronics over in Perth to buy capacitors and resistors for different projects I was working on. I’ve been thinking of ways to integrate that side of things with my art.
Anyway, I reached out to @Ledlenser Australia to see if they wanted to collaborate. Over September, I ended up creating a series of short light painting videos and photographs! Ledlenser kindly provided me with two of their flashlights, the P6R Core QC and P7R Work UV. I used both for these shots (and upcoming videos). I own the P17 and used to own the P7 until it was stolen from my car, so thought it’d be fun to try out some of their newer lights.
So, what is light painting? It’s a photography technique where you use different light sources and tools to colour, draw and paint a subject. This can be a portrait, landscape or everyday object.
I was drawn to light painting because of one similarity it shares with watercolour painting. The element of surprise! You never know exactly how it’ll turn out (good or bad). I found it strangely exciting waiting for the camera to process each exposure.
To create a light painting, you’ll need a camera, a light source (I use a flashlight) and a dark area.
Camera settings:
ISO 50-100
F10-18
Exposure 30 seconds+
Basically, you want a long exposure time paired with a low aperture and ISO. This is to ensure the camera captures the movements and areas that are lit up. Having the ISO on lower reduces grain and also makes sure the photo isn’t over-exposed due to the duration of the shot.
Have any questions? Let me know what you think below! -Darren
► My Shop (I recommend these materials):
https://www.amazon.com/shop/watercolourmentor
-
 2:23:20
vivafrei
13 hours agoEp. 285: Visa Revocation No-Go! Sortor Arrested! Ostrich Crisis! 2A Win! Comey Defense & MORE!
98.9K85 -
 LIVE
LIVE
CassaiyanGaming
4 hours ago🟢LIVE - VISITING GOOB LAGOON! - Will They Rip Me Off?!? Waterpark Simulator
593 watching -

EricJohnPizzaArtist
6 days agoAwesome Sauce PIZZA ART LIVE Ep. #64: Robbie “The Fire” Bernstein
35.5K2 -
 2:23:58
Nerdrotic
6 hours ago $8.72 earnedDeDunking the Debunkers with Dan Richards | Forbidden Frontier #119
46.4K8 -
 LIVE
LIVE
SlinderPigCamz
4 hours ago $0.62 earnedThe Headliners and other games W/GrinchyGamer101 (Road to 500 Followers)
58 watching -
 LIVE
LIVE
MrOldFart
8 hours ago $1.47 earnedLIVE - MEGABONK First Playthrough - Mr.OldFart
230 watching -
 9:06:53
GritsGG
10 hours agoWarzone Win Grinding! Most Wins in WORLD! 3680+!
74.1K1 -
![[LIVE] POST-SHOW | STAR WARS: Jedi Academy - Movie Battles 2 | ReaperAF95's Community Event Day 2](https://1a-1791.com/video/fwe2/ce/s8/1/E/Q/f/o/EQfoz.0kob-small-LIVE-STAR-WARS-Jedi-Academy.jpg) LIVE
LIVE
Joke65
6 hours ago[LIVE] POST-SHOW | STAR WARS: Jedi Academy - Movie Battles 2 | ReaperAF95's Community Event Day 2
22 watching -
 5:41:09
Right Side Broadcasting Network
2 days agoLIVE REPLAY: President Trump to Deliver Remarks at America's Navy 250 in Norfolk, VA - 10/5/25
140K72 -
 LIVE
LIVE
SynsFPS
7 hours ago🔴B07 Beta🔴|🔴 LEVEL CAP INCREASED 🔴|🔴Path to Verify 🔴
31 watching
