How to Move Windows 10 Recovery Partition without Data Loss
✅ 【Detail】
⏰ 0:29 AOMEI Partition Assistant Standard
Generally, you cannot move the recovery partition within windows, and also it is easy to get your data lost while moving the partition with third-party tools. In order to move the recovery partition without losing data, it is recommended to use specialist software: AOMEI Partition Assistant Standard. Before we move the recovery partition, you must ensure that there is some unallocated space after the recovery partition. If not, you can shrink or delete a partition to generate some.
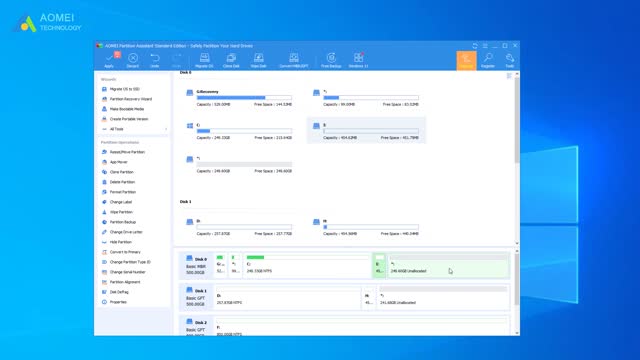
1. Open AOMEI Partition Assistant.
2. If the recovery partition is between the partition you want to extend and the unallocated space, right-click on the recovery partition and select Move Partition.
3. In the Move Partition screen, click and hold to drag the recovery partition towards the right-hand side, and then click OK.
4. Now you can preview the partition layout after moving the recovery partition in Windows 10. If there is no problem, click Apply to save the changes.
If you need to add the unallocated space to the C: drive, you can right-click on the C: drive and select Resize Partition to successfully extend the system drive.
⏰ 1:47 Create a Recovery Drive
If you really want to delete the recovery partition but still want to have the recovery options, you can move it to a USB flash drive and delete it. There is a built-in feature called Create a Recovery Drive, allowing you to troubleshoot and fix problems with your PC, even when it’s unbootable. You can backup the system files to the recovery drive and you will then be able to use it to reinstall Windows when needed.
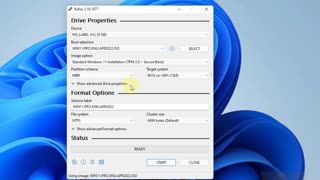
To create a recovery drive in Windows 11 as an example:
1. Connect a USB drive to your PC and make sure it is detected successfully.
2. Search for Create a recovery drive and then select it.
3. When the tool opens, select Back up system files to the recovery drive and then Next.
4. Select the inserted USB drive and then click on Next.
5. Select Create. Many files will be copied to the recovery drive, so this might take a while.
In the final step of creating the recovery drive, you will be given the option to delete the Windows recovery partition. Since you have just created a recovery drive that has all of the complete recovery options, you can safely delete the recovery partition.
-
 4:55
4:55
Academy of Cleaning Excellence
3 years agoClean Outside Windows Without a Squeegee
31 -
 4:40
4:40
tk Computer Service
3 years agoWindows Vista - Resize an Existing Partition (Volume)
21 -
 9:55
9:55
Gallery3
3 years agoHow to Install Windows 11 on any PC without Errors
19 -
 LIVE
LIVE
The Jimmy Dore Show
1 hour agoTrump Administration Sends Accused Pedo BACK TO ISRAEL! Ukrainians Now OVERWHELMINGLY Oppose War!
5,839 watching -
 1:09:21
TheCrucible
3 hours agoThe Extravaganza! Ep. 24 (8/20/25)
45.1K2 -
 1:18:42
Kim Iversen
3 hours agoUFO Base Area 51 Catches Fire… Is It a Massive Cover-Up?!
17K39 -
 1:51:18
Redacted News
3 hours ago"There will be consequences!!!" Trump issues big threat to Putin ahead of peace summit | Redacted
84.7K59 -
 53:14
53:14
Candace Show Podcast
3 hours agoThe MOST MORAL Blackmail In The World | Candace EP 231
35.2K121 -
 1:11:28
vivafrei
4 hours agoMatt Taibbi Getting "Westfalled"? Kathy Hochul Fighting for Illegals! Mamdani Minority Report & MORE
85.7K51 -
 2:03:39
Pop Culture Crisis
5 hours agoWTF Happened to Miley Cyrus? HARRY POTTER Set Images, Sydney Sweeney Hater EXPOSED | Ep. 901
30.5K21