How to Remodel a Coat Closet; DIY Industrial Pipe Shelves
In this video Marie and Emmaline from Wisdom Preserved teach you how to remodel a coat closet; DIY industrial pipe shelves. A coat closet is an interesting thing. It is supposed to organize and contain our outdoor gear, but often it becomes so overstuffed with items that it is hard to find anything. This is especially true in my (Marie's) house where we have many children equating to many coats, hats, and shoes.
I had the classic set up in the closet with a high shelf and a hanging bar. In a bid to have some form of organization a few years ago I placed a shelf with cubbies on the back wall and gave everyone their own cubby for shoes. This kind of worked, but required frequent reorganization. As the kids have gotten older, their coats have too. It came to the point that the coats were covering many of the cubbies and would get knocked down regularly as kids were looking for their shoes. The hat basket that was on the top shelf would be taken down and frequently left in the walkway. This really wasn't working well.
I finally came to a solution. I didn't have to stick with the standard setup. With my limitations removed, I started to think about what I really wanted in my closet. I wanted to be able to easily put away shoes and find mates. I wanted bars for our many scarves and low baskets for hats and gloves. I also determined I didn't want any coats. The coats took up so much room and many of the kids have trouble with hangers. If you are thinking about redoing your closet just sit back and decide what you really want in there first.
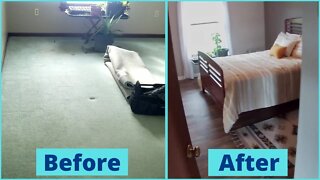
I decided to place coat hooks on a board and install them in our stairwell. Everyone had one hook and if they had any more coats they could hang them in their room. This worked so well. The kids were way more willing to hang up their coats and it made it so much easier to find them again when it was time to go.
I like to sit down with a pencil and paper and sketch out some ideas before I get started. I try to keep an open mind though because often as I am working on a project I get ideas that I think are better. I knew I wanted to use the hardware that looked like pipe fittings. My daughter and I had done our bathroom in that and it fits our house well. I started by measuring the closet and estimating how many shelves/bars/baskets I thought would work in there. After that point, I was able to get the supplies.
Supplies list:
5/8 inch screws - https://amzn.to/3qFr6hf
2 inch screws - https://amzn.to/3dhM4ic
7 - 8ft 1 x 4inch pine boards - https://amzn.to/2Zp9Hgw
2 - 12ft 1 x 10inch pine boards - https://amzn.to/3jUpYDy
Varathane Kona wood stain - https://amzn.to/3u2wflo
polyurethane - https://amzn.to/2ZnjGD7
foam brushes - https://amzn.to/3jYZ9ym
4 - towel racks - https://amzn.to/3atfQyO
1 - 19.5 inch wide wall basket - https://amzn.to/3s0tS0K
2 - 22 inch wide wall baskets - https://amzn.to/3s0tS0K
24 - black pipe metal wall hooks - https://amzn.to/3bbrYUe
24 - black pipe metal base - https://amzn.to/3bsf7NF
Tools
I try not to cut all the boards until after I can set a few in there because often what seemed to work well on paper will be too close or not look right in reality.
The first thing we had to do was clear out the closet. After we had removed all our stuff, we took everything else out. I had decided as long as we were doing it I would replace the carpet at the same time. Often hardware stores will have remnants available for an inexpensive amount. This made it easier to paint as we didn't have to worry about the carpet.
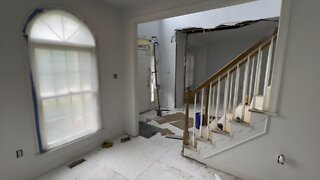
We had a few additional issues with the closet. First off, there was a water control panel on the back wall that we needed to maintain access to. Also, the boards in the wall were irregularly spaced. Because of this, we had to alter our plans and use the header and footer boards in the wall to attach our runner boards.
Now that we knew how we were going to do the runner boards we were able to prep the wood. We measured from the ceiling to the floor and went to cut our 1 x 4 pine wood to 8ft in length. I like to double-check the cuts so I bring it in and try it out before I do any staining. Especially with trying to hit the header and footer boards, it needed to be a kind of tight fit. We needed 2 on each wall. Next, we stained it with Varathane Kona stain. After that dried, we applied a coat of polyurethane to seal it. It needs a few hours to dry.
READ MORE AT OUR WEBSITE: https://wisdompreserved.life/how-to-remodel-a-coat-closet-diy-industrial-pipe-shelves/
Shop for some of our favorite products with us: https://amzn.to/3rZbiG1
Music: Porch Swing Days - faster Kevin MacLeod (incompetech.com)
Licensed under Creative Commons: By Attribution 3.0 License
http://creativecommons.org/licenses/by/3.0/
Intro: (00:00)
Closet Remodel: (00:11)
Empty Closet: (02:05)
Closet Deconstruction, Measurement, and Painting: (02:25)
Wood Preparation: (06:10)
Installation: (11:22)
Trick: (13:17)
Outro: (15:15)
-
 12:01
12:01
Wisdom Preserved
4 months agoHow to Make the Best Homemade Cinnamon Rolls
329 -
 25:09
25:09
CodyKingsWorld
2 years agoDIY Bedroom Remodel
6 -
 0:40
0:40
chriswit321
1 year agoRemodel
6 -
 1:26
1:26
shawnghert
2 years agoHome Remodel
3 -
 21:14
21:14
A Frugal Homestead
2 years agoDIY BATHROOM REMODEL
461 -
 1:01:10
The StoneZONE with Roger Stone
6 hours agoHas an Iranian Spy Ring Permeated the US Gov? Author & Journalist Lee Smith Enters The StoneZONE!
14.1K4 -
 2:01:58
Film Threat
11 hours agoVERSUS: THE DEATH OF STAR WARS: REVENGE OF THE SIXTH | Film Threat Versus
27.6K2 -
 1:36:32
The Quartering
6 hours agoTrump Threatened With Jail, Legal Ramifications Of Campus Commies & More With Ron Coleman
49.2K42 -
 1:37:32
2 MIKES LIVE
12 hours ago#62 2ML Join us to breakdown all the news worth mentioning!
17.7K5 -
 1:52:59
The Big Mig™
1 day agoTommy Victorious Robinson, Round II
19.8K20