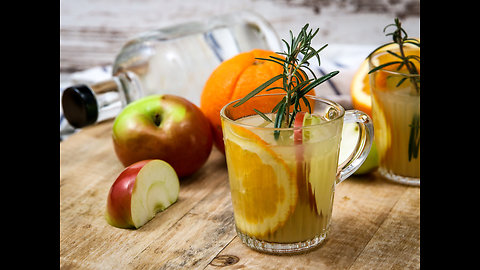
How to make hot apple rosemary gin
Bored by the mulled wine? Try out this tasty gin recipe that's perfect for those cold winter nights!
138
views
1
comment
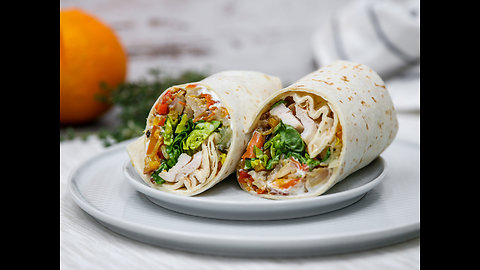
All-in-one oven chicken wrap recipe
Learn how to make the ultimate chicken wrap that's super delicious and easy to make! Yum!
175
views
1
comment
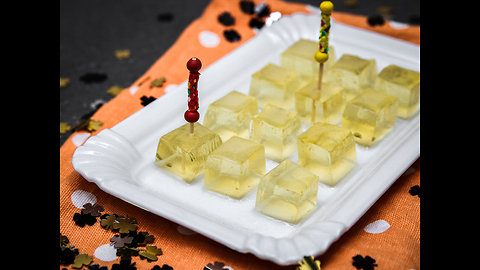
How to make champagne jello shots
This is the ultimate New Years party snack that's super easy to make! Enjoy!
92
views

Delicious Christmas mojito recipe
Mojitos are always a good choice, even during the holiday season! Check out this new take on a classic cocktail!
1.17K
views
1
comment
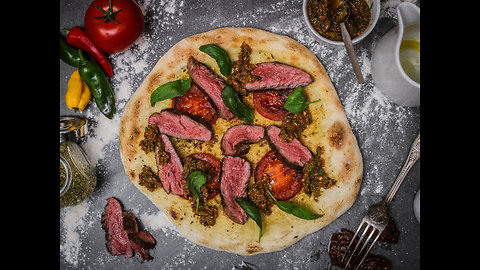
Steak pizza bianco with chimichurri recipe
Medium rare steak, crispy and fluffy pizza and spicy chimichurri... Now that's a delicious recipe!
173
views

Winter beverage recipes: How to make a ginger latte
The lower the temperature gets, the hotter the drinks should be! Check it out!
65
views

How to make your own mustard caviar
Learn how to make this delicious delicious topping for all kinds of dishes - steaks, fish, eggs, salads... The list goes on and on!
138
views
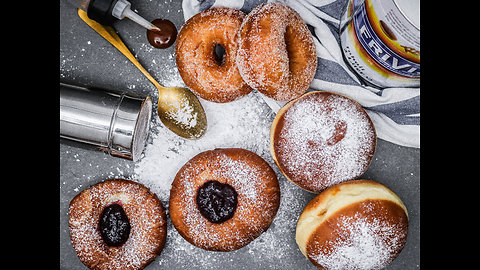
Austrian dessert recipes: Marmalade stuffed donuts
This recipe from Austria teaches us how to make a special donut dessert known in the local tongue as "krapfen". Enjoy!
86
views

Cheese fondue recipe inside pumpkin
To all cheese freaks: You must check out this fondue that can be enjoyed out of a roasted pumpkin! It's delicious and the perfect dish for the fall!
179
views

Cinnamon roll stuffed baked apple recipe
This divine baked apple is stuffed with fluffy cinnamon rolls that you simply must try. Enjoy!
1.69K
views

Fried buttermilk chicken sandwich recipe
Buttermilk makes the chicken even more tender and extra juicy! Try this amazing fried chicken sandwich!
1.2K
views
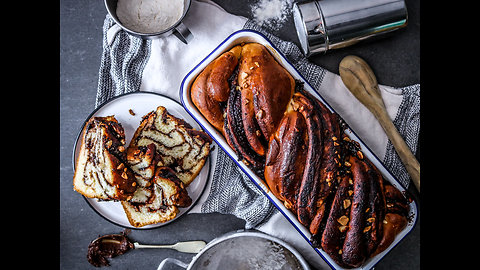
Divine babka recipe with chocolate filling
Have you ever tried babka? It's a fluffy yeast dough with a crunchy chocolate filling. Try it out for yourself!
64
views
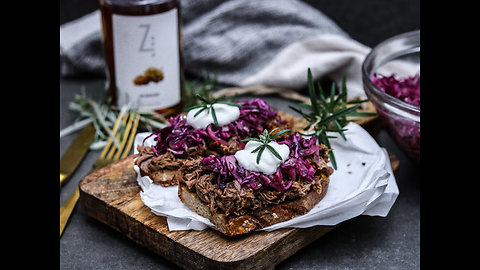
How to make pulled venison with brandy sauce
Learn how to make this deliciously juicy dish with a creamy brandy sauce on crispy bread. Yum!
736
views

Homemade Cola Syrup Is A Healthier Replacement For The Regular One
Soda tastes so good to many people, but unfortunately it isn’t the healthiest of choices. It has lots of sugar that isn’t good for you even though some do have a great taste. There are many alternatives to soda out now like carbonated water if you need that carbonated feel. In fact, this video will show you how to make your own <a href="https://rumble.com/v30oqj-10-curious-facts-about-coca-cola.html" target="_blank">cola</a> syrup that is much healthier choice. If you are someone who needs some soda in their life, this might be the video for you. It tastes good and isn’t as bad for you like all those popular soda drinks. Get ready to take some notes so you can be making your own syrup in no time!
It all starts with the southern wood, which is a plant, also called cola herb in this video! Apparently this plant tastes like cola, you probably wouldn’t know that because people don’t often taste plants out of nowhere. The realization that this tastes like cola and it is a plant, too it already sounds healthier than the sugar processed drinks you can get at a store. What is good about this cola plant, is that it is easy to make into a syrup. Obviously, it won’t have the same color as a regular cola, but it has a similar taste with a clear look.
The first step is to pull of the leaves of the plant because you will be making the <a href="https://rumble.com/v5l9xz-homemade-syrup-for-reversing-cough-and-clearing-phlegm-from-lungs.html" target="_blank">syrup</a> out of them! Take a pot and put some sugar and water in it. After pouring water in, you can begin stirring the two together. Make sure to mix it so you can have the sugar floating around in the water. Next step is to put the pot on a stove so you can start to boil the water. Once you have the water boiling, put it aside since the leaves comes next in the water you have boiled just a few seconds before.
Since you have already taken the leaves off the southern wood plant, you need to put them in the boiled water with sugar. After the bowl has the cola plant in it, you need to a fresh lemon because of the lemon zest, then you should pour some actual lemon juice inside. After pouring in the juice, you can begin mixing all the ingredients. The cola herb and juice must blend well together and make sure to spin the lemon peels around. Once it sits for awhile, you can get all the liquid inside. You can use a strainer to get the liquid and separate all the leaves of the cola herb. The person in the video used a thin cloth to strain the liquid! Once you have the liquid separated, bring this to a boil. Now when it's ready, put it in a glass and cool it so you can have a nice, cold, and tasty beverage. This is a nice and simple way to make your own cola. This is a great video for all those who need a soda replacement!
127
views
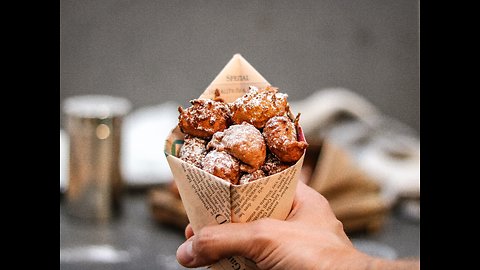
How To Easily Make Delicious Apple Fritters
Learn how to make this divine treat in this super simple recipe tutorial. This is one of the simplest recipes out there as the recipe can be made in less than 30 minutes. Check it out!
Apple fritters are bread flavored and fried dessert. They can be made in large sizes and small bite-sizes. One thing is for sure though people love them but they are very difficult to make. They are moist in the center sometimes added apples inside too. The edges of the apple fritters are sometimes crunchy but with a soft center. Most people will sprinkle a little bit of powdered sugar on top of them which adds a level of sweetness to the <a href="https://rumble.com/v324n0-apple-fritters-a-tasty-italian-classic-youll-want-to-try.html" target="_blank">apple fritters</a>.
The first thing you did to make this <a href="https://rumble.com/v5xgyx-your-favorite-girl-scout-cookies-are-now-donuts.html" target="_blank">recipe</a> is decide which apples you would like to use such as green apples or red apples. Most of the time people use green apples because of the tartness.
You want to cut the apples in a smaller julienne size and place them in a medium to large bowl depending on how many apple fritters you intend on making. Then crack one full egg over the apples. At one teaspoon of vanilla extract to the bowl. At this time you want to add one cup of flour to the bowl. Then you want to add a third cup of sugar to the bowl and the rest of the ingredients. After all ingredients are in the bowl you want to mix the items. Some people use a spoon or fork to help with mixing the ingredients.
You can have a pot of oil for cooking or frying the apple fritters. In order to get the fritters into a mold two spoons are utilized to create a oval or round apple fritter. Slide the apple fritter into the hot oil. Expect that some of the oil Splash out of the pot and make the necessary safety adjustments if so. Once the apple fritters are a golden brown scoop them out with a slotted spoon. The apple fritters need to drain or be placed in a container that will absorb some of the outer oil that is attached to the apple fritters. In this case the person is folding a newspaper cone to put the apple fritters into.
Once you have your container place your apple fritters in there and sprinkle powdered sugar on them. They are best served hot as they will be the most flavorful at that time. However, they can most certainly be enjoyed anytime of the day and are not bad to eat when they are cold especially if you were going to put something on top of them or dip them into rather than simply powdered sugar.
Some people decide to create a dipping sauce to go with the apple fritters. While there are a variety of different things that you can dip the apple fritters into a majority of people choose syrup or homemade jellies and jams.
These apple fritters are low in calorie and fat unless you decide to create a sauce for them to go into then you want to be careful about the added sugar to such a snack.
947
views
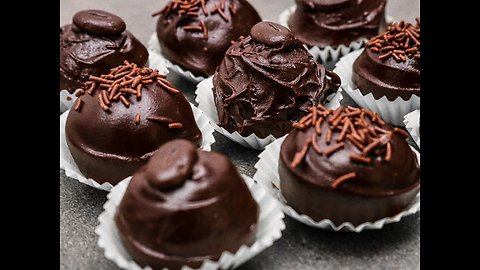
Perfect Recipe For Leftover Pralines
Sounds crazy, but there are people out there who don't eat up all their cake, so here's a delicious solution for that! These chocolate bites will not only be great for gatherings but they are pleasing to the eye and we know that most people eat what is appealing to the eye. Here is the simple recipe to follow when creating these cake bites.
Place a layer of <a href="https://rumble.com/v30kgh-chocolate-cake-recipe-in-microwave-5-minutes-time-by-sharmilazkitchen.html" target="_blank">chocolate cake</a> into a mixer. Close the mixer of impulse ate the chocolate cake. Now this particular cake will not have any icing or flavor being on top or around it as it will be completely plain. Once it has been completely mixed then it will turn into chocolate powder but it will still have the color of the cake that you placed in there in the first place, so do not expect the color to change as we're not adding any water to this mixture. Transfer the chocolate powder into another medium-to-large sized bowl. Add roughly a tablespoon or less of orange liqueur. Mix the chocolate powder and the orange cord together being sure to keep the powder loose and not matted as we just want the liquid to be on most of chocolate cake. You do not want your chocolate cake powder to be lumpy at this point. Add a drizzle of whipping cream over the top of the entire chocolate powder and then mix it with your hands again being sure not to squeeze the chocolate cake and the liquids together.
Once you are satisfied with the mixing of all of the ingredients, you will then proceed to create small balls of this mixture. This is where you will squeeze the mixture is really tight into small balls. Arrange those small balls on a pan.
Take a bark of chocolate whichever one of the flavors that you prefer such as bittersweet or semisweet and chop it up into crumbly pieces. Place crumbly pieces into a pan on the stove then add a layer of whipping cream on top. Once the chocolate has melted to a creamy rich consistency you will then stick something into the chocolate balls to hold them while dipping them in chocolate. Make sure to cover the entire thing. Once the small chocolate balls have been dipped into the chocolate you can place chocolate sprinkles on top. You can even place pralines on top of the chocolate bites. You can even place the chocolate bites into <a href="https://rumble.com/v68dvd-st.-pete-cupcake-contest.html" target="_blank">cupcake</a> tins for quicker and cleaner ways to pick up the bites.
These little bites will be a crowd-pleaser and will not break the bank when providing a great dessert for people to grab while on the go mingling with other party-goers.
While this dessert can be used with any cake mix and can be dipped into any flavoring as well as topped with your favorite cake topping for cupcake topping. These cake bites can also substitute for larger cupcakes when you have little ones over for a child's birthday party.
2.18K
views
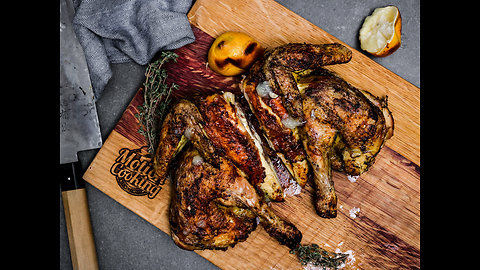
Mouthwatering 'Chicken Under A Brick' Recipe Method
Is there any way to make grilled whole chicken better? Of course... Just crush it! Check it out!
This beautiful ground chicken will leave your mouth watering just by looking at it. What is so amazing about this <a href="https://rumble.com/v30e5z-grilled-cheesy-buffalo-chicken.html" target="_blank">grilled chicken</a>, besides the flavor, is it is extremely easy to make. The key to grilling the chicken entirely or all the way through is to crush it down the middle and fan out the parts from side to side. This allows for the chicken to be cooked evenly while on the grill.
When you place the chicken on the grill you also place a whole lemon which you will cut up later to place over the cooked chicken. The meat is unbelievably moist and tender you can almost eat it with a fork and no knife.
To make this delicious meal the first thing you start out with is some fresh thyme. You want to pull the leaves or buds off of the stem and place them in a small bowl. Next you will add some lemon zest and <a href="https://rumble.com/v2zeo0-how-to-make-roasted-garlic-in-a-minute.html" target="_blank">garlic</a> to the same bowl. No recipe will be complete without your trusty salt and pepper. After all ingredients are in the bowl, you begin to crush them together and Infuse each of the piece or flavor of the ingredients during the crushing process. Then you add a little bit of olive oil and proceeded to crush together the ingredients again.
At this time you will want to play some gloves on your hands. It will help to keep your hands clean while handling the chicken. Once this process is complete we will take a whole free range chicken and cut with shears down the center of the chicken, breast side up. Make sure to take out the sternum. At this time you will open the chicken fully and expose the inside of the chicken. All of your ingredients will then be placed inside and outside of the chicken. Be sure to rub the ingredients into the chicken as it will soak up all of the flavor that way.
On a hot and grill you want to place the chicken skin side down or breast side down. This will allow the chicken to be seared or browned on top which will not only provide the skin with great texture, but for presentation purposes as well. Be sure to place a weighted piece of cooking utensil on top of the chicken as to weight it down this will also allow the skin to be seared evenly while on grill. Once the chicken has been seared on one side and you will flip the chicken place those weighted utensils back on top. Once the process has been completed and the chicken is cooked your desired tenderness, in most cases all the way through for food safety reasons then you split the lemon down the middle and squeeze it on the breast side.
Place it on a dish, garnish it if you like but one thing is going to be true, you are going to want to make this dish over and over again.
65
views

Creative Recipe On How To Make A Fondue Volcano
It's getting colder and colder outside, so it's the perfect time for fondue! Better as a pizza fondue volcano!
The presentation of food goes a long way when someone is trying to get another to try food. This delicious looking dish of <a href="https://rumble.com/v330wq-pizza-fondue.html" target="_blank">fondue</a> is the perfect example of that. There is a group of people that love to put cheese on everything and most are or certainly become fondue lovers. Fondue is a dish in which pieces of food is dipped into it. Typically fondue is liquids or broths; however, in this case, fondue is the dipping of roasted vegetables into melted cheese. Fondue can also be chocolate fondue. It seems as though the definition of fondue has simply transformed (or used incorrectly) to the dipping of pieces of food into different types of liquids or melted foods.
Experts say that the best parts of cheese is the flavor and the nature in which is pulls along as you enjoy each distinct flavor. Melted cheese covers the roasted vegetables which is certain to make cheese lovers swoon at not only the sight but their first bite. Cheese also has a buttery flavor that pulls in the creamy food lovers.
The cheese has been melted into a flaky buttery bread bowl that is the vehicle for deliciousness. As the cheese melts into the bread, it leaves a film of goodness that cheese toast lovers look forward to when eating this type of fondue. Oh the sight of the cheese covered vegetables makes the mouth water.
This <a href="https://rumble.com/v6i5vd-fluffy-english-muffins.html" target="_blank">recipe</a> calls for very simple ingredients. However, they are some expensive ingredients. A layer of pizza dough is rolled on the table; three round one-inch thick pieces of brie are added, one on top of the other. The pizza dough is wrapped around the brie. Into a shallow baking dish the pizza dough and brie go to be surrounded by boiled potatoes, olive oil, and a generous covering of fresh grinded salt and pepper.
The dish is cooked at a two hundred and forty degrees for fifteen minutes. Please be sure to take safety measures when pulling the dish out of the over as it will be hot. The pizza dough will cooked into a crust and the cheese escapes to enclose around the potatoes. The crust is a golden brown. The entire dish is topped with parsley.
Take care in eating such a delicious meal as cheese tends to hold in heat pockets which can burn your mouth unexpectedly. The potatoes are not the only thing you can dip into the brie as it is expected that you will enjoy this dish so much that you dip even raw vegetables into it.
As the holidays are fast approaching, people are more health conscious but one thing is for sure this dish is one that you do not want to miss. This pizza dough cheese fondue is sure to please the crowd. It will become the new dish that is gone in a matter of minutes once the first person takes a bite.
72
views

How to make potato burger buns
The perfect burger bun needs just one secret ingredient... Potatoes! Check it out!
476
views

Spooky Recipe For Making Delicious Halloween Ribs
These ribs are scary and delicious at the same time, which makes them absolutely perfect for your Halloween party! Enjoy!
The recipe goes as follows: Start first with regular honey. Add in some Tabasco sauce. Stir that mixture until well combined. This will give your sauce covering a sweet, tangy, and spicy combination of flavor. Good ribs are all about combining and layering flavors. You don’t want your ribs to have just a single layer of flavor because you’ll be missing out on the opportunity to really shock your guests with some very fine cuisine for your <a href="https://rumble.com/v6i829-halloween-cheese-dip.html" target="_blank">Halloween</a> party!
Next, combine the dry ingredients: Start with black salt. Black salt is not a common ingredient in most kitchens, but it can be a great staple to have handy and available for recipes such as this. If you choose to use course black salt, like what is used in the video here, you will need to grind and crush it. Even though this is a few extra moments of work, it gives your rub a fresher and stronger flavor, and who doesn’t want that!?
Add paprika to your finely crushed black salt, and follow that with garlic. Now, as you will see, this video does not give specific measurements for these ingredients, but there is a reason for that. Your measurements really depend on the size and number of the ribs you are using and cooking, and it also depends on individual tastes.
For example, if you do not like a super sweet flavor, you can opt for less honey and more tabasco in your first step wet mixture. If you have any sensitivities to salt intake, you can lessen the amount of salt that you use for your dry rub. If you are only making a small portion for yourself, obviously you should use much less of every ingredient, as opposed to if you are cooking several racks for a family cookout.
Everything can be and should be adjusted to your individual preferences. This always makes cooking more fun anyway because it allows each person to experiment to see what they like and dislike and what they prefer. After you have added paprika, garlic powder, and onion powder, finally add cumin. Combine all of these ingredients until well mixed together. Then stir in some brown sugar for a sweet and savory kick.
First brush your completely thawed ribs with the wet mixture of honey and tabasco. Next, press in the dry rub on all sides of the ribs to ensure maximum flavor. This dry mixture will also help create the outer caramelized crust, giving your ribs both great flavor and fantastic texture.
Pour your favorite stout beer into a pan, and place your ribs on a roasting rack above the beer. Cover the entire pan and rib rack with foil, and place in the oven at 300 degrees for a total of three hours. This video also contains a recipe if you are wanting to create the little skeleton head as well. <a href="https://rumble.com/v6i92x-halloween-snack-spider.html" target="_blank">Scary</a>, right?!
For your final sauce to go over the cooked ribs, melt butter in a sauce pan; toss and lightly brown minced garlic for 2 minutes. Add in ketchup, apple juice, apple cider vinegar, brown sugar, paprika, chili powder, and cayenne powder. Remove ribs from oven and smother in wet sauce. Feast on the delicious dish you have created!
Don’t forget to subscribe and comment below if you tried the recipe and let others know how it went! Also, please share any adjustments you may have made to the recipe that worked well for you.
176
views

Crunchy Oven Baked French Toast Recipe
Fluffy and crunchy at the same time! This oven baked chocolate French toast has a creamy surprise and an amazing flavour combination, it will quickly become your go to breakfast recipe for special occasions! This delicious recipe makes an amazing brunch or a perfect Sunday morning breakfast for overnight guests. It is so impressive that your guests will be talking about it all week and everyone is going to want the recipe!
With simple ingredients that you will find in your fridge or cabinet, it is a very easy recipe to follow and you can adapt to your taste, using different fruits and spices to change it up! Try strawberries, raspberries or even nuts. This is such a versatile recipe for any occasion.
Ingredients:
3 large eggs
1 cup milk
2 tablespoons Olvomaltine crunchy <a href="https://rumble.com/v31j1o-best-no-churn-cherry-chocolate-ice-cream.html"target="_blank">chocolate</a> cream
1 teaspoon cinnamon
freshly grated nutmeg
1 load brioche bread
1 tablespoon butter
½ cup blueberries
½ cup granola
icing Sugar
Directions:
Preheat oven to 175 degrees Celsius or 350 degrees Fahrenheit.
In a blender, add 3 large eggs. To be on the safe side of not getting any egg shells in your dish, crack eggs first in bowl before adding to the blender, being careful to not get any small white pieces of shell! Add 1 cup of milk to the blender, followed by 2 tablespoons Olvomaltine Crunchy Chocolate Cream, 1 teaspoon cinnamon and freshly grated nutmeg to taste (approximately 1/2 teaspoon). Close lid to blender and pulse until ingredients are well incorporated. Set aside.
On a cutting board, cube a loaf of brioche bread into bite size pieces.
In a pie plate or 9x9 baking dish, butter the bottom and all sides, taking care not to miss any spots. Layer cubes of bread along the bottom of the dish in a single layer. Try not to overlap the bread as it will cause the dish to look uneven. Top the layer of bread with ½ cup of blueberries, followed by ½ cup of granola.
Take the milk mixture in the blender and slowly pour over the top of the bread, blueberries and <a href="https://rumble.com/v6blxz-homemade-granola.html"target="_blank">granola</a> in the dish. Make sure to soak each and every piece of bread in the dish so the flavoured are well distributed.
Place baking dish in oven and bake at 175 degrees Celsius or 350 degrees Fahrenheit for 40-45 minutes, keeping a close eye on it to make sure it turns a nice shade of golden brown. Even oven is different, so if you see it getting brown early, take it out and poke with a fork to test if it is done. You will be able to tell because the top will be crunchy and the inside will be nice and fluffy!
Remove from over and let cool for a couple minutes. Sprinkle with icing sugar and serve warm right out of the oven! If you are having an extra special breakfast or brunch, this oven baked french toast recipe is amazing with a scoop of vanilla ice cream or extra berries sprinkled on top!
We hope you enjoy!
70
views
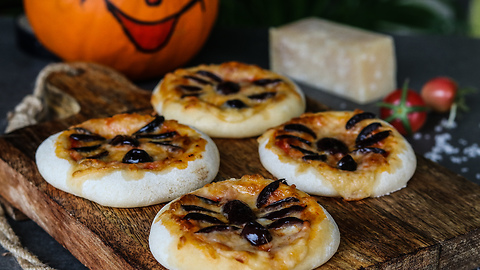
Halloween-Themed Mini Pizzas Are Great For Children’s Halloween Party
With Halloween just around the corner, it is time to pre-heat your oven and get in the spooky mood by trying out different recipes in order to ensure that this year's party will be both dreadful and delicious.
The month of October is the perfect time to get cozy and enjoy the beautiful nature of autumn. While some will bask in the various shades of red, orange and yellow of that season, others will patiently wait for the one holiday that offers endless possibilities of imagination and creativity from costume design to food preparation.
Celebrated around the world, this frightening holiday has its origins in ancient Celtic harvest festivals which have changed and evolved into the Halloween that we know and celebrate today together with its many traditions. However, besides the traditional practices such as carving Jack-O'-Lanterns, creating spooky costumes and watching scary movies, an important part of every <a href="https://rumble.com/v2zxmt-how-to-make-pumpkin-pretzels-easy-and-fun-halloween-treat.html" target="_blank">Halloween</a> party is the food. It is the one thing that everyone is looking forward to and the one thing that can make a great party even more memorable.
True Halloween lovers are always able to figure out a way to transform an already delicious meal into something straight out of a horror movie. However, while some recipes may look rather overwhelming and complicated for those of us who are not so skilled in the craft of baking, these Halloween-themed mini pizzas are not only scarily delicious but also extremely easy to create. With just a minimal amount of ingredients and a few easy steps, you will be able to craft this spooky snack that is guaranteed to impress both children and adults with its eerie spidery appearance but absolutely delicious taste.
As seen in this short but creative video, all you need are some simple ingredients that can easily be found in most households.
To begin with, preheat your oven and get your pizza dough ready by cutting it up into seven, or however many even pieces you want. Then, take each piece, sprinkle it with some flour and mold it into a circular shape with small and shallow indents in the middle enough to hold the tomato sauce without it spilling out. Add one tablespoon of tomato sauce and throw in some grated mozzarella, or any cheese of your liking, onto the dough.
Next, comes the fun part which is the key element that will transform these mini pizzas into the perfect Halloween-themed snack. To achieve this, all you need are some black olives, cut into smaller pieces and placed in the middle of the dough in the shape of a spider with its head, body and its creepy eight legs. Lastly, bake these tiny pizzas for a few minutes and voilà you have your perfect Halloween <a href="https://rumble.com/v6i829-halloween-cheese-dip.html" target="_blank">snack</a> .
After successfully re-creating these mini pizzas you will most likely feel tempted to try your hand at other equally fun and creative recipes. For more inspiration, you can check out other videos from Motion Cooking, the creators of this video. Soon enough, you will welcome this year's October 31st with a whole array of frightening but tasty Halloween meals and snacks that are sure to make a lasting impression on all of your family and friends.
45
views
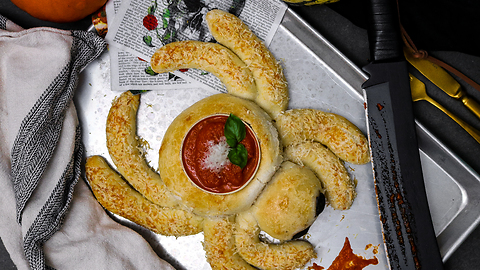
Creepy Spider Appetizer For A Great Halloween Party
Enjoy this tasty treat with spicy tomato sauce, just in time for your Halloween party. The recipe can also be made into any shape you want, so get creative and impress your guests with a tasty and good looking treat!
This <a href="https://rumble.com/v3w2ez-alaskan-malamute-dressed-as-a-spider-for-halloween.html" target="_blank">spider</a> looks so impressive, your guests may feel bad picking it apart to eat, but we assure you, they will! It tastes just as good as it looks! With it’s break stick legs, it is perfect for dipping into the tasty and spicy tomato dipping sauce.
Ingredients:
1 x pizza dough
1 x black olive cut lengthwise
2 x tablespoons melted butter
Directions:
On clean surface, sprinkle white flour all over. Roll out pizza dough and knead until it has a springy texture and feels like an elastic band when pulled apart. Roll dough out into a 12 inch log and cut off a quarter of the log (4 inches) and set aside. Then cut off another 2 inch log and set aside. Take the remaining dough log and slice it into four more section. You should have 6 pieces of dough all together.
Shape the 4 inch piece of dough into a ball and flatten it slightly. This is going to be the body of your spider <a href="https://rumble.com/v3tq91-scary-halloween-dracula-cookies.html" target="_blank">appetizer</a>. Place spider body on baking sheet covered with parchment paper. Once body is in place, roll the 2 inch piece of dough into the shape of the spiders head and place at the top on the body on the baking sheet. Take the left over 4 pieces of dough and make 2 legs out of each. You should have eight legs in total. Add them to the spider body with four legs on each side. Curve two legs on each side forward towards the head of the spider and the last two legs on each side backwards towards the end of the spider. To make it resemble a bug, stretch the back legs a little longer than the front legs. Play around with the placement of the legs until you are satisfied. Once you have assembled your spider, cut a black olive length with and stick into the dough head as spider eyes.
Melt 2 tablespoons of butter and spread all over spider body, making sure to cover the entire thing. After spreading the butter, cover the entire spider with finely shredded mozzarella cheese. Be sure not to miss any sections of the dough.
Place baking sheet in oven at 190 degrees Celsius or 375 degrees Fahrenheit for 20-25 minutes or until it is puffed up and golden brown. Once spider is finished baking, take it out of the over and let sit until cool.
Using a small dish, use to cut out a whole in the middle of the spider body where you will place the spicy tomato sauce. Cut out the whole and use the leftover pieces of pizza dough to make more dipping pieces. Place small dish in the hole and fill with your choice of marinara or tomato sauce for dipping.
We hope you and your guests enjoy this recipe!
61
views

Get Ready For Halloween With This Cheese Dip Recipe
Let’s get ready for Halloween! You'll be perfectly prepared with this creamy cheese dip! Serve it in a pumpkin shape for an extra special party or dinner and impress your guests with your culinary skills. They will be raving about the recipe for weeks.
Make sure to write it the recipe out on a couple cards because people are definitely going to be asking you for it! This recipe not only tastes amazing but looks amazing too. The creaminess of the cream cheese in the middle filled with spices, peppers and onions and the sharp cheddar cheese outside give this dip an incredible flavour combination that everyone is going to talk about long after your <a href="https://rumble.com/v3viu9-halloween-dog-party.html" target="_blank">Halloween party</a> or get together!
Serve this pumpkin cheese dip with tortilla chips, fresh cut veggies or crackers! It makes a beautiful centerpiece for that special dinner as well, resembling an orange pumpkin decoration! It is always nice when you can make a dish that can also be incorporated into your décor style!
Ingredients:
8 ounces cream cheese at room temperature
1 teaspoon garlic powder
½ teaspoon onion powder
½ teaspoon ground black pepper
¼ cup diced red sweet peppers
¼ cup thinly sliced green spring onions
1 cup shredded cheddar cheese, separated in two
Directions:
In bowl, add 8 ounces of cream cheese at room temperature so that it stirs up smooth and creamy. To the cream cheese, add 1 teaspoon garlic powder, ½ teaspoon onion powder, ½ teaspoon ground black pepper, ¼ cup diced red sweet peppers and ¼ cup thinly sliced green spring onions. Using a fork, combine all ingredients together until they are well incorporated in the bowl.
Spreading out a piece of plastic wrap shred 1/2 cup of cheddar cheese and spread over entire piece of plastic wrap. Spoon out cream cheese mixture in the middle of cheddar cheese so that the cream cheese is in the very center. Once all of the cream cheese mixture is out of the bowl, shred the rest of the cheddar cheese on top. Carefully wrapping the plastic wrap around the cream cheese mixture, make sure that the shredded cheddar surrounds the white center. This gives the dip an orange outside which will give it that “pumpkin” look! To get the ridges in the pumpkin, use several elastic bands to make indents in the ball of cheese. 4 to 5 rubber bands should be enough to give it the right look.
Let cheese ball sit in the fridge for a minimum of one hour before serving to give it the chance to firm up and set in the shape of a pumpkin. Right before serving, carefully remove the elastic bands and peel away the plastic wrap very carefully, making sure that the cheddar cheese outside sticks to the cream cheese mixture. Serve this pumpkin <a href="https://rumble.com/v350bz-nachos-with-homemade-cheese-dip.html" target="_blank">cheese dip</a> with tortilla chips, fresh cut veggies or crackers! It makes a beautiful centerpiece for that special dinner as well, resembling an orange pumpkin decoration! Place right in the middle of your dining room table for a very impressive table setting and watch your guests as the compliment your taste!
73
views

How to make chocolate cheescake with crunchy filling
A delicious chocolate cheesecake with a twist! Have you ever had a crunchy cheesecake filling? Check it out!
72
views
1
comment