

My baby always wants to feeding milk
Why kids always hungry?
#DailyVlog #LifeVlog #EverydayLife #VloggersofUSA #UKVloggers #CanadianVloggers #EuropeanVloggers #DailyAdventures #ExploreUSA #UKLife #CanadianLifestyle #EuropeanCulture #TravelDiaries #CityLife #CountrysideCharm #UrbanExploration #LocalEats #StreetScenes #HomeSweetHome #LifeinUK #DailyVlog #LifeVlog #EverydayLife #VloggersofUSA #UKVloggers #CanadianVloggers #EuropeanVloggers #DailyAdventures #ExploreUSA #UKLife #CanadianLifestyle #EuropeanCulture #TravelDiaries #CityLife #CountrysideCharm #UrbanExploration #LocalEats #StreetScenes #HomeSweetHome #LifeinUK #DailyVlog #LifeVlog #EverydayLife #VloggersofUSA #UKVloggers #CanadianVloggers #EuropeanVloggers #DailyAdventures #ExploreUSA #UKLife #CanadianLifestyle #EuropeanCulture #TravelDiaries #CityLife #CountrysideCharm #UrbanExploration #LocalEats #StreetScenes #HomeSweetHome #LifeinUK #DailyVlog #LifeVlog #EverydayLife #VloggersofUSA #UKVloggers #CanadianVloggers #EuropeanVloggers #DailyAdventures #ExploreUSA #UKLife #CanadianLifestyle #EuropeanCulture #TravelDiaries #CityLife #CountrysideCharm #UrbanExploration #LocalEats #StreetScenes #HomeSweetHome #LifeinUK #DailyVlog #LifeVlog #EverydayLife #VloggersofUSA #UKVloggers #CanadianVloggers #EuropeanVloggers #DailyAdventures #ExploreUSA #UKLife #CanadianLifestyle #EuropeanCulture #TravelDiaries #CityLife #CountrysideCharm #UrbanExploration #LocalEats #StreetScenes #HomeSweetHome #LifeinUK #DailyVlog #LifeVlog #EverydayLife #VloggersofUSA #UKVloggers #CanadianVloggers #EuropeanVloggers #DailyAdventures #ExploreUSA #UKLife #CanadianLifestyle #EuropeanCulture #TravelDiaries #CityLife #CountrysideCharm #UrbanExploration #LocalEats #StreetScenes #HomeSweetHome #LifeinUK#DailyVlog #LifeVlog #EverydayLife #VloggersofUSA #UKVloggers #CanadianVloggers #EuropeanVloggers #DailyAdventures #ExploreUSA #UKLife #CanadianLifestyle #EuropeanCulture #TravelDiaries #CityLife #CountrysideCharm #UrbanExploration #LocalEats #StreetScenes #HomeSweetHome #LifeinUK #DailyVlog #LifeVlog #EverydayLife #VloggersofUSA #UKVloggers #CanadianVloggers #EuropeanVloggers #DailyAdventures #ExploreUSA #UKLife #CanadianLifestyle #EuropeanCulture #TravelDiaries #CityLife #CountrysideCharm #UrbanExploration #LocalEats #StreetScenes #HomeSweetHome #LifeinUK #DailyVlog #LifeVlog #EverydayLife #VloggersofUSA #UKVloggers #CanadianVloggers #EuropeanVloggers #DailyAdventures #ExploreUSA #UKLife #CanadianLifestyle #EuropeanCulture #TravelDiaries #CityLife #CountrysideCharm #UrbanExploration #LocalEats #StreetScenes #HomeSweetHome #LifeinUK #DailyVlog #LifeVlog #EverydayLife #VloggersofUSA #UKVloggers #CanadianVloggers #EuropeanVloggers #DailyAdventures #ExploreUSA #UKLife #CanadianLifestyle #EuropeanCulture #TravelDiaries #CityLife #CountrysideCharm #UrbanExploration #LocalEats #StreetScenes #HomeSweetHome #LifeinUK #DailyVlog #LifeVlog #EverydayLife #VloggersofUSA #UKVloggers #CanadianVloggers #EuropeanVloggers #DailyAdventures #ExploreUSA #UKLife #CanadianLifestyle #EuropeanCulture #TravelDiaries #CityLife #CountrysideCharm #UrbanExploration #LocalEats #StreetScenes #HomeSweetHome #LifeinUK #DailyVlog #LifeVlog #EverydayLife #VloggersofUSA #UKVloggers #CanadianVloggers #EuropeanVloggers #DailyAdventures #ExploreUSA #UKLife #CanadianLifestyle #EuropeanCulture #TravelDiaries #CityLife #CountrysideCharm #UrbanExploration #LocalEats #StreetScenes #HomeSweetHome #LifeinUK
5
views

Good morning. Swimming time with my Babies <3
#DailyVlog #LifeVlog #EverydayLife #VloggersofUSA #UKVloggers #CanadianVloggers #EuropeanVloggers #DailyAdventures #ExploreUSA #UKLife #CanadianLifestyle #EuropeanCulture #TravelDiaries #CityLife #CountrysideCharm #UrbanExploration #LocalEats #StreetScenes #HomeSweetHome #LifeinUK #DailyVlog #LifeVlog #EverydayLife #VloggersofUSA #UKVloggers #CanadianVloggers #EuropeanVloggers #DailyAdventures #ExploreUSA #UKLife #CanadianLifestyle #EuropeanCulture #TravelDiaries #CityLife #CountrysideCharm #UrbanExploration #LocalEats #StreetScenes #HomeSweetHome #LifeinUK #DailyVlog #LifeVlog #EverydayLife #VloggersofUSA #UKVloggers #CanadianVloggers #EuropeanVloggers #DailyAdventures #ExploreUSA #UKLife #CanadianLifestyle #EuropeanCulture #TravelDiaries #CityLife #CountrysideCharm #UrbanExploration #LocalEats #StreetScenes #HomeSweetHome #LifeinUK #DailyVlog #LifeVlog #EverydayLife #VloggersofUSA #UKVloggers #CanadianVloggers #EuropeanVloggers #DailyAdventures #ExploreUSA #UKLife #CanadianLifestyle #EuropeanCulture #TravelDiaries #CityLife #CountrysideCharm #UrbanExploration #LocalEats #StreetScenes #HomeSweetHome #LifeinUK #DailyVlog #LifeVlog #EverydayLife #VloggersofUSA #UKVloggers #CanadianVloggers #EuropeanVloggers #DailyAdventures #ExploreUSA #UKLife #CanadianLifestyle #EuropeanCulture #TravelDiaries #CityLife #CountrysideCharm #UrbanExploration #LocalEats #StreetScenes #HomeSweetHome #LifeinUK #DailyVlog #LifeVlog #EverydayLife #VloggersofUSA #UKVloggers #CanadianVloggers #EuropeanVloggers #DailyAdventures #ExploreUSA #UKLife #CanadianLifestyle #EuropeanCulture #TravelDiaries #CityLife #CountrysideCharm #UrbanExploration #LocalEats #StreetScenes #HomeSweetHome #LifeinUK
4
views
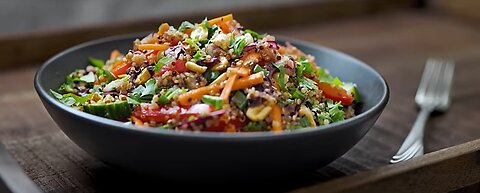
WHOLESOME QUINOA NOURISH BOWL with Asian Dressing | High Protein Vegetarian and Vegan Meal Ideas
#quinoasalad #plantbaseddiet
Wholesome Quinoa Nourish Bowl with Asian Dressing. High Protein Vegetarian and Vegan Meal Ideas perfect for meal prep/planning.
💬 Let me know in the comments if you enjoyed my vegan quinoa recipe.
▶️ RECIPE INGREDIENTS: (Servings 3 to 4 servings)
👉 To Cook Quinoa:
1 Cup / 190g Toasted Quinoa (I have used tri-colour quinoa)
1+1/4 Cup / 300ml Water
👉 Other Ingredients:
1 Cup / 125g Red Bell Pepper - thinly sliced
1 Cup / 100g Purple Cabbage - Shredded
1 Cup / 100g Carrot - Cut into julienne strips
1 Cup / 150g Cucumber - cut into small pieces
1/2 Cup / 65g Red Onion - chopped
1/2 Cup / 25g Green Onion - chopped
1/2 Cup / 15g Cilantro (Coriander leaves) - chopped
1/2 Cup / 65g Toasted Peanuts
👉 SALAD DRESSING:
3 Tablespoon Lemon Juice OR TO TASTE
1 Teaspoon Ginger - Grated or minced
1/2 Teaspoon Garlic - Grated or minced
2 Tablespoon Soy Sauce or Tamari
2 Tablespoon Maple syrup
2 Tablespoon Toasted Sesame Oil or to taste
1 Tablespoon Olive Oil
Salt to Taste (I have added 1/4 teaspoon of pink Himalayan salt)
1/4 Teaspoon Cayenne Pepper
▶️ METHOD:
Start by chopping the vegetables and set it aside.
Toast the quinoa on medium to medium-heat (depending on the heat of your stove) for about 2 minutes or until the seeds starts to crackle and releases it's nutty aroma. By now your kitchen should be filled with this toasty nutty aroma :)
IMMEDIATELY transfer the toasted quinoa to a sieve - spread it out and allow it to cool down completely.
👉 PLEASE NOTE: DO NOT LEAVE the toasted quinoa in the hot pan, otherwise it may end up burning
👉 Toasting the quinoa adds a nutty flavour to this dish and also makes it easy to digest - it serves the same purpose as soaking
Once the quinoa has cooled down, wash it thoroughly, then tranfer it to a wide pan and add the water. Turn on the stove to medium-high heat and bring it to a boil. Then reduce the heat to low and cook for about 10 minutes or until the quinoa is cooked. DO NOT LET THE QUINOA GET MUSHY, that will ruin the dish. As soon as the quinoa is cooked, transfer it to a large mixing bowl and spread it our evenly and allow it to cool down completely.
To prepare the dressing add lemon juice, grated/minced ginger, garlic, soy sauce, maple syrup, sesame oil, olive oil, salt and cayenne pepper to a small bowl. Mix thoroughly and set it aside.
By now the quinoa would have cooled down, if not, wait till it completely cools down. Add the bell pepper, purple cabbage, carrot, cucumber, red onion, green onion, cilantro and peanuts to the mixing bowl with quinoa. Stir the dressing again to make sure everything is well incorporated. Then add the dressing to the quinoa/veggies and mix well.
You can eat it right away, BUT I HIGHLY RECOMMEND TO CHILL THE SALAD IN THE REFRIDGERATOR FOR A FEW HOURS BEFORE SERVING. This will allow the flavours to blend and it tastes so good cold
This recipes is perfect for meal prep / meal planning - it stores well in the refrigerator for up to 4 days, if stored well in an airtight container.
▶️ IMPORTANT NOTES:
👉 Toasting the quinoa adds a nutty flavour to this dish and also makes it easy to digest - it serves the same purpose as soaking
👉 Every stove is different so regulate the heat as required. If at any point you notice the pan is getting over heated, reduce the heat
👉 Once the quinoa is toasted, right away transfer it to a sieve or a plate for it to cool down. Please DO NOT LEAVE IT in the hot pan, otherwise it may end up burning
👉 Wash the toasted quinoa, only when it has completely cooled down
👉 Regarding cooking the quinoa, do not let the quinoa get mushy. Cook for 10 minutes or just until quinoa is cooked but still holds it's shape
👉 After you mix the dressing with the quinoa and veggies, I HIGHLY RECOMMEND TO CHILL IT IN THE REFRIGERATOR FOR A FEW HOURS BEFORE SERVING. This will allow the flavours to blend and tastes so good cold
👉 This recipes is perfect for meal prep / meal planning, as it stores in the refrigerator for up to 4 days - if stored well in an airtight container
#salad #saladrecipe #healthysalad #quinoarecipes#quinoasalad #vegetarian #vegetarianrecipes #vegan #VeganRecipes #VeganFood #HealthyRecipes #PlantBased #plantbaseddiet
5
views

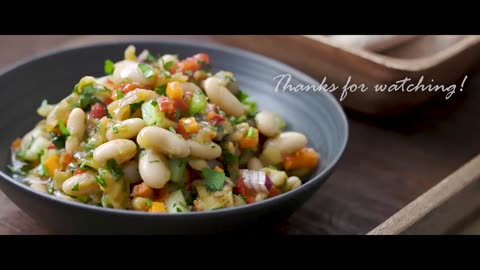
Roasted EGGPLANT & BEANS NUTRITION BOWL | HIGH PROTIEN Vegetarian and Vegan Meal Ideas
#plantbaseddiet #aubergine
Roasted Eggplant & Beans Nutrition Bowl. High protein vegetarian and vegan meal Ideas for any day of the week.
💬 Let me know if you enjoyed my healthy vegan nourish bowl recipe.
▶️ RECIPE INGREDIENTS: (3 to 4 servings)
👉 To roast the Eggplant and Red Bell pepper:
Olive oil
1 large Eggplant / Aubergine (490g approx. including skin)
1 large Red Bell Pepper (300g approx. including seeds/core)
Aluminum foil to cover the roasted vegetables
✅ 👉 Ingredients:
1+1/3 Cup / 300g ROASTED Eggplant (VERY FINELY CHOPPED INTO A MASH)
3/4 Cup / 140g ROASTED Red Bell Pepper (VERY FINELY CHOPPED ALMOST INTO A MASH)
2 Cups / 1 can (540ml can) White Kidney Beans / Cannellini Beans
1/2 cup / 75g Carrots finely chopped
1/2 cup / 75g Celery finely chopped
1/3 cup / 50g Red Onion finely chopped
1/2 cup / 25g Parsley finely chopped
👉 Salad Dressing:
3+1/2 Tablespoons Lemon juice OR TO TASTE
1+1/2 Tablespoon Maple Syrup OR TO TASTE
2 Tablespoon Olive Oil (I have used organic cold pressed olive oil)
1 Teaspoon minced/grated Garlic
1 Teaspoon Ground Cumin
Salt to taste (I added 1+1/4 Teaspoon pink Himalayan salt which is milder than the conventional salt so adjust accordingly)
1/4 Teaspoon Ground Black Pepper
1/4 Teaspoon Cayenne Pepper (OPTIONAL)
▶️ METHOD:
Pre-heat the oven at 400 F. Line a baking tray with parchment paper. Cut the eggplant in half. Score it in a crosshatch diamond pattern about 1 inch deep. Brush with olive oil. Cut the red bell pepper in half and remove the seeds/core, brush with olive oil. PLACE BOTH THE EGGPLANT AND PEPPER FACE DOWN on the baking tray.
✅👉 NOTE: IT'S REALLY IMPORTANT THAT YOU PUT IT FACE DOWN ON THE BAKING TRAY. This will trap the steam and help it bake properly.
Bake in a pre-heated oven at 400 F for about 35 minutes or until the vegetables are nicely roasted and soft. Once roasted remove from the oven place it on a cooling rack. Allow it to cool down.
✅👉 MAKE SURE TO COVER IT, THIS WILL LOOSEN THE SKIN of the vegetables and make it easy to peel the skin.
Drain the cooked white kidney beans (cannellini beans) and rinse it with water. Now let the beans sit in a strainer until all the water is drained. WE DO NOT WANT SOGGY BEANS here.
To a small bowl, add lemon juice, maple syrup, olive oil, minced garlic, salt, ground cumin, black pepper, cayenne pepper. Mix thoroughly until well combined. Set it aside.
By now the roasted eggplant and pepper would have cooled off. So uncover and peel the skin of the bell pepper and CHOP IT VERY FINELY ALMOST INTO A MASH. Scoop the pulp of the roasted eggplant and discard the skin, CHOP IT VERY FINELY BY RUNNING THE KNIFE SEVERAL TIMES UNTIL IT TURNS INTO A MASH.
✅👉 IT'S VERY IMPORTANT THAT YOU FINELY CHOP THE ROASTED EGGPLANT AND PEPPER ALMOST INTO A MASH - to make this dish creamy and it becomes a part of the dressing.
Transfer the roasted eggplant and pepper to a large bowl. Add the cooked kidney beans (cannellini beans), chopped carrot, celery, red onion, parsley and the dressing. Mix thoroughly.
Cover the bowl and CHILL IN THE REFRIGERATOR FOR 2 HOURS, TO ALLOW THE BEANS TO ABSORB THE DRESSING. DO NOT SKIP THIS STEP.
Once chilled, it's ready to serve. This is a very versatile dish, have it with pita, in a lettuce wrap, with chips, as a salad and can also be eaten with steamed rice. It stores well in the refrigerator for 3 to 4 days (in an airtight container).
▶️ IMPORTANT NOTES:
👉 After brushing the raw eggplant and pepper with olive oil, MAKE SURE TO PLACE IT FACE DOWN ON THE BAKING TRAY. This will trap the steam and help it bake properly
👉 Drain the cooked beans and rinse it with water. Let the beans sit in a strainer until all the water is drained. WE DO NOT WANT SOGGY BEANS
👉 IT'S VERY IMPORTANT THAT YOU FINELY CHOP THE ROASTED EGGPLANT AND PEPPER ALMOST INTO A MASH - to make this dish creamy and it becomes a part of the dressing
👉 This is a very versatile dish, have it with pita, in a lettuce wrap, with chips, as a salad and can also be eaten with steamed rice. Stores well in the refrigerator for 3 to 4 days (if stored well in an airtight container)
**********
#salad #saladrecipe #healthysalad #vegetarian #vegetarianrecipes #vegan #VeganRecipes #VeganFood #HealthyRecipes #PlantBased #plantbaseddiet #FoodImpromptu #beans #aubergine
15
views
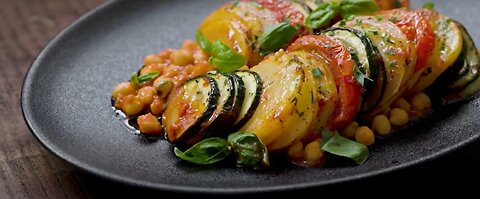
CHICKPEA and VEGETABLE CASSEROLE Recipe | Healthy Vegan and Vegetarian Meal Ideas | Chickpea Recipes
#roastedvegetables #plantbaseddiet
CHICKPEA and VEGETABLE CASSEROLE Recipe | Healthy Vegan and Vegetarian Meal Ideas | Chickpea Recipes
💬 Let me know if you enjoyed my vegan roasted vegetable and chickpea recipe.
▶️ RECIPE INGREDIENTS:
✅ 👉 BAKING DISH: 9 X13 inches
2 Cups / 1 Can (540ml Can) Cooked Chickpeas
400ml / 1+3/4 Cup Passata / Tomato Puree
1+1/2 Tablespoon Maple Syrup (to balance the acidity of the tomatoes)
1 Teaspoon Ground Cumin
1/4 Teaspoon Cayenne Pepper (Optional)
1 Teaspoon Salt or to taste (I added pink Himalayan salt)
👉 Vegetables & other ingredients:
700g / 4 to 5 Medium YELLOW POTATOES (Yukon Gold) - Peeled and cut into1/8th inch thick slices (with skin 825g approx.)
✅ YELLOW POTATOES ARE LOW TO MEDIUM STARCH AND WELL SUITED FOR ROASTING
600g / 2 to 3 Zucchini (WITH THE TIPS 640g approx.) - Tips chopped off & cut into 1/4th inch thick slices
200g / 2 Medium Tomatoes (cut into 1/4th inch thick slices)
200g / 1 Medium Onion OR 2 small onions (with skin 655g approx.) - cut into 1/4th inch thick slices
1+1/2 Tablespoon Garlic - Finely chopped
1 Teaspoon Dry Oregano
1 Teaspoon Dry Thyme
1/2 Teaspoon Ground Black Pepper
3 to 4 Tablespoon Olive Oil
Salt to taste (I added 1 teaspoon of pink Himalayan salt)
👉 Garnish:
2 Tablespoon / 6g Parsley - finely chopped
1/2 cup / 12g Fresh Basil
Olive oil (I have added organic cold pressed olive oil)
Ground black pepper to taste
▶️ METHOD:
Start by prepping the vegetables. Thoroughly wash the vegetables. Peel and slice the potatoes into thin slices, 1/8th inch thick. Remove the tips of the zucchini and slice it into 1/4th inch thick slices. Same with the tomatoes and onion, cut it into thin slices. TRANSFER ONLY THE SLICES POTATO AND ZUCCHINI INTO A MIXING BOWL and set aside.
DO NOT MIX THE TOMATOES AND ONIONS SLICES WITH the zucchini and potatoes. Keep it separately.
✅ 👉 THIS RECIPE USES YELLOW POTATOES. THEY ARE LOW TO MEDIUM STARCH AND WELL SUITED FOR ROASTING
Drain 1 can of cooked chickpea OR 2 cups of home cooked chickpeas and add to a 9 x 13 inches baking dish. Add the passata/tomato puree, maple syrup, ground cumin, salt, cayenne pepper. Mix thoroughly until spices are well combined.
Back to the mixing bowl with the zucchini and potato slices - add finely chopped garlic, dry oregano, thyme, ground black pepper, salt, olive oil and mix well until nicely coated with the herbs and oil.
PRE-HEAT THE OVEN TO 400 F.
Arrange the potato, zucchini, tomato and onion slices as shown in the video and lay it on top of the chickpea tomato layer. There may be a lot of liquid from the zucchini collected at the bottom of the bowl. DO NOT THROW IT. POUR IT EVENLY OVER THE LAYERED VEGETABLES. Fit in any extra slices of tomato/onion between the layers. Cover the baking tray with aluminum foil or if your baking dish has a lid then even better. Bake for 40 minutes covered at 400 F in a pre-heated oven. After 40 minutes, remove the baking dish from the oven and remove the aluminum foil covering. Bake it uncover for another 15 to 20 minutes or until the potatoes are cooked. IT TOOK ME 20 MINUTES IN MY OVEN.
👉 To check if the potatoes are cooked, stick a knife or a fork through one of the potato slices. If not cooked bake for longer.
At the end of the baking process, SWITCH THE SETTING OF YOUR OVEN TO BROIL. Broil anywhere between 2 to 4 minutes or until the vegetables are golden brown on top.
Remove from oven and let it sit on a wire rack. Brush the top of the vegetables with olive oil. Garnish with chopped parsley, fresh basil & black pepper. Serve hot with a side of crusty bread or rice or a green salad.
▶️ IMPORTANT TIPS:
👉 ✅ THIS RECIPE USES YELLOW POTATOES. YELLOW POTATOES ARE LOW TO MEDIUM STARCH AND WELL SUITED FOR ROASTING
👉 Thinly slice the potatoes about 1/8th inch (thinner than the other vegetables) to match the cooking time with the other vegetables
👉 The zucchini & potatoes release a lot of water after adding the salt/herbs/garlic. DO NOT THROW THE WATER AWAY. POUR IT EVENLY OVER THE LAYERED VEGETABLES
👉 Every oven is different so adjust the baking time accordingly
****
Welcome to Food Impromptu! Food Artist, Plant-Based & Vegan Recipes Creator
Here you will find easy & nourishing vegan recipes for your everyday cooking. My goal is to make the transition to a Plant Based diet achievable and effortless using everyday ingredients. I draw my inspiration from classic, traditional, & modern cuisines from around the world. I take pride in creating recipes and videos for your best viewing experience.
#chickpeas #chickpearecipe #vegetarian #vegan #vegetarianrecipes #VeganRecipes #VeganFood #HealthyRecipes #PlantBased #plantbaseddiet #vegetarianfood #roastedvegetables #garbanzos
73
views
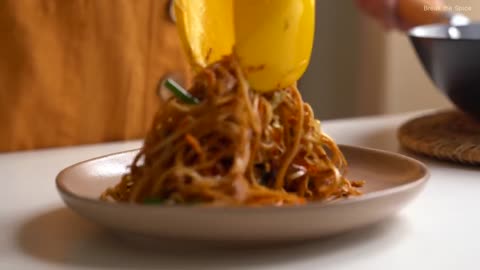
How to make Perfect Chow Mein at home like a chef!
Chow mein recipe | how to make perfect chow mein at home
RECIPE (2 servings)
INGREDIENTS:
1/2 small cabbage
5 green onions/spring onions
2 carrots
300g/11 oz noodles (preferably egg noodles)
4 tbsp oil
—sauce—
1.5 tbsp light soy sauce
1 tbsp dark soy sauce
1 tbsp oyster sauce (regular or vegetarian)
3 cloves garlic grated
1 tsp sugar
2 tbsp water
METHOD:
1. Thinly slice cabbage, carrots and white part of the green onions/spring onions. Slice the green part into 2 inch thick pieces
2. Mix sauce ingredients in a bowl before hand. This will make it easier while stir frying
3. Boil water and cook noodles 2 mins less than the package instructions. The noodles will cook further while stir frying so it’s important to undercook them
4. Strain the noodles and dunk it into cold water or rinse them until they are cold. This helps making the noodles stop cooking immediately. Strain out excess water and coat in some oil to prevent it from sticking
5. Heat a wok/pan on high heat and add some oil. Add the carrots and stir fry for 1 min
6. Next add the cabbage and stir fry for 1 min
7. Next add the white part of green onion/spring onions and mix well
8. Spread the veggies around the wok/pan so they can get a light char. Once the veggies are done, set it aside
9. Next add some oil and stir fry the noodles for 2-3 mins on high heat. This enhances the taste and gives it a wok tossed flavour. Use chopsticks or tongs to mix the noodles so they don’t break
10. Once the noodles stir fried well, add the veggies and mix well
11. Pour in the sauce and stir fry for 2 mins. Taste and adjust salt if needed. Some noodle brands are saltier than others
12. Switch off the flame, add green part of green onions/spring onions and a few drops of sesame oil. Enjoy!
14
views

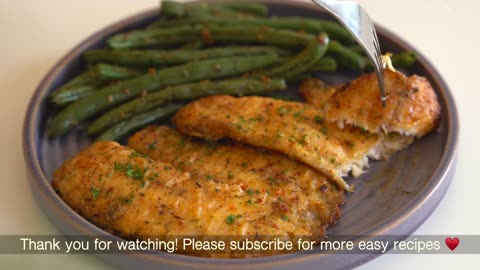
Tilapia Fillet Recipe!
Tilapia recipes | Tilapia fillet recipe
Today I’m sharing my easy pan seared tilapia recipe! This recipe will give you fish that is crispy on the outside and perfectly flaky and delicious on the inside! Cook my tilapia recipe on a weeknight for a quick, delicious and easy dinner!
________________________________
INGREDIENTS:
2 large tilapia fillets
1 tbsp olive oil
2 tbsp butter
2 garlic cloves
1/4 lemon
Parsley for garnish
Dry Batter:
2 tbsp all purpose flour
1/4 tsp salt
1/4 tsp black pepper
1/4 tsp red chilli flakes
1/2 tsp dried oregano
1/4 tsp dried thyme
METHOD:
1. Clean and pat dry 2 large tilapia fillets. Sprinkle with a pinch of salt and set aside for 5 mins
2. In a plate, mix all the ingredients mentioned under dry batter. Coat the fish on both sides with the dry batter and gently shake off excess
3. On low flame, heat 1 tbsp olive oil in a skillet/wide pan and infuse it with 2 crushed garlic cloves. Once the garlic starts to brown, remove it from the pan. This way we get a subtle garlic flavor in the dish
4. Next melt 2 tbsp butter in the oil. If using salted, don't add salt to the dry batter or it might end up too salty
5. Set flame to medium and gently place the fish. Fry for 3-4 mins per side. Be careful while flipping as it can break easily
6. Once the fish is done, squeeze the juice of 1/4 lemon all over and garnish with fresh parsley
7. Serve these delicious pan fried Tilapia fillets with sautéed veggies or a salad
________________________________
SUBSTITUTES:
• What other fish can be used?
Bass, cod, snapper, halibut
• Can prawns be used?
Yes
• No parsley?
Coriander/cilantro can also be used
• No dried oregano/thyme?
Use 1 tsp mixed herbs/Italian seasoning
• No red chilli flakes
Use red chilli powder
________________________________
TIPS:
• Be careful while flipping the fish as it can break
• Adding lemon juice at the end helps cut the richness of the butter
• Store leftover dry batter in an airtight container in the freezer and use it the next time you make this recipe
5
views

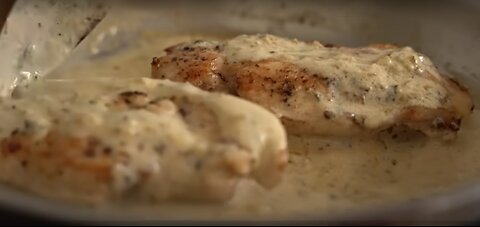
Creamy Garlic Chicken Breast Recipe
#chicken #dinner #easyrecipes
Chicken breast recipes | Keto chicken recipe | Creamy garlic chicken | How to make Creamy garlic chicken
Today I'm making an easy Creamy garlic chicken recipe. This recipe is extremely versatile and can be turned into creamy garlic chicken pasta, creamy garlic chicken and rice, creamy garlic chicken and mushrooms, the list goes on! This one-pot chicken recipe is perfect for a weeknight as well as a meal prep option. You can also switch the chicken breast for chicken thighs or any other part. Give this a shot and it's surely going to turn into your favorite quick dinner recipe!
INGREDIENTS: (2 servings)
2 large chicken breasts
5-6 cloves garlic (minced)
2 cloves garlic (crushed)
1 medium onion
1/2 cup chicken stock or water
1 tsp lime juice
1/2 cup heavy cream (sub-fresh cream)
Olive oil
Butter
1 tsp dried oregano
1 tsp dried parsley
Salt and pepper (as needed)
*1 chicken stock cube (if using water)
_______________________________________
FAQ:
• Why lime juice?
As wine is not used in this recipe, lime juice is added for acidity (sourness). Otherwise, the sauce might seem too rich
• When to add salt to the sauce?
Add salt towards the end as stock/stock cubes have added salt. I did not find the need to add more salt
• What else can be added to the dish?
Mushrooms, broccoli, bacon, spinach, and parmesan cheese can also be added for additional flavor
• What to pair with the dish?
Pasta, steamed veggies, mashed potatoes, rice, couscous, or crusty bread.
_______________________________________
TIPS:
• Chicken stock can be substituted with white wine as well. Omit lime juice if using white wine
• The entire sauce needs to be cooked on low flame so as to prevent it from splitting
• Reduce the liquid before adding cream
• Add 1/4 cup parmesan cheese to add more flavor
_______________________________________
Disclaimer: Some of the above links are Amazon affiliate links and I receive a small commission with each sale at no extra cost to you. Thanks so much for the support.
#easyrecipes #chicken #dinner
18
views

How are you friends, finally back to my home after office -_-
Guys, Why I am not getting views? Are my videos boring you or do you need something else?
2
views
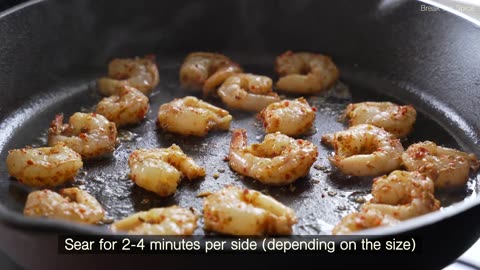
Shrimp Fajitas Recipe
Shrimp fajitas | shrimp fajitas recipe | easy shrimp fajitas | how to make shrimp fajitas
Shrimp Fajitas Ingredients:
1 lb or 450g shrimp (peeled and deveined)
1 red, yellow and green bell peppers
1 onion
4 tbsp olive oil
1/2 tsp dried oregano
1/2 tsp cumin powder
Salt to taste
---Fajita seasoning---
1 tsp dried oregano
1/2 tsp red chilli flakes
1 tsp cumin powder
1/2 tsp black pepper
1/2 tbsp minced garlic
1 tbsp lime juice
1/2 tsp salt
3
views


'UPHILL FIGHT': NYC councilman on growing calls for Staten Island secession
#foxnews
New York City Councilman Joe Borelli discusses migrant crime in the Big Apple and growing calls for Staten Island to secede from the city. #foxnews
Subscribe to Fox News! https://bit.ly/2vBUvAS
Watch more Fox News Video: http://video.foxnews.com
Watch Fox News Channel Live: http://www.foxnewsgo.com/
FOX News Channel (FNC) is a 24-hour all-encompassing news service delivering breaking news as well as political and business news. The number one network in cable, FNC has been the most watched television news channel for 18 consecutive years. According to a 2020 Brand Keys Consumer Loyalty Engagement Index report, FOX News is the top brand in the country for morning and evening news coverage. A 2019 Suffolk University poll named FOX News as the most trusted source for television news or commentary, while a 2019 Brand Keys Emotion Engagement Analysis survey found that FOX News was the most trusted cable news brand. A 2017 Gallup/Knight Foundation survey also found that among Americans who could name an objective news source, FOX News was the top-cited outlet. Owned by FOX Corporation, FNC is available in nearly 90 million homes and dominates the cable news landscape, routinely notching the top ten programs in the genre.
Watch full episodes of your favorite shows
The Five: https://www.foxnews.com/video/shows/t...
Special Report with Bret Baier: https://www.foxnews.com/video/shows/s...
Jesse Watters Primetime: https://www.foxnews.com/video/shows/j...
Hannity: https://www.foxnews.com/video/shows/h...
The Ingraham Angle: https://www.foxnews.com/video/shows/i...
Gutfeld!: https://www.foxnews.com/video/shows/g...
Fox News @ Night: https://www.foxnews.com/video/shows/f...
Follow Fox News on Facebook: https://www.facebook.com/FoxNews/
Follow Fox News on Twitter: https://twitter.com/FoxNews/
Follow Fox News on Instagram: https://www.instagram.com/foxnews/
16
views

Let's go to for doctor checkup in a hospital
Let's go to for a Doctor's checkup in a hospital ✌️
5
views

Good morning for all my friends vlog by hariel ferari
Good morning
How are you friends? Do you love me! share my videos in 5 group. I will knock you 😘
5
views

Today i am completed my washing machine repairing.
Today I am completed my washing machine repair.
Follow for more videos.
5
views


My first vlog in English Language
My first vlog in English.
Watch Till End Please
If you like me please share my videos
Love you all❤️
2
views


Get ready for swim vlog by hariel ferari
Get ready for swim in a wonderful swimming pool.
baby milk feeding by hariel ferari
#DailyVlog #LifeVlog #EverydayLife #VloggersofUSA #UKVloggers #CanadianVloggers #EuropeanVloggers #DailyAdventures #ExploreUSA #UKLife #CanadianLifestyle #EuropeanCulture #TravelDiaries #CityLife #CountrysideCharm #UrbanExploration #LocalEats #StreetScenes #HomeSweetHome #LifeinUK
1
view

Make a New tatto in my body vlog by hariel ferrari
How is that?
Making a new tattoo
Watch full videos
Thank you
4
views

hello friends how are you vlog from heriel ferrari
Good morning, Good Evening, Good night :D
2
views