-
Replacing our Old Shower - Part 8
Living the Northern LifeAmazon Link for the Shower Taps Canada: https://amzn.to/49S3mNe USA: https://amzn.to/49TFARa This is the last video in our series on building our new shower to replace our old one. We're grouting the everything but the corners and we will be using a coloured silicon for all the corners where there are joints. This was a great project for us and I think it turned out extremely well. Here is the link to Jeff from Home Renovision: https://youtu.be/kM1lSU5QR4o?si=BgEEv1nnzKdjwkPC&t=3002 Until the next one, keep Living the Northern Life! You can help support the channel if you Subscribe and hit the Bell notification for All updates so that you are notified when I post a new video. We have a new Patreon account as well if you would be willing to support us this way as well. https://www.patreon.com/livingthenorthernlife You can also help support the channel by clicking on the links to any of the items below. Even if you choose not to purchase any of these items we would receive a commission if you purchase any item from Amazon within 24 hours of clicking on any link below. Amazon Affiliate Link Canada: https://amzn.to/31AufV8 USA: https://amzn.to/34HXNT2 9 inch Chainsaw Tooth Brush Blade Canada: https://amzn.to/2CQJPm7 USA: https://amzn.to/2ECFlQB 0:00 Intro 0:29 Plans 3:05 Starting the Grouting 14:37 Siliconing the Corner Joints 19:37 Completing the Shower Fixtures 21:36 Testing the Shower 22:48 Installing the Curtain Rod 25:20 Closing Remarks 26:12 Outro57 views 1 comment -
Replacing our Old Shower - Part 7
Living the Northern LifeWelcome to Day 5 of our Replacing our Old Shower - Part 7 series. We have some more QEP tools and we're knocking the clips off. Knocking the clips off was a bit satisfying :) but you can see that I left a lot of thin set behind that needs to be cleaned up... Cleaning up the thin set took me A LOT of extra hours that I hadn't planned for. I should have worked a lot cleaner than I did that's for sure. Until the next one, keep Living the Northern Life! You can help support the channel if you Subscribe and hit the Bell notification for All updates so that you are notified when I post a new video. We have a new Patreon account as well if you would be willing to support us this way as well. https://www.patreon.com/livingthenorthernlife You can also help support the channel by clicking on the links to any of the items below. Even if you choose not to purchase any of these items we would receive a commission if you purchase any item from Amazon within 24 hours of clicking on any link below. Amazon Affiliate Link Canada: https://amzn.to/31AufV8 USA: https://amzn.to/34HXNT2 9 inch Chainsaw Tooth Brush Blade Canada: https://amzn.to/2CQJPm7 USA: https://amzn.to/2ECFlQB 0:00 Intro 0:10 Plans 0:36 Knocking Clips Off 3:27 QEP Grout Saw 6:38 Should I have Built out from the Center 7:22 Triangle QEP Grout Removal Tool 7:59 No One Tool Can Do it All 10:19Closing Remarks 12:52 Outro56 views 2 comments -
Replacing our Old Shower - Part 6 - Finishing The Border Tiles
Living the Northern LifeAmazon Link for the Shower Taps Canada: https://amzn.to/49S3mNe USA: https://amzn.to/49TFARa Welcome back to the next chapter of our renovation journey as we near the completion of our shower renovation project. In this episode, "Replacing our Old Shower - Part 6 - Finishing The Border Tiles," we continue our DIY adventure by setting the border tiles and cutting a hole for the shower head pipe. Join us as we tackle these final touches, armed with determination and a new QEP tool to aid in the process. Despite a hiccup with our GoPro camera, we press on, documenting our progress and sharing our insights along the way. Utilizing Sketchup to plan and visualize the layout, we meticulously draw the front of the shower, ensuring accurate angles and lengths for the tiles. This strategic approach proves to be a lifesaver, guiding us through the installation process with precision and efficiency. As we set the border tiles and cut the necessary holes, we're reminded once again that while we may not be professionals, our passion for DIY and commitment to quality shine through in every aspect of our work. Join us as we put the finishing touches on our shower renovation, bringing our vision to life one tile at a time. Stay tuned for more updates as we wrap up this chapter of our renovation journey. Until the next one, keep Living the Northern Life! You can help support the channel if you Subscribe and hit the Bell notification for All updates so that you are notified when I post a new video. We have a new Patreon account as well if you would be willing to support us this way as well. https://www.patreon.com/livingthenorthernlife You can also help support the channel by clicking on the links to any of the items below. Even if you choose not to purchase any of these items we would receive a commission if you purchase any item from Amazon within 24 hours of clicking on any link below. Amazon Affiliate Link Canada: https://amzn.to/31AufV8 USA: https://amzn.to/34HXNT2 9 inch Chainsaw Tooth Brush Blade Canada: https://amzn.to/2CQJPm7 USA: https://amzn.to/2ECFlQB 0:00 Intro 0:10 Plans 0:41 QEP Diamond Hole Drill Bit 2:13 Sketchup Measurements for the Neo-Angle for the shower 2:14 Lining Up the Tiles in the 24" QEP Tile Cutter 4:28 Using the Diamond Blade Hole Saw 6:37 Two Batches of Thinset 6:49 Work Begins 8:22 Camera Pointed in the Wrong Location 8:46Closing Remarks 9:35 Outro54 views 1 comment -
Replacing our Old Shower - Part 5 - Installing the Wall Tiles
Living the Northern LifeAmazon Link for the Shower Taps Canada: https://amzn.to/49S3mNe USA: https://amzn.to/49TFARa Welcome back to the next installment of our renovation journey as we embark on the next phase of transforming our old shower into a modern oasis. In this episode, "Replacing our Old Shower - Part 5 - Installing the Wall Tiles," we tackle the task of installing the big 12x24 wall tiles, a pivotal step in bringing our vision to life. Join us as we guide you through the process of meticulously placing each tile, emphasizing the importance of working as clean as possible. Drawing from our own experiences, we share valuable lessons learned, stressing the significance of cleanliness to ensure a seamless and successful installation. With careful planning and execution, we take a methodical approach, starting with the first row and allowing it to set before progressing further. This strategic method minimizes weight on the wall, preventing tiles from slipping or shifting unexpectedly. Despite initial nerves, our confidence grows as we witness the effectiveness of our technique. Thanks to the quality of our thinset and attention to detail, our tiles adhere securely to the wall, creating a sturdy and reliable foundation for our shower. As each row takes shape, we're reminded of the importance of patience and precision in achieving professional-looking results. With every tile securely in place, we're one step closer to realizing our vision of a revitalized shower space. Join us as we continue this journey of transformation, navigating the challenges and triumphs of DIY renovation. Stay tuned for more updates as we progress further in our quest to create the ultimate shower experience. Until the next episode, remember to keep Living the Northern Life! You can help support the channel if you Subscribe and hit the Bell notification for All updates so that you are notified when I post a new video. We have a new Patreon account as well if you would be willing to support us this way as well. https://www.patreon.com/livingthenorthernlife You can also help support the channel by clicking on the links to any of the items below. Even if you choose not to purchase any of these items we would receive a commission if you purchase any item from Amazon within 24 hours of clicking on any link below. Amazon Affiliate Link Canada: https://amzn.to/31AufV8 USA: https://amzn.to/34HXNT2 9 inch Chainsaw Tooth Brush Blade Canada: https://amzn.to/2CQJPm7 USA: https://amzn.to/2ECFlQB 0:00 Intro 0:10 Plans 1:41 Mixing Thinset 2:20 Lash Leveling Kit 2:38 Day 1 - Setting the First Row of Tiles 4:38 Day 2 - Setting the Second Row of Tiles 6:43 Day 3 - Setting the Last Row of Big Tiles 9:17 QEP Tool to set the Leveling Wedges 9:39 Closing Remarks 10:14 Outro133 views 2 comments -
Replacing our Old Shower - Part 4
Living the Northern LifeAmazon Link for the Shower Faucet Canada: https://amzn.to/49S3mNe USA: https://amzn.to/49TFARa Welcome back to the latest chapter of our renovation saga as we continue our mission to revamp our old shower into a modern masterpiece. In this episode, "Replacing our Old Shower - Part 4 - Setting the Floor Tiles," we dive deep into the meticulous process of setting the floor tiles, sharing every step of the journey from beginning to end. Join us as we navigate the intricacies of tile installation, ensuring precision and attention to detail every step of the way. From preparing the surface to carefully laying each tile, we showcase the entire process, offering valuable insights and tips along the way. In addition to setting the floor tiles, we tackle the challenge of adjusting our Schluter Drain to align perfectly with the lowest tiles, ensuring both functionality and aesthetics in our final design. As always, we emphasize that while we may not be seasoned professionals, our dedication to the task at hand shines through in every aspect of our work. This video serves as a testament to the power of determination and DIY spirit in achieving remarkable results. However, we encourage viewers to seek professional advice before embarking on similar projects to ensure safety and optimal results. Join us on this journey of transformation and empowerment as we continue to breathe new life into our space, one tile at a time. Stay tuned for more updates as we progress further in our renovation endeavors. Until the next installment, remember to keep Living the Northern Life! You can help support the channel if you Subscribe and hit the Bell notification for All updates so that you are notified when I post a new video. We have a new Patreon account as well if you would be willing to support us this way as well. https://www.patreon.com/livingthenorthernlife You can also help support the channel by clicking on the links to any of the items below. Even if you choose not to purchase any of these items we would receive a commission if you purchase any item from Amazon within 24 hours of clicking on any link below. Amazon Affiliate Link Canada: https://amzn.to/31AufV8 USA: https://amzn.to/34HXNT2 9 inch Chainsaw Tooth Brush Blade Canada: https://amzn.to/2CQJPm7 USA: https://amzn.to/2ECFlQB 0:00 Intro 0:29 Plans 10:00 Closing Remarks 11:00 Outro60 views -
Replacing our Old Shower - Part 3 - Installing Concrete Board & RedGard
Living the Northern LifeIn this episode, Replacing our Old Shower - Part 3 - Installing Concrete Board & RedGard, we remove our old corner show and build a new one starting with the concrete base. We used 9.5 bags of concrete to build the base. It's heavy but it's in our basement on the concrete floor. Join us as we start building our new corner shower. Until the next one, keep Living the Northern Life! Amazon Link Canada: https://amzn.to/49S3mNe USA: https://amzn.to/49TFARa You can help support the channel if you Subscribe and hit the Bell notification for All updates so that you are notified when I post a new video. We have a new Patreon account as well if you would be willing to support us this way as well. https://www.patreon.com/livingthenorthernlife You can also help support the channel by clicking on the links to any of the items below. Even if you choose not to purchase any of these items we would receive a commission if you purchase any item from Amazon within 24 hours of clicking on any link below. Amazon Affiliate Link Canada: https://amzn.to/31AufV8 USA: https://amzn.to/34HXNT2 9 inch Chainsaw Tooth Brush Blade Canada: https://amzn.to/2CQJPm7 USA: https://amzn.to/2ECFlQB 0:00 Intro 0:10 Plans 1:03 Showing you the End Product 1:40 Cutting ther Concrete Board 3:35 Instaling the First Concrete Board 5:33 Installing the Schluter Products 8:40 Applying RedGarud 11:26 Closing Remarks 12:39 Outro62 views -
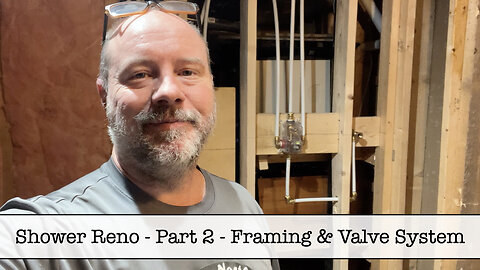
Replacing our Old Shower - Part 2 - Framing & Valve System
Living the Northern LifeIn this episode, Replacing our Old Shower - Part 2 - Framing & Valve System, we've removed our old corner show and build a new one starting with the concrete base.Now it's time to install the new framing and get the new valve, handheld and shower head PEX installing Join us as we start building our new corner shower. Until the next one, keep Living the Northern Life! Amazon Link Canada: https://amzn.to/49S3mNe USA: https://amzn.to/49TFARa You can help support the channel if you Subscribe and hit the Bell notification for All updates so that you are notified when I post a new video. We have a new Patreon account as well if you would be willing to support us this way as well. https://www.patreon.com/livingthenorthernlife You can also help support the channel by clicking on the links to any of the items below. Even if you choose not to purchase any of these items we would receive a commission if you purchase any item from Amazon within 24 hours of clicking on any link below. Amazon Affiliate Link Canada: https://amzn.to/31AufV8 USA: https://amzn.to/34HXNT2 9 inch Chainsaw Tooth Brush Blade Canada: https://amzn.to/2CQJPm7 USA: https://amzn.to/2ECFlQB 0:00 Intro 0:10 Plans 0:22 Start installing the Framing 6:01 The Amazon Valve System 7:40 Installing better Screws 10:00 The Valve has a Level 13:38 The Pex Pipe Tool 14:10 Pressure Testing the System 14:55 Closing Remarks 16:02 Outro92 views -
Replacing our Old Shower - Part 1 - The Concrete Base
Living the Northern LifeIn this episode, Replacing our Old Shower - Part 1 - The Concrete Base, we remove our old corner show and build a new one starting with the concrete base. We used 9.5 bags of concrete to build the base. It's heavy but it's in our basement on the concrete floor. Join us as we start building our new corner shower. Until the next one, keep Living the Northern Life! You can help support the channel if you Subscribe and hit the Bell notification for All updates so that you are notified when I post a new video. We have a new Patreon account as well if you would be willing to support us this way as well. https://www.patreon.com/livingthenorthernlife You can also help support the channel by clicking on the links to any of the items below. Even if you choose not to purchase any of these items we would receive a commission if you purchase any item from Amazon within 24 hours of clicking on any link below. Amazon Affiliate Link Canada: https://amzn.to/31AufV8 USA: https://amzn.to/34HXNT2 9 inch Chainsaw Tooth Brush Blade Canada: https://amzn.to/2CQJPm7 USA: https://amzn.to/2ECFlQB 0:00 Intro 0:10 Plans 0:41 Using the Laser Level 2:03 Starting the Base Framing 4:42 Schluter Drain Package 6:19 Starting Concrete 8:35 Removing the Base Framing 9:11 Closing Remarks 10:51 Outro59 views 1 comment