
How i made this Combination Lock System with Display
Hello Guys, in this video I will show you How we can build an Arduino Combination Lock.
Links: (Global)
Arduino Nano: https://bit.ly/3IbOzQn
Lock: https://bit.ly/3P2HS5F
Display: https://bit.ly/3IiuhoE
Bread Board: https://bit.ly/3Oz7SWl
Keypad: unable to find
Gerber File, Codes And Diagram:https://bit.ly/3I92pDl
That's it for today guys, i hope you like this video thanks for watching and don't forget to Like, Comment Subscribe and Share.
Share, Support, Subscribe.!!!!!!!
Subscribe: https://www.youtube.com/channel/UC92-...
Facebook:
Instagram: https://instagram.com/thewrench_
73.8K
views
15
comments
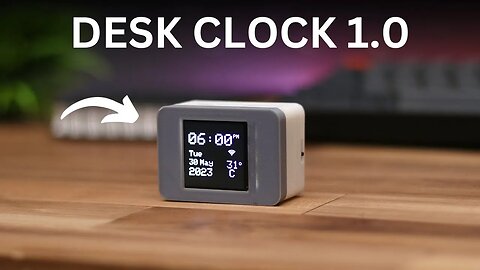
Building a Small Desk Clock with Weather Station
Hi Friends, in this video i will show you how i made this amazing looking desk clock with weather station.
Try on $1 for 5 pcs 1-6 layers PCBs ► https://www.allpcb.com/activity/prototype2023.html?code=yt67
ALLPCB's Youtube ►https://www.youtube.com/@ALLPCB/videos
Items that i used:
NodeMCU: https://s.click.aliexpress.com/e/_DDyB1ez
Display: https://s.click.aliexpress.com/e/_DmfRIsz
Charging Module: https://s.click.aliexpress.com/e/_DE32G8d
Battery: https://s.click.aliexpress.com/e/_DdI5rKl
Bread Board: https://s.click.aliexpress.com/e/_DmncNMp
Gerber File, Codes: https://bit.ly/3qe1FI5
STL Files: https://bit.ly/3MKXzPl
Coding Video: coming tomorrow
if you have any question about it, you can reach me on Instagram.
Instagram: https://instagram.com/thewrench_
Share, Support, Subscribe.!!!!!!!
Subscribe: https://www.youtube.com/channel/UC92-zm0B8vLq-mtJtSHnrJQ
50.6K
views
15
comments

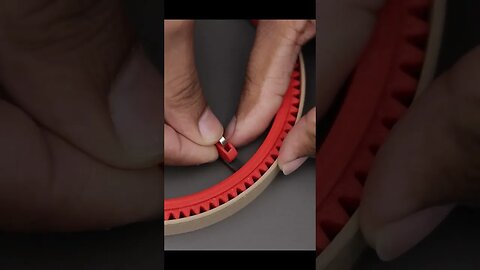
Building a Amazing Split-Flap Clock | Arduino
Get Free PCB on First Order: https://www.nextpcb.com/?code=thewrench
Register here and get $100 coupon: https://www.nextpcb.com/register?code=thewrench
Get your components here: https://www.hqonline.com/?code=thewrench
Hello Guys, in this video i will show you how i made Amazing Split Flap Clock
Stepper Motor: https://bit.ly/3jqykXK
Stepper Motor: https://amzn.to/42WSnyS
All Files: https://bit.ly/3G6TGSp
3D Printer that i used: https://amzn.to/3l4ZHqM
Tinkered By: Akash, Abhi
That's it for today guys, i hope you like this video thanks for watching and don't forget to Like, Comment Subscribe and Share.
Share, Support, Subscribe.!!!!!!!
Subscribe: https://www.youtube.com/channel/UC92-zm0B8vLq-mtJtSHnrJQ
Facebook:
Instagram: https://instagram.com/thewrench_
65.7K
views
10
comments

Turn Your Raspberry Pi into a Mini PC with DeskPi Lite M.2 Case | DIY Projects | The Wrench
In this video will unbox and review a Raspberry 4 Case from DeskPi Lite M.2 Case. it can convert your Raspberry Pi into a Mini PC, The DeskPi Lite NAS is an ABS case with an integrated M.2 SATA SSD expansion board, a cooling heatsink, and a PWM signal-controlled fan. This case provides reliable protection for your NAS components, efficient heat dissipation, and the flexibility to adjust fan speed according to your requirements. It is a practical and functional solution for expanding storage capacity while maintaining optimal performance in your NAS system.
Links:
Official DeskPi Website: https://deskpi.com/collections/new-arrival/products/deskpi-lite-nas-case-with-m-2-sata-ssd-expansion-board-raspberry-pi-4b-with-power-button-heatsink-with-pwm-fan-dual-full-size-hdmi-extra-two-usb-port
US Amazon: https://www.amazon.com/dp/B0C7YWK2P5
UK Amazon: https://www.amazon.co.uk/dp/B0C7W5HNCF
DE Amazon: https://www.amazon.de/dp/B0C7W5HNCF
#DIYProjects #MiniPC #Hacks #DIY #Thewrench
Subscribe my Channel- https://www.youtube.com/@TheWrench
Follow me on Social Media
Facebook- https://www.facebook.com/people/The-Wrench/100063668262344/
Instagram- Instagram: https://instagram.com/thewrench_
PRODUCT FEATURES
ABS Case: The DeskPi Lite NAS features a sturdy ABS (Acrylonitrile Butadiene Styrene) case that provides durability and protection for your M.2 SATA SSD expansion board and other internal components. ABS is known for its strength and impact resistance, making it an ideal material for this type of case.
M.2 SATA SSD Expansion Board: The case is designed with an integrated M.2 SATA SSD expansion board, allowing you to easily install and securely mount an M.2 SATA SSD. This expansion board provides additional storage capacity for your NAS setup, enhancing its versatility and performance.
Cooling Heatsink: To maintain optimal operating temperatures for the M.2 SATA SSD and other components, the DeskPi Lite NAS incorporates a cooling heatsink. The heatsink efficiently dissipates heat generated during extended operation, preventing overheating and ensuring the reliable performance of your NAS system.
PWM Signal-Controlled Fan: The cooling heatsink is accompanied by a PWM (Pulse Width Modulation) signal-controlled fan. This fan is capable of dynamically adjusting its rotational speed based on temperature requirements. By monitoring the system temperature, the fan can automatically increase or decrease its speed to provide effective cooling while minimizing noise levels.
Adjustable Fan Speed: The PWM signal-controlled fan allows you to adjust the fan speed manually, providing flexibility in balancing cooling performance and noise levels according to your preferences. This feature enables you to optimize the cooling efficiency of your DeskPi Lite NAS while maintaining a quieter environment.
Efficient Airflow: The combination of the cooling heatsinks and the PWM signal-controlled fan ensures efficient airflow within the case. This airflow helps to dissipate heat effectively, keeping the M.2 SATA SSD and other components within the optimal temperature range, even during demanding usage scenarios.
Easy Installation: The DeskPi Lite NAS is designed for straightforward installation. It typically includes all the necessary mounting hardware and connectors, making it easy to assemble and integrate with your existing NAS setup.
M.2 SATA SSD Adapter board (Support M.2 SATA SSD B-KEY Only)
#thewrench
40.3K
views
1
comment

How i Made this Amazing Padlock with Fingerprint | Arduino
Try the world's most trusted PCB design software, Altium Designer with 365, for free and 25% off your purchase: - https://www.altium.com/yt/TheWrench
Octopart - https://octopart.com/
Hello Guys. in this video I'll show you how i made this Padlock with Fingerprint and Display
Arduino: https://bit.ly/2GpcwER
Display: https://bit.ly/3T5ikrN
Fingerprint Sensor: https://bit.ly/3T9xZX0
Hall Effect Sensor: https://bit.ly/3JymoNO
Servo: https://bit.ly/3LgUl78
Programing Video: coming in 1-2 days.
if you have any question about it, you can reach me on Instagram.
Instagram: https://instagram.com/thewrench_
Share, Support, Subscribe.!!!!!!!
Subscribe: https://www.youtube.com/channel/UC92-zm0B8vLq-mtJtSHnrJQ
21.8K
views
3
comments

How i Made this Amazing Hollow Clock | Arduino
Get Free PCB on First Order: https://www.nextpcb.com/?code=thewrench
Register here and get $100 coupon: https://www.nextpcb.com/register?code=thewrench
Get your components here: https://www.hqonline.com/?code=thewrench
Hello Guys, in this video i will show you how i made Amazing Looking Hollow Clock.
Stepper Motor: https://bit.ly/3jqykXK
Codes, STL Files : http://bit.ly/3YeGcdU
Gerber File with Upgraded STLs - https://bit.ly/40o0L9G
3D Printer that i used: https://amzn.to/3l4ZHqM
That's it for today guys, i hope you like this video thanks for watching and don't forget to Like, Comment Subscribe and Share.
Share, Support, Subscribe.!!!!!!!
Subscribe: https://www.youtube.com/channel/UC92-zm0B8vLq-mtJtSHnrJQ
Facebook:
Instagram: https://instagram.com/thewrench_
10.3K
views
7
comments

WOW! Making a Mini PC Setup | Mini Apple Mac Pro
https://jlcpcb.com/3d-printing?from=Wrench
Hey Guys, in this video I'll show you how i made this Mini Computer and i try to give it the look of an Apple Mac Pro. i hope you will like it.
Lattepanda Board: https://bit.ly/3W6QpIE
STL Files: https://bit.ly/3HGyGU3
That's it for today guys, i hope you like this video thanks for watching and don't forget to Like, Comment Subscribe and Share.
Share, Support, Subscribe.!!!!!!!
Subscribe: https://www.youtube.com/channel/UC92-zm0B8vLq-mtJtSHnrJQ
Facebook:
Instagram: https://instagram.com/thewrench_
4.69K
views
17
comments
Building The World's Smallest PC with Khadas Edge 2 Pro
#minipc #thewrench #diyprojects
Welcome to our channel, where today we embark on an exciting journey to build the world's smallest PC using the incredible Khadas Edge 2 Pro! Join us as we push the limits of miniaturization and unleash the power of this tiny powerhouse.
Links: https://www.khadas.com/edge2
Tech Specs: https://dl.khadas.com/products/edge2/
Subscribe my Channel- https://www.youtube.com/@TheWrench
In this video, we dive deep into the realm of compact computing, showcasing the Khadas Edge 2 Pro, a remarkable single-board computer that packs a punch in a minuscule form factor. With its powerful hardware and versatile capabilities, the Edge 2 Pro is perfect for DIY enthusiasts, developers, and anyone looking to create innovative solutions in a small space.
We take you through every build process step, from unboxing the Khadas Edge 2 Pro to assembling the components. We'll guide you through connecting peripherals, such as a display, keyboard, and mouse,
ensuring a seamless setup. Don't worry if you're new to building PCs; we'll provide clear and detailed instructions, making it accessible for beginners and experts alike.
Furthermore, we highlight the Edge 2 Pro's extensive connectivity options. From USB-C and USB 3.0 ports to Gigabit Ethernet and Wi-Fi, this mini PC offers an array of options for connecting peripherals and networking devices. We'll showcase how you can leverage these connections to expand its functionality and tailor it to your specific needs.
Don't forget to like, share, and subscribe to our channel for more exciting content, reviews, and tutorials on the latest technology trends. Hit that notification bell, so you never miss an update! Let's embrace the world of mini PCs together with the Khadas Edge 2 Pro!
Subscribe my Channel- https://www.youtube.com/@TheWrench
Follow me on Social Media
Facebook- https://www.facebook.com/people/The-Wrench/100063668262344/ Instagram- Instagram: https://instagram.com/thewrench_
3.34K
views
8
comments

How To Make a Tiny Home Server | DIY Projects with Zimaboard | The Wrench
Hey Guys, In this video we are going to review the World's First Single Board Hack-able Server.
#diyprojects #diy #howtomake #miniserver #thewrench
ZimaBoard Official Shop: https://bit.ly/3Pm0D7b
ZimaBoard Official Site: https://bit.ly/47OICpe
ZimaBoard on Amazon: https://bit.ly/4478n1b
Case that i made: https://www.thingiverse.com/thing:6235152
ZimaBoard is a low-cost single-board server designed for makers and geeks.
Zimaboard has both the expandability of an x86 SBC and the appropriate power of a microserver. With ZimaBoard, you can set up a 4 Terabyte personal cloud in 5 minutes, configure a secure VPN to protect your digital footprint, tune your network with OpenWrt and pfSense, build a 4K media server that runs with Plex, share and collaborate with team members on your files, or upgrade your smart projects across different systems.
ZimaBoard is created by makers who got tired of recurring fees, unfriendly presets, and isolated systems. We want to make the home digital experience more attractive and affordable.
If you enjoy my work, you can support me in creating more content like this:
Paypal: www.paypal.me/wrenchdiy
Ko-Fi: www.ko-fi.com/thewrench
Buy me a Coffee: https://www.buymeacoffee.com/thewrench
Subscribe to my Channel- https://www.youtube.com/@TheWrench
Follow me on Social Media
Facebook- https://www.facebook.com/people/The-Wrench/100063668262344/
Instagram- https://instagram.com/thewrench_
2.91K
views
3
comments

Creality K1 | Fast and Budget 3D Printer - Unlock The Speed
Creality K1 Link: https://shrsl.com/4bomr
Right now there is sales going on, you can get if for $399.
Creality Store Link: https://shrsl.com/4bomy
Hey Guys, in this video i will checkout the all new Creality - K1. One of the most interesting FDM 3D printers in their offer is the Core XY closed chamber K1 3D printer, dubbed by Creality "the King of Speed". K1 can achieve an astonishing printing speed of up to 600 mm/s, making it approximately 12 times faster than a standard FDM 3D printer. With 20000mm/s² acceleration, K1 achieves a speed of 600 mm/s in only 0.03 s, delivering full speed in 90 % of the printing time. K1 has a build volume of 220 x 220 x 250 mm and is compatible with 1.75 mm filaments. K1 is delivered assembled and calibrated, which makes it possible to start printing "right out of the box".
In this Arduino project, we will guide you through the process of building your very own mini-game console using Arduino. With step-by-step instructions, we will show you how to create a versatile gaming device that brings joy and excitement to your free time.
Watch my other videos:
https://youtu.be/wOM361y1ltY?
https://youtu.be/XkO-BOJ37QA?
https://youtu.be/EnOATaVxpI8?
#Thewrench #3dprinting #diy #creality
Subscribe my Channel- https://www.youtube.com/@TheWrench
Follow me on Social Media
Facebook- https://www.facebook.com/people/The-Wrench/100063668262344/
Instagram- Instagram: https://instagram.com/thewrench_
3.58K
views
2
comments

Making 5 Amazing Things with Atezr L2 24W Laser Engraver
Hi guys, in this video i will unbox and review the all new Atezr L2 Laser Engraver, This machine has a powerful 24w diode laser that can engrave almost any material at speeds up to 54,000mm/min and has advanced z axis control that provides convenient auto focusing of the laser's focal point. It also comes with a digital control terminal that allows you to work offline or resume your work after a power outage, as well as multiple safety features such as slope and flame detection and a child safety lock.
Links:
Official Site: https://bit.ly/46I91UQ
Amazon: https://bit.ly/43wXYLL
Share, Support, Subscribe.!!!!!!!
Subscribe: https://www.youtube.com/channel/UC92-zm0B8vLq-mtJtSHnrJQ
Instagram: https://instagram.com/thewrench_
2.46K
views
1
comment
Building a Tiny Handheld Game #diyprojects #diy #arduino #thewrench #shorts #tech
2.22K
views
1
comment
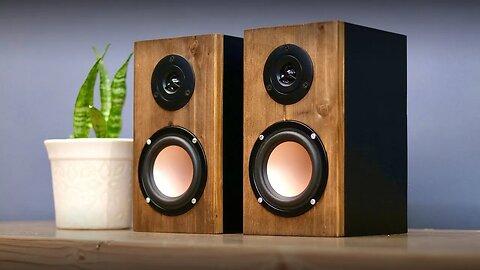
How to Make Desk | Book Shelf Speakers at Home | Budget DIY Speaker
How I Build Book Shelf-Speakers at Home in Budget
Welcome to my channel where creativity and sound engineering collide! In this exciting video, I'll be taking you on a journey through the world of DIY speaker building. Get ready to witness the magic of transforming basic components into powerful audio giants that will leave you in awe.
Links:
Speakers: https://s.click.aliexpress.com/e/_DecCix5 (pair)
Tweeter: https://s.click.aliexpress.com/e/_DkrLPpH (pair)
Cross-over Board: https://s.click.aliexpress.com/e/_Dmvi4kn
Amplifier: https://bit.ly/445rwAn
DFRobot: https://www.dfrobot.com/
India:
Speaker: https://bit.ly/47rjmVx
Tweeter: https://bit.ly/3Qz18vr
Subscribe to my Channel- https://www.youtube.com/@TheWrench
Follow me on Social Media
Facebook- https://www.facebook.com/people/The-Wrench/100063668262344/
Instagram- https://instagram.com/thewrench_
🔊 In "I Build Powerful Speakers at Home | DIY Speaker," I dive into the art and science of crafting your very own speakers from scratch. Whether you're a seasoned audio enthusiast or a curious beginner, this video has something special for everyone.
🛠️ Join me as I guide you through the step-by-step process of selecting the right components, designing the enclosure for optimal acoustics, and assembling the entire speaker system. I'll share insider tips and tricks that I've learned from years of tinkering with sound systems, ensuring you achieve the best possible sound quality without breaking the bank.
#DIYSpeakers #AudioEnthusiast #SpeakerBuilding #SoundEngineering #homeaudio
Don't forget to like, share, and subscribe to our channel for more exciting content, reviews, and tutorials on the latest technology trends. Hit that notification bell, so you never miss an update!
Building the High-Quality Speakers at Home | DIY Speaker | @TheWrench
1.98K
views
7
comments
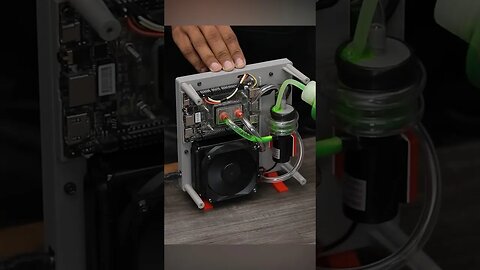
Building an 3D Printed Mini Liquid Cooled PC #diyprojects #3dprinting #computer
1.87K
views
1
comment

3 Amazing ideas with Arduino
Hey everyone, in this video, I will showcase three awesome projects using an Arduino board. It's a compilation video featuring projects I've previously shared on my channel. If you want to learn more about any of these projects, please watch the full video for additional information.
Things you need to build these projects:
Stepper Motors: https://s.click.aliexpress.com/e/_DeM0rKD
Arduino Board: https://s.click.aliexpress.com/e/_DFItaMD
Display: https://bit.ly/3T5ikrN
Fingerprint Sensor: https://bit.ly/3T9xZX0
Hall Effect Sensor: https://bit.ly/3JymoNO
Servo: https://bit.ly/3LgUl78
Full Video Links:
Padlock: https://youtu.be/jTxhyaw1k44
Hollow Clock: https://youtu.be/jvoOgxK4EvI
Split Flap Clock: https://youtu.be/BZnZ_EVVWgw
If you enjoy my work, you can support me in creating more content like this:
Paypal: www.paypal.me/wrenchdiy
Ko-Fi: www.ko-fi.com/thewrench
Buy me a Coffee: https://www.buymeacoffee.com/thewrench
Subscribe to my Channel- https://www.youtube.com/@TheWrench
Follow me on Social Media
Facebook- https://www.facebook.com/people/The-Wrench/100063668262344/
Instagram- https://instagram.com/thewrench_
1.94K
views

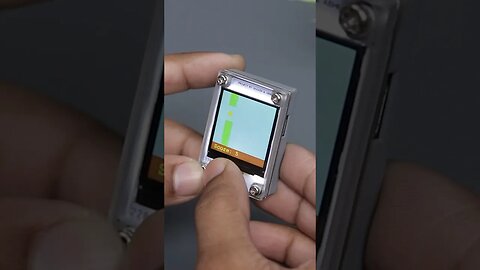
How i Made this Tiny Handheld Game with Arduino | Arduino Projects
JLCPCB 1-20 layer PCB from $2, Sign up here to Get Free Coupons : https://jlcpcb.com/?from=Wrench
In this Arduino project, we will guide you through the process of building your very own mini-game console using Arduino. With step-by-step instructions, we will show you how to create a versatile gaming device that brings joy and excitement to your free time.
Things i used.
Arduino Nano: (Aliexpress) : https://s.click.aliexpress.com/e/_DDUNriP
(Amazon) : https://amzn.to/49LNiNw
Display: (Aliexpress) : https://s.click.aliexpress.com/e/_DBPWsLd
(Amazon) : https://amzn.to/49LKlwn
Bread Board with Jumper Wires (Aliexpress):https://s.click.aliexpress.com/e/_DFrMY9t
(Amazon): https://amzn.to/3QTaHDR
Cheaper Option for Display: https://s.click.aliexpress.com/e/_DCc1NV9
3D Model and Gerber Files: https://bit.ly/3MVo8Ck
Github (codes): https://github.com/Abhiibhullar/arduino_tiny_game
Project by: Akaash
Code By: Abhii : https://www.instagram.com/abhibhullar111 (contact for paid coding work)
3D Printer i use.
Bambu Lab Carbon X1: http://shrsl.com/2a1rt-2yn7-1cwx9
If you enjoy my work, you can support me in creating more content like this:
Paypal: https://bit.ly/49IKWix
Ko-Fi: https://bit.ly/3usWJBj
Buy me a Coffee: https://bit.ly/40PBSUG
Watch my other videos:
https://youtu.be/wOM361y1ltY?
https://youtu.be/XkO-BOJ37QA?
https://youtu.be/EnOATaVxpI8?
#DIYProjects #MiniGame #ArduinoProjects #Hacks #DIY #Thewrench
Subscribe my Channel- https://www.youtube.com/@TheWrench
Follow me on Social Media
Facebook- https://www.facebook.com/people/The-Wrench/100063668262344/
Instagram- Instagram: https://instagram.com/thewrench_
1.9K
views
1
comment
Building A RC Boat from Yakult Bottles #diyprojects #3dprinting #diy #howtomake
1.92K
views
1
comment
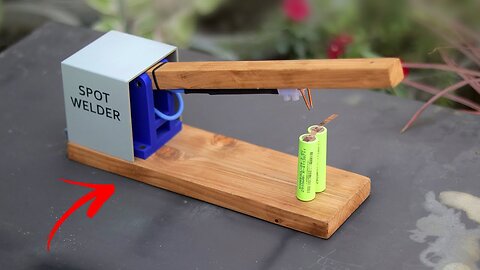
How i Made this Spot Welder for 18650 Batteries
https://www.altium.com/yt/TheWrench
Octopart - https://octopart.com/
Hey Guys, in this video im going to show you how made this Spot Welder for 18650 Batteries
Spot Welder PCB: http://bit.ly/3XgXuHt
V2. http://bit.ly/3TQZ687
That's it for today guys, i hope you like this video thanks for watching and don't forget to Like, Comment Subscribe and Share.
Share, Support, Subscribe.!!!!!!!
Subscribe: https://www.youtube.com/channel/UC92-zm0B8vLq-mtJtSHnrJQ
Facebook:
Instagram: https://instagram.com/thewrench_
1.42K
views
1
comment
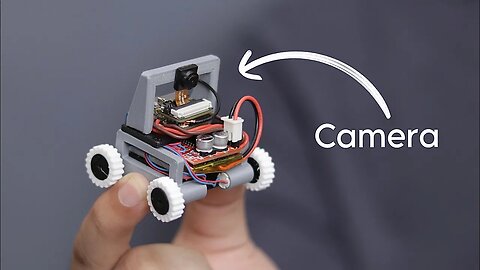
Building a Tiny Car Robot with Camera - SPY CAR?
Try the world's most trusted PCB design software, Altium Designer with 365, for free and 25% off your purchase: - https://www.altium.com/yt/TheWrench
Check out Altium 365: https://www.altium.com/altium-365
Check out OctoPart: https://octopart.com/
In this video i will show you how i made a tiny robot car with Seed Studio Xiao ESP32S3 along with a FPV Camera, you can control this car through you phone and see the live video as well.
Links:
Motors: https://s.click.aliexpress.com/e/_Ddlg5hd
XIAO ESP32S3 : https://bit.ly/3sNJjyY
(India) : https://bit.ly/3ZcuFgJ
Battery: https://s.click.aliexpress.com/e/_DD7rvrt
Motor Driver: https://s.click.aliexpress.com/e/_DB85g0f
Bambu Lab Carbon X1: http://shrsl.com/2a1rt-2yn7-1cwx9
CODES, STL Files and Diagram: Coming Very Soon
Subscribe to my Channel- https://www.youtube.com/@TheWrench
Follow me on Social Media
Facebook- https://www.facebook.com/people/The-Wrench/100063668262344/
Instagram- https://instagram.com/thewrench_
1.57K
views
1
comment

Making a Gaming Console out of Arduino #diyprojects #diy #arduino #thewrench #shorts
1.96K
views
3
comments

This Mini PC can change your Bulky Desktop PC | Khadas Mind
ooking for a flexible workspace that keeps up with your pace? We've designed the perfect solution for digital nomads who won't settle for less. After countless prototypes and endless dedication, we're ready to introduce our innovation.
Say hello to the Khadas Mind, the perfect blend of high-speed computing and exceptional portability.
Link: https://www.kickstarter.com/projects/khadasmind/khadas-mind-your-next-gen-portable-workstation/
The Khadas Mind — At a mere 0.99 lbs (450g) and less than a quarter the size of an A4 sheet, the Mind is built to boost your creativity on the move. Thanks to its 5.55 Wh standby battery, you can enjoy up to 5 hours of uninterrupted operation - ensuring that you're ready whenever inspiration strikes.
Follow me on Social Media
Facebook- https://www.facebook.com/people/The-Wrench/100063668262344/
Instagram- https://instagram.com/thewrench_
Subscribe for Awesome Content
1.58K
views
1
comment
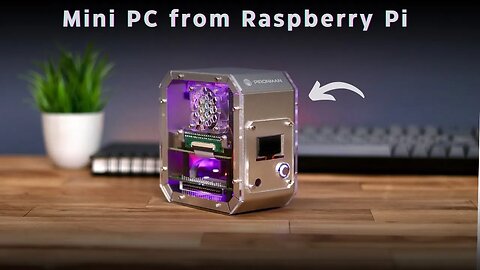
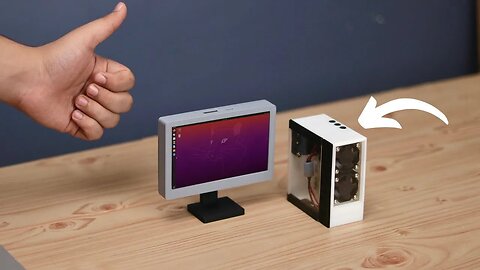
Convert Your Raspberry Pi into a Mini PC
Hi Guys, in this video i will show you Sounder's Pironman Raspberry Pi $ Case.
Official website link:https://www.sunfounder.com/products/raspberry-pi-4-case
US Amazon:https://www.amazon.com/dp/B0BL7QLX8W/
DE Amazon:https://www.amazon.de/dp/B0BL7QLX8W/
UK Amazon:https://www.amazon.co.uk/dp/B0BL7QLX8W/
if you have any question about it, you can reach me on Instagram.
Instagram: https://instagram.com/thewrench_
Share, Support, Subscribe.!!!!!!!
Subscribe: https://www.youtube.com/channel/UC92-zm0B8vLq-mtJtSHnrJQ
1.44K
views
