

Bike Rear V-Brake Adjustment. Bicycle brake cable replacement. ASMR
Hello fellow cyclists 😉!
In this video lesson we will show you how to change your brake cables and adjust bike rear v-brake.
This video was created to teach you how to repair and maintain bikes.
Video format "DIY" with "ASMR" on bicycle.
It will be interesting for cyclists!
We will show you how to repair a bicycle in a workshop.
*Main episodes of the video tutorial:.
00:00 Bicycle brake lever not holding the brake
00:13 Brake cable worn out
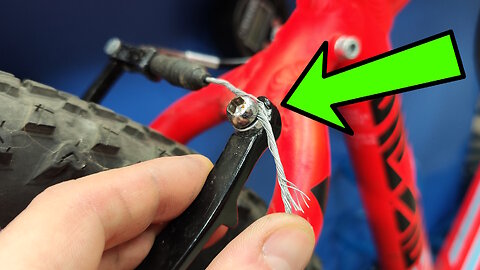
00:25 Disconnecting old bicycle brake cable
02:03 New bicycle brake cable
02:45 Replacing bicycle brake cable
05:13 Fixing the bike V-brake cable
05:51 Bike rear v-brake adjustment
09:02 Cutting off excess brake cable
09:42 Good job!
10:01 Bike rear v-brake test
23
views
Bike shifter replacement. Bicycle front derailleur adjustment. | DIY
In this video tutorial, I will show you how to replace left bike shifter.
You will see how to adjust the front derailleur.
For example, we will use a GT bicycle.
This video tutorial "diy" in style "asmr" for people who love cycling.
Episodes in this video tutorial:
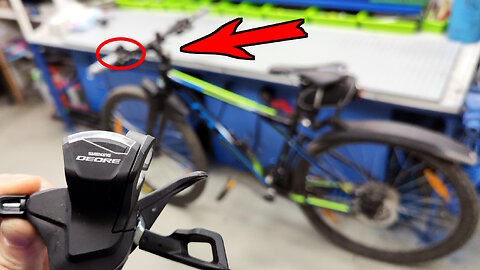
00:00 Bike shifter shimano deore sl-m6000 replacement
00:11 Testing old altus bicycle shifter with fd-m6000 front derailleur
00:26 How to quickly remove grips from bicycle handlebars
01:06 How to remove the old left shifter
02:45 How to install the new left shifter
03:23 How to quickly install handlebar grips on a bike
04:24 Fixing a bicycle derailleur cable
07:45 Bicycle front derailleur adjustment
11:03 Checking the front derailleur
#derailleur #bikeservice #bicycle
14
views
Brakes hit the rim of a bicycle wheel. Bicycle Wheel Alignment
Hello my fellow cyclists! 🙃
In this video, brakes hit the rim of a bicycle wheel.
As the brakes make their initial contact with the rim of a bicycle wheel, a journey of meticulous adjustments and expert techniques unfolds.
Our exploration continues with a detailed scrutiny of rim offset, ensuring that the wheel is positioned to perfection. The heart of the video lies in the masterful execution of bicycle wheel alignment, a step-by-step process that embodies precision and skill.
Concluding with meticulous testing, we ensure that the aligned wheel performs flawlessly, guaranteeing an unparalleled cycling experience.
00:00 Brakes hitting the rim of a bicycle wheel
00:30 Removing the rear of a bicycle tire
01:02 Wheel hub adjustment
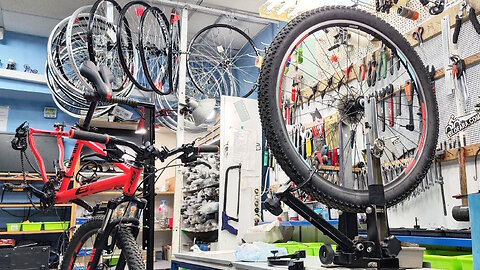
02:35 Bicycle wheel centering machine
03:06 Check rim offset
04:12 Bicycle wheel alignment
04:47 Checking the tension of the spokes of a bicycle wheel
05:42 How to true a bicycle wheel
09:48 Mounting a rear wheel on a bicycle
10:47 Testing a bicycle wheel
31
views
How to install a new chain on a bicycle. Shortening a bicycle chain
Hello cyclists!
In this video tutorial we will show you how to install a new chain on a bicycle.
You will learn how this process is done in the shop. We will show you how to determine the required length of a bicycle chain and how to shorten it with a special tool.
Watch this video tutorial to the end. Good luck with your repairs!
This video tutorial was created to teach you how to repair and maintain bicycles.
It will be interesting for cyclists!
Main episodes of the video tutorial:
00:00 Unpacking the KMC X8 chain
00:24 How to install a new chain on a bike
01:42 How to connect chain quick links bicycle
02:56 How to shorten a bicycle chain
04:44 How to install a quick link on a bicycle chain
05:05 Good work
05:15 Testing a bicycle chain
10
views

MTB V-Brakes make your bike slower. How to fix a cheap bike wheel. ASMR
*Hello Bike Lovers!
In this video tutorial we will show you how to fix a cheap bicycle wheel and bicycle rear v-brake adjustment.
This video was created to teach you how to repair and maintain bikes.
Video format "DIY" with "ASMR" on the bike.
It will be interesting for cyclists!
*Main episodes of the video tutorial:*.
00:00 MTB v-brakes make your bike slower
00:42 Removing the rear V-brakes on a bicycle
01:09 How to remove the rear wheel of a bicycle
02:08 Removing a bicycle tire
02:55 Cleaning a bike wheel with a damp cloth
03:36 Checking the true of a bicycle rim
04:35 Mounting a bike wheel on a treadmill
04:47 Repairing an inexpensive bicycle wheel
08:28 Checking the spoke tension on a bicycle wheel
14:14 Slack spokes on a bicycle wheel
15:39 How to true and center a bicycle wheel
16:20 How to mount a bicycle tire
20:20 Mounting a rear wheel on a bicycle
21:28 Mounting a rear wheel on a bike
21:57 Adjusting the rear V-brakes on a bike
24:02 Testing. Good job!
39
views
1
comment
How to fix bike chain skipping. Shimano Altus rear derailleur adjustment.
*Hello Cyclists!
In this video lesson we will show you how to fix bicycle chain skipping and adjust bicycle rear derailleur.
This video tutorial was created to teach you how to repair and maintain bicycles.
Video format "DIY" with "ASMR" about bicycle.
It will be interesting for cyclists!
*Main episodes of the video tutorial:*.
00:00 Chain slipping
00:22 Bike chain skipping
00:51 Remove Shimano Altus rear derailleur
01:16 How to straighten a bent rear derailleur hanger
02:55 Installing a Shimano altus rear derailleur
04:14 Adjusting the Shimano Altus rear derailleur
05:13 How to adjust a bicycle rear derailleur
05:57 Testing how a rear derailleur works
06:25 Finished! Good job!
#bike #bicycle #fixbike
19
views

How to change a chain on a bike in a hurry
Hello Friends! Hello everyone! In this video I will show you how quickly you can change a chain on a bicycle!
We measured the chain and found that it has stretched 0.75%. Need to make a replacement!
Now let's see if we have a chain lock. But the lock of the chain was missing.
We take another tool. it's a chain puller. find any pin. in this case, any, because here, in this chain model, there is no release pin.
Pins are all the same. Take any pin and squeeze it.
Gently push the pin out, but be careful not to push the pin out of the link. This chain will be used in the future, on the same bike.
As you can see, the pin is on the outside. The important thing is that it does not fall out.
Carefully disconnect the chain and pull it out of the bike's transmission.
Our experimental fatbike. This is an MTB bike with big wheels, the essence does not change.
Put the old chain aside, we will use it in the future.
We take the chain above the class, the kmc brand is the X8 series. it has great packaging.
There is a padlock included which allows you to remove and put on the chain without squeezing the chain.
This lock is a "quick link" to get a new chain. In some cases, the chain was washed of preservative, of factory oil, but we will not do that.
We have winter now. Let the chain will remain viscous in the factory lubrication.
It doesn't wash so quickly with snow and water with mud, which we just need.
But usually the chain is washed because the preservative is very sticky and dirt sticks very quickly.
Thread the chain through the switch speeds. throw on the connecting rod system.
do it like me and all of you it will be easy and fast!
when we put on the chain, we look at its length to shorten it. But we're lucky, chain length we match.
Usually you need to cut two to six links from the new chain.
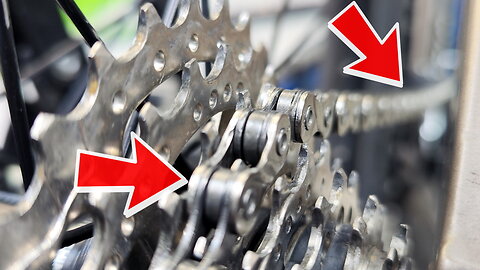
Dressing the chain lock is very simple and fast, we look, we check on a small asterisk, and on a large asterisk.
If the switch is not broken, so all is well! if it wrinkled, like this, it would be very bad!
We also check the lamoe on a small asterisk. As you can see, the chain is not sagging. With the chain length, we guessed it! )
Everything, the chain was replaced, everything is very quick and easy!
People who love cycling will be fascinated by this video.
00:00 How to replace a bicycle chain.
00:30 How to use a chain tool to break a chain.
01:23 remove the bicycle chain from the system.
01:51 Opening a new chain from the package.
02:35 Installing a new bicycle chain.
24
views

Bicycle repair. Left bike shifter replacement. ASMR
Hello, my dear cyclists!
In this video, I will show you how to properly replace the left shifter on your bicycle.
00:00 The left shifter does not work
00:32 Disassembly of the bicycle's handlebar grip, brake lever, and left shifter
01:33 Removing the bicycle's bike shift cable
02:22 Demonstration of damages to the left shifter.
02:38 Get a new good shifter
03:30 Installing a new bike shifter sl-m310 on a bike
04:44 The handlebar grip is rotating, let's fix that
06:38 Fix the brake lever and shifter in the same position as on the right side of the bicycle
07:12 The cable is jammed in the front derailleur, and we trim off the excess.
08:12 Nice work!
9
views

My bike is crunching. The bicycle chain is biting. Replacing bicycle cranks
https://youtu.be/xiD3BBKQ3K4
Good day, fellow cyclist. When there's a need to replace the bike cranks, it's not always clear how to do it correctly and in what sequence. In this step-by-step video, I'll show you how to remove the old cranks and install new ones on a square taper system. This video will be helpful for cyclists and those interested in self-repairing their bicycles. Enjoy watching
00:00 Bicycle crankset has play.
00:46 Dismantling the securing bolts of the bicycle crankset.
01:19 How to remove bicycle pedals.
00:40 How to remove the right crank of the bicycle.
03:40 Dismantling the left crank of the bicycle.
05:24 How to install new bicycle cranks.
07:07 How to correctly install pedals on the bicycle.
#crankset #roadbike #bicyclemechanic
🆗🎥🚲 *Write in the comments, what you would like me to do in the new video.*
❓❔❓ *Ask your questions*
👇👇👇
11
views
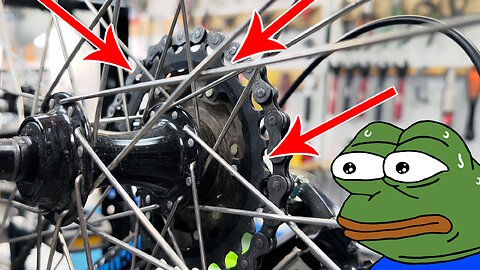
Ball bearing bicycle wheel hub service. Rebuilding and cleaning of bicycle hubs.
Hello to those who ride a bike!
In this video tutorial, I will show you "How to service ball bearing bike wheels hubs".
We will change the oil in a conventional rear hub MTB bike, or mountain bike.
Watch this video lesson to the end you can service yourself your rear hub on your bike.
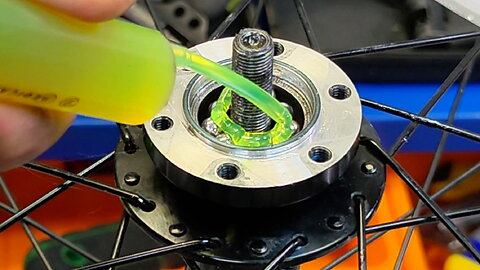
You will see how the bushing is serviced in the workshop. Bicycle hubs: Rebuilding and cleaning.
Make your bike fast and ride fast by doing wheel hub maintenance at home. In this video I will show you how to easily service Shimano ball bearing hubs at home.
IF you do this service on your bike, it will go fast and your ride will be FAST.
If you're passionate about cycling, this video is for you.
Speech-free video with technical audio, transcending language barriers. An international, do-it-yourself (DIY) video format.
00:00 Rebuilding and cleaning the hubs
00:10 Cassette removal
01:12 Disassembling the hub
04:27 Maintaining ball bearing hubs
06:54 Adjusting the cup and cone bearings on your bike
08:05 Fitting the rotor to the wheel
08:25 Cassette installation
9
views
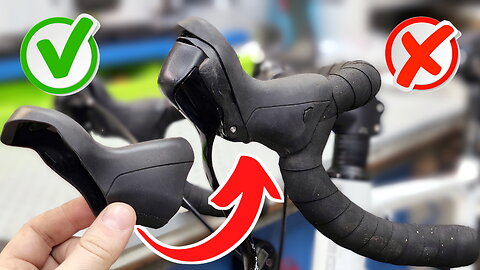
Microshift shifter cover replacement on road bike. How to replace brake lever covers.
Hi there! Dear cyclists! In this video tutorial, we'll take a look at
How to replace the brake lever covers.
Remove the winding from the handlebar. First of all, you need to unwind the handlebar cable very carefully so as not to damage it. You may want to reinstall it, but of course it is better to install a new winding. It will be more pleasant to the touch and generally better. Remove the shifter from the bottom of the road bike. Usually the outer casing is torn as a result of a bike fall. I wish it could be replaced quickly and easily, but unfortunately it will take some hard work to make it all work.
Absolutely everything has to be removed, disconnected and then reconfigured. Remove the hood from the street shifter. Difficult, but possible.
Sometimes it is recommended to warm up the rubber with a hair dryer or hot water, but there is a chance of damaging the shifter itself.
We will not do this, but we will try to take off and put on, as usual way, without the use of elevated temperature. Before replacing the shifter, you need to make sure that the outer shell is the same.
Put on a new cover for the shifting wheel. It is better to remove the clamping ring beforehand, it will interfere with the installation of a new shell on the microshifter. Sometimes it seems impossible, but if you try a little, it will work! A little bit, a millimeter by millimeter we get to finish.
Looks like it's done! Subscribe to the channel, put likes. And we continue to put a cover on the shifter of our gravel bike.
The hardest one is behind. Now we need to prepare the fixing clamp and put the shifter on the bike ram (road bike handlebar). Positioning on the drop bars. Brake lever mounting and positioning on the handlebars.
When the Revoshifters are lined up opposite each other, you can go to the next step, which is to wind the winding on the handlebars of a bicycle. So we replaced the outer skin on a road bike revoshifter.
Ask your questions in the comments and like!
Cycling enthusiasts will be captivated by this video.
Verbal-free video showcasing mechanical sounds. Understandable across languages; an international DIY video.
00:00 How to replace brake lever covers.
00:20 Remove the winding from the handlebars.
00:59 How to remove the shifter from a road bike.
02:10 Removing the shifter cover from a road bike.
03:16 Putting a new shifter cover on a road bike.
06:18 Positioning on the drop bars.
06:58 Brake lever mounting and positioning on drop bars.
8
views

How to adjust a rear derailleur. Adjusting a rear derailleur
Hello everyone!
How to fix a bike derailleur hange.
Happens often, what we do is drop the bike, lean it against the curb and scratch the rear derailleur, bend the bike hook and because of this, our switch can break. It flies between the spokes and the big star cassettes. The chain jams and the shifter breaks. The bike shifts poorly. Wrap the film so as not to dirty the sprockets. How to untangle a bicycle chain. The first thing we need to do is make sure the wheel is properly seated in the dropouts. I noticed that the eccentric was installed incorrectly. Fix it. The clamp must be in the side of the brake disk. Center the wheel and tighten the eccentric by hand as much as possible. The wheel should not wobble. Check that the hook cover is tightened. How to remove the rear derailleur for MTB. Oops) This often happens. Chik! Our rear derailleur adapter is bent! It is called a bicycle hook. First try to center it with a hammer. From the front, we centered it. Next, use a special hook centering tool. This will show us how bent the hook is. Fixing a bent hanger. It happens that the bend is very strong and the hanger bursts. When it bursts, it needs to be replaced. In this case, we are lucky that the hanger gives way and does not burst. I have to tinker.
There is still a bit left. Boring for a long time, but this is a detailed instruction on how to center the hook of the rear derailleur of the bike. To order. Install rear derailleur for mtb Screwing the switch is also difficult. not always turns out quickly and do it. The hexagon keeps jumping. Be sure to check the pulleys. They have to be tight. Let's start with the rear derailleur. Adjust a rear derailleur. We have adjusting screws to the switch did not go further than the cassette on the spokes of the wheel limit on the large star and on the small star of the cassette Check everything step by step. Limit the small star so that the chain does not fly to the frame. Now adjust the cable tension. You can do it like oursiffer switch, which is located on the handlebars of a bicycle, and you can do it on the rear derailleur, and here and there we have a lamb for cable tension. Now change the switch tension. is the location between the big star and the top roller of the switch. Because the rear derailleur is a budget Shimano Tourney, the springs of this switch are weak. Little life hacks how to help switch spring to work properly when casing help. fasten the cable cover to the frame and it allows the spring to work more efficiently. Do such a life hack with a housing and your switch will work much better! Gears jump perfectly. Check. Rear derailleur backlash is bad! We can not fix this, but we try to set it up as is. The next time I turn this fatbike on, it will be different. A few gears jumping back and forth need attention? The cassette should also be of good quality. If a cheap San Race brand cassette is installed, it will work poorly. It is better to choose Shimano or Sram. It doesn't get any better!
Cycling enthusiasts will find this video fascinating.
00:00 How to fix a bike derailleur hanger.
00:10 Bike shifts badly.
00:20 How to untangle a bike chain.
01:07 The quick release is not installed correctly, fix it.
01:37 It is important to tighten the quick release tightly so that there is no play in the wheel.
01:53 How to remove rear derrailleur for mtb bike.
02:03 Oops)).
02:24 The rear derailleur holder is crooked.
02:40 Aligning derailleur hangers.
03:04 Fix a bent derailleur hanger.
03:20 Use a tool to see how bent the rear derailleur holder is.
05:00 Check the straightness of the bike derailleur hook.
05:43 Install rear derailleur for mtb bike.
06:50 Tighten the rollers of the rear derailleur.
07:03 Adjusting a rear derailleur.
07:55 Set the derailleur roller in line with the small star of the cassette with the h screw.
08:11 Adjust the cable tension of the rear bike derailleur.
08:38 Adjusting the position of the derailleur rollers relative to the large sprockets of the cassette bicycle.
09:00 Fixing the shifting housing with a cable tie so that it springs the rear derailleur of the bicycle.
09:23 Small adjustments and now everything works.
112
views
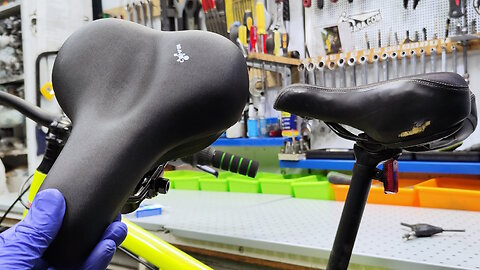
Replacing the torn old saddle on a bicycle
Additionally perform the necessary operations.
Bicycle Saddle Replacement If our old saddle is already worn out and needs to be replaced, we'll see how to do it right, as well as additional steps that won't interfere with the operation of the bike. we take out the seat post, we need this to make it easier to unroll the old saddle and at the same time, clean the clip under bed pins and holes in the frame. unscrew the seat clamp. we clean it thoroughly, unrolling it in advance. the new saddle has a different clamping standard. it doesn't suit us, we just unscrew and remove. our bike has a newer one seat post where the clamp is already present. the new saddle has a different clamping standard. it does not fit us, we just twist and remove. our bike has a newer one seatpost where the clamp is already present. unscrew the saddle clamp completely to get the saddle out of the clamp. the rails in both saddles are the same. the saddle clamp must be perfectly clean. clean all the dirt. disassemble and clean. toothbrush, wet wipes, isopropyl alcohol, ear sticks. we use everything. When our parts are clean, we start the reverse assembly. The main thing is not to confuse! string the nuts, but do not tighten to stop until we insert the saddle in the clamp. put the seat in the middle of the rails. Also clean the bicycle seat post clamp. we collect, but do not forget that we you need to lubricate it so that everything is fine. chik-chik Here also need to be cleaned. back and forth, back and forth and our frame is clean. pin is cleaned. lubricated the clamp. and seat, also lubricated. to lubricate the seat post, before assembling the frame, we use graphite grease. it is black and suitable for this purpose. It is black and well suited for this site. greased the pin and greased the frame. The main thing is not to lubricate yourself, but then we will go like a black master) clamp the clamp well and wipe off the remaining grease. all seats have been replaced. Everything is very easy!
00:00 The old bicycle saddle tore.
00:15 Removing the seatpost along with the saddle.
00:18 If it's difficult to open the quick-release lever, we'll use a lever to help.
00:40 Removing the seatpost clamp.
01:12 Removing the seat clamp, if present.
01:46 Taking off the old bike saddle.
02:20 The seatpost is very dirty.
02:30 Disassembling and cleaning the seatpost attachment.
03:00 Assembling the seatpost attachment.
03:36 Installing the new bike saddle.
04:27 Cleaning and installing the seatpost clamp.
05:10 Clearing the seatpost hole on the frame-.
05:45 Using graphite lubricant to prevent squeaking and add water resistance.
06:13 Mounting the seatpost with the saddle onto the bicycle.
06:33 Wiping off any excess lubricant.
11
views
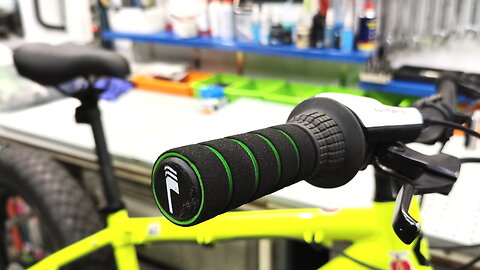
Bicycle handlebar grips. Secrets, how to fix.
Hello, how often does this happen? When foam pads on your bike, or rubber grips steering wheel, they scroll and the hand is unstable. There is a possibility fall that the flu will break. To avoid this, I will show you one little trick that can be applied to any flu using regular electrical tape. Take and wind the electrical tape on steering wheel several layers. To begin with, we applied the first layer and check how our grips, the foam handle rests on it. Well by sensations are not enough, you still need to wind the second layer. Cut and see. Oh, already better, the handle is twisted, pulled difficult. Here is one life hack on how to pull the rower, if it is hard to climb, or poorly removed. To do this, you need a gun with a compressor. Blow under the edge of the handle. And she just jumps on the handlebar of the bike itself. Feel like we need another layer electrical tape. Quickly wind the third layer. And this will be the final step. It's so easy to not put on the flu anymore. But with a compressor we fly very quickly and easily. Class! Everything is holding up great now. The grip has become a little thicker and keeps super!
It often happens that the handlebars of a bicycle scroll. We'll show you how to fix it. Also, we will show how you can remove the grips with a compressor if the handlebars are stuck.
Hello, how often does this happen? when
foam rowing pads on your bike, or rubber grips
steering wheel, they scroll and the hand is unstable.
there is a possibility fall that the flu will break.
to avoid this, I will show you one little trick that
can be applied to any flu using regular electrical tape.
00:00 Bicycle grips are rotating.
00:15 Removing bicycle grips.
00:30 Wrapping tape around the handlebar.
01:18 Trying on the grip.
01:30 Adding more tape.
01:56 Installing the grip.
02:19 A compressor life hack helps put on and remove the grip.
02:42 Adding even more tape.
02:57 Reinstalling the grip.
03:25 Great job.
23
views