

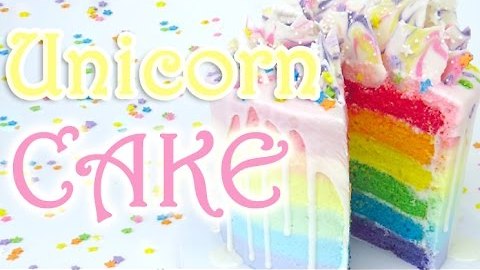
How-To Make A Rainbow Unicorn drip CAKE - Absolute Nails Collab!
Learn how to make a Rainbow inside and out Unicorn CAKE!
TOP 10 CRAZY CAKES - http://bit.ly/1t6LNEA
SUBSCRIBE HERE: http://bit.ly/28JL71L
Check out all the tools and Ingredients you'll need to make this cake here:
http://bit.ly/2d8eRp4
Nicki from Absolute Nails Channel:
https://www.youtube.com/user/configur...
Nicki’s Video:
https://www.youtube.com/watch?v=oEWV2...
Unicorn Chocolate Bark Video:
https://www.youtube.com/watch?v=-Yjxi...
This cake has a rainbow inside and out, glitter, chocolate, stars and mini fondant unicorn horns! To get started you are going to need to make some Unicorn chocolate. Links above for the DIY! I made one batch of my vanilla pound cake and divided it evenly into six bowls. I dyed each bowl of batter each colour of the rainbow and baked them for 15 minutes and 350F.
Once cooled, I stacked them up with vanilla buttercream, crumb coated it and chilled it in the fridge for an hour to set up. I dyed my buttercream each colour of the rainbow and added in 1/2 tsp. of water to soften it. I put my frosting into disposable piping bags and piped a thing line going around my cake working my from the bottom to the top with violet, blue, yellow, green orange and red. Working quickly I smoothed out the top of my cake using an offset spatula. I then smoothed out the side using a straight edge cake smoother.
I made some white chocolate ganache and poured it over the top of my cake letting the excess drip over the edges. I quickly added on some star sprinkles, unicorn chocolate and edible glitter. Slice it up and enjoy the taste of Unicorn cake!
Chocolate Ganache Recipe:
1 cup of Melted White chocolate
1/4 to 1/2 cup of milk or cream
Melt chocolate, heat cream and combine till smooth.
FOLLOW ME:
Instagram- www.instagram.com/theicingartist.laurie
Facebook- https://www.facebook.com/laurietheici...
Twitter- www.twitter.com/theicingartist
Pintrest- www.pintrest.com/theicingartist
Website- www.theicingartist.com
Useful links!
Vanilla pound cake recipe-
http://bit.ly/20Xp20l
Buttercream Icing/frosting recipe-
http://bit.ly/1TSV7Y9
Buttercream icing step by step video-
https://www.youtube.com/watch?v=D8diT...
How to cover a cake in fondant video-
https://www.youtube.com/watch?v=sTmUP...
How to smooth ice a perfect buttercream cake video-
https://www.youtube.com/watch?v=GKPk0...
Vanilla Pound Cake Ingredients:
-box white cake mix
-1cup all-purpose flour
-1 cup granulated sugar
-3/4 tsp salt
-1 1/3 cup water
-1/8 cup vegetable oil
-2 tsp vanilla
-1 cup sour cream
-4 egg whites
Buttercream Icing Ingredients:
-1 cup butter (room temperature)
-1 tbs vanilla
-4 cups of icing sugar
-1/4 cup water
For detailed recipes go to http://www.theicingartist.com
#NoCakeLimits
I love seeing pictures of your cakes and creations! Tag me on social media @theicingartist.laurie or email me at theicingartist@hotmail.com
BIG thank you to my Patreon supporters, who help make this show possible!
Darlene Meecham, Laurie de Vos, Stefanie Woosey, JK Denim (Koali Pops), Nancy Robertson, Alex Kate Jackson, Sandra Rocco
Music:
Nicolai Heidlas Music - Drive
'DRIVE' - Fresh Upbeat Pop Background Music by Nicolai Heidlas Music is licensed under a Creative Commons License.
Nicolai Heidlas Music - Sunny Afternoon
Sunny Afternoon - Upbeat Ukulele Background Music by Nicolai Heidlas Music is licensed under a Creative Commons License.
Nicolai Heidlas Music - Paint It
[142 BPM 'PAINT IT!' - Free Upbeat Pop Background Music by Nicolai Heidlas Music is licensed under a Creative Commons License.
1.49K
views

3D Carved Teapot Cake - How To With The Icing Artist
Learn how to make an authentic teapot cake. I will take you through every step you need to take, in order to re-create this beautiful cake at home. This is a bright spring teapot cake.
SOCIAL MEDIA:
https://www.facebook.com/laurietheici...
Twitter: www.twitter.com/theicingartist
Pintrest: www.pintrest.com/theicingartist
Instagram: www.instagram.com/theicingartist.laurie
Website: www.theicingartist.wix.com/cake
New videos every Tuesday!
Thanks for watching!!!!
79
views
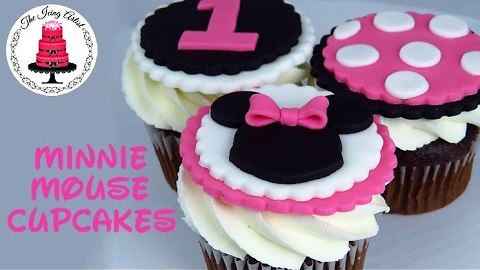
Minnie Mouse Cupcake Toppers - How To With The Icing Artist The Icing Artist
In this weeks tutorial I am going to show you how to create Minnie Mouse cupcake toppers. I am going to show you how to easily create three different beautiful designs! These toppers are made entirely out of fondant, and are 100% edible.
For my Recipes and more:
www.theicingartist.com
My Mickey Mouse Tutorial:
https://youtu.be/ogyexvCTYUg
Mickey Mouse Cutter:
http://www.ebay.ca/itm/3D-Mickey-Mous...
SOCIAL MEDIA:
https://www.facebook.com/laurietheici...
Twitter: www.twitter.com/theicingartist
Pintrest: www.pintrest.com/theicingartist
Instagram: www.instagram.com/theicingartist.laurie
Website: www.theicingartist.com
New videos every Tuesday!
Thanks for watching!!!!
61
views
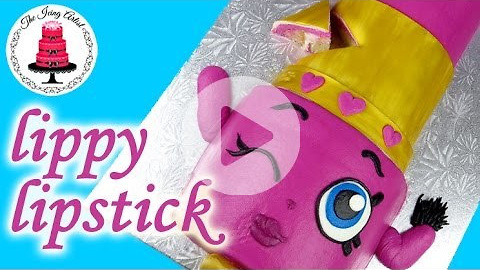
Easy Lippy Lips Lipstick Shopkins Character Cake - How To With The Icing Artist
This week I will be showing you how to make a Lippy Lipstick Shopkins Cake entirely out of cake, buttercream, & fondant! In this step by step tutorial, you will learn everything you need to know to make your favourite Shopkin at home. I will show you how to stack the cake, carve it, ice it in buttercream frosting, cover it in fondant, paint it in gold colour dust and how to add all of the great details that make Lippy Lipstick!
Check out all the tools and Ingredients you'll need to make this cake here:
http://bit.ly/2bFQayV
Buttercream Recipe:
https://www.youtube.com/watch?v=D8diT...
Cheeky Chocolate Cake:
https://www.youtube.com/watch?v=hGpIJ...
Cupcake Queen Cake:
https://www.youtube.com/watch?v=UMJJI...
SUBSCRIBE HERE: www.youtube.com/theicingartist
Connect with me on:
Facebook: https://www.facebook.com/laurietheici...
Twitter: www.twitter.com/theicingartist
Pintrest: www.pintrest.com/theicingartist
Instagram: www.instagram.com/theicingartist.laurie
Website: www.theicingartist.com
Thanks for watching!!!!
I'd love to see pictures of your cakes and creations! You can send picture here theicingartist@hotmail.com
I'll post them on my website viewer's cakes page http://www.theicingartist.com/#!your-...
201
views

How-To Make A Rainbow FUNFETTI Sprinkle CAKE
It's Sprinkle time, we're making a confetti sprinkle COVERED cake!
TOP 10 CRAZY CAKES - http://bit.ly/1t6LNEA
SUBSCRIBE HERE: http://bit.ly/28JL71L
Check out all the tools and Ingredients you'll need to make this cake here:
How-To Make A Rainbow FUNFETTI Sprinkle CAKE
http://bit.ly/2c8q2jF
This week I'm coming at you with another how-to video that's not only super cute, but unbelievably easy!
To make this cake rainbow-rific inside and out, I mixed confetti sprinkles into my vanilla cake recipe batter. I baked my cake in a 3" tall 6" round cake pan. Leveled off my cake and divided it into four equal parts. I then filled my cake layers with buttercream icing stacking it up nice and tall.
Once my cake was all stacked up, I applied my icing frosting to the cake using a disposable piping bag and a 789 piping tip. I smoothed out my icing using an offset spatula and a piece of paper towel.
Now that my cake is perfectly iced, it's time to apply the gel paste. I watered down my gel paste so it would smooth onto the cake easier and applied it to my cake using a large brush.
It's sprinkle time, it's sprinkle time!! I covered my cake with sprinkles but using my hand to gradually add the sprinkles to the sides of the cake, then the top of the cake. I whipped off any extra sprinkles and cleaned up the bottom edge of my cake.
I then added a pretty boarder to my cake using a light purple ribbon. I make a cute little bow with a twist tie wrapped around it to stick into the cake.
That's it! Slice that bad boy up and enjoy!
FOLLOW ME:
Instagram- www.instagram.com/theicingartist.laurie
Facebook- https://www.facebook.com/laurietheici...
Twitter- www.twitter.com/theicingartist
Pintrest- www.pintrest.com/theicingartist
Website- www.theicingartist.com
Useful links!
Vanilla pound cake recipe-
http://bit.ly/20Xp20l
Buttercream Icing/frosting recipe-
http://bit.ly/1TSV7Y9
Buttercream icing step by step video-
https://www.youtube.com/watch?v=D8diT...
How to cover a cake in fondant video-
https://www.youtube.com/watch?v=sTmUP...
How to smooth ice a perfect buttercream cake video-
https://www.youtube.com/watch?v=GKPk0...
Vanilla Pound Cake Ingredients:
-box white cake mix
-1cup all-purpose flour
-1 cup granulated sugar
-3/4 tsp salt
-1 1/3 cup water
-1/8 cup vegetable oil
-2 tsp vanilla
-1 cup sour cream
-4 egg whites
Buttercream Icing Ingredients:
-1 cup butter (room temperature)
-1 tbs vanilla
-4 cups of icing sugar
-1/4 cup water
For detailed recipes go to http://www.theicingartist.com
#NoCakeLimits
I love seeing pictures of your cakes and creations! Tag me on social media @theicingartist.laurie or email me at theicingartist@hotmail.com
BIG thank you to my Patreon supporters, who help make this show possible!
Darlene Meecham, Laurie de Vos, Stefanie Woosey, JK Denim (Koali Pops), Nancy Robertson, Alex Kate Jackson, Sandra Rocco
Music:
Nicolai Heidlas Music - Drive
'DRIVE' - Fresh Upbeat Pop Background Music by Nicolai Heidlas Music is licensed under a Creative Commons License.
Nicolai Heidlas Music - Sunny Afternoon
Sunny Afternoon - Upbeat Ukulele Background Music by Nicolai Heidlas Music is licensed under a Creative Commons License.
1.77K
views
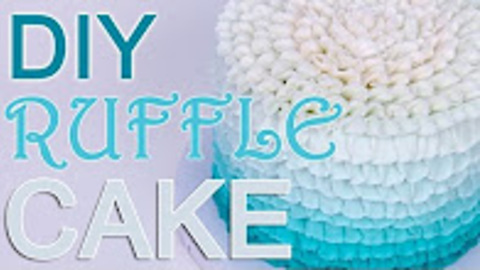
How-To Buttercream Ombre Ruffle CAKE
Learn how-to make a quick and easy Tiffany Blue ruffle cake!
TOP 10 CRAZY CAKES - http://bit.ly/1t6LNEA
SUBSCRIBE HERE: http://bit.ly/28JL71L
Check out all the tools and Ingredients you'll need to make this cake here:
http://bit.ly/2bUdGqj
Baking With Best's Channel
https://www.youtube.com/channel/UCRLK...
I am in LOVE with the petal ruffle technique! Not only does it look gorgeous, but since it's covered in buttercream icing it's also delicious! This is the ultimate combination of cake trends!
Here are my step by step instructions for making this beautiful cake.
I started off with two 6" round vanilla cakes. I leveled off my cakes and divided them in two. Stacked up all the layers of the cake filling them with buttercream icing. I then crumb coated them and smoothed out my frosting with my offset spatula. I paper toweled the cake until it was perfectly smooth.
I adore the classic Tiffany blue colour from the Tiffany jewelry box. However it is every cake decorators worst nightmare. The colour is the perfect balance of blue and green making a beautiful teal. It can be hard to balance both colours. I like to start off with a light sky blue and add touch of electric green. then adjust accordingly. I add a little more blue, then a little more green bit by bit holding the icing up to the box each time until I get the perfect shade.
Using a number 104 piping tip and a disposable piping bag I placed the large side of the tip to the cake facing down. Applying pressure to the bag I moved my piping bag side to side ruffling along the bottom of the cake. Since this is an ombre cake we need to lighten the icing after each row. I took my tiffany blue icing and added some white icing to it. I mixed it up and repeated the same steps I took with the first layer. I did the same thing going up the sides of the cake lightening the icing each time.
Once I reached the top I turned my bag so it was facing outward and I ruffled moving into the center of the cake.
This tutorial was so simple to do even with the beautiful piping decorations! Make sure to leave a comment if you have any other piping ideas you would like me to give a try!
FOLLOW ME:
Instagram- www.instagram.com/theicingartist.laurie
Facebook- https://www.facebook.com/laurietheici...
Twitter- www.twitter.com/theicingartist
Pintrest- www.pintrest.com/theicingartist
Website- www.theicingartist.com
Useful links!
Vanilla pound cake recipe-
http://bit.ly/20Xp20l
Buttercream Icing/frosting recipe-
http://bit.ly/1TSV7Y9
Buttercream icing step by step video-
https://www.youtube.com/watch?v=D8diT...
How to cover a cake in fondant video-
https://www.youtube.com/watch?v=sTmUP...
How to smooth ice a perfect buttercream cake video-
https://www.youtube.com/watch?v=GKPk0...
Vanilla Pound Cake Ingredients:
-box white cake mix
-1cup all-purpose flour
-1 cup granulated sugar
-3/4 tsp salt
-1 1/3 cup water
-1/8 cup vegetable oil
-2 tsp vanilla
-1 cup sour cream
-4 egg whites
Buttercream Icing Ingredients:
-1 cup butter (room temperature)
-1 tbs vanilla
-4 cups of icing sugar
-1/4 cup water
For detailed recipes go to http://www.theicingartist.com
#NoCakeLimits
I love seeing pictures of your cakes and creations! Tag me on social media @theicingartist.laurie or email me at theicingartist@hotmail.com
BIG thank you to my Patreon supporters, who help make this show possible!
Darlene Meecham, Laurie de Vos, Stefanie Woosey, JK Denim (Koali Pops), Nancy Robertson, Alex Kate Jackson, Sandra Rocco
Nicolai Heidlas Music - Sunny Afternoon
Sunny Afternoon - Upbeat Ukulele Background Music by Nicolai Heidlas Music is licensed under a Creative Commons License.
140
views

How to make a cow cake with an inside cow pattern!
This week I will be showing you how to make a cow cake both inside and out!
TOP 10 CRAZY CAKES - http://bit.ly/1t6LNEA
SUBSCRIBE HERE: http://bit.ly/28JL71L
Check out all the tools and Ingredients you'll need to make this cake here:
http://bit.ly/2bzlO42
Now you could just bake an ordinary vanilla cake and decorate it to look like a cow... but I am going to show you how to bake a cake with a cow pattern inside!
To make this very special inside surprise cow pattern you are going to need one batch of my thick vanilla cake recipe. Using two cups of the cake batter, add in 1/4 of cocoa powder and some back food colouring. Place your cake batting into piping bags and let set up in the fridge over night.
For the cake I am using an 8" round sphere cake pan. I have greased it and lined it with parchment paper so my cake will easily pop out of my pan once baked. To make the cow pattern you want to layer up your black and white cake staring in the middle and working our way to the outside. You want to make rings or circles with the cake batter. The more layers you do the thicker the black spots will be. Let you cake come to room temp for an hour then pop it in the oven for an hour to an hour and a half at 325F.
Once you can has cooled completely pop it out of the cake pan and level off the top. You ready to decorate! I made one batch of my vanilla buttercream icing and crumb coated the cake, wet it with some water and covered it in white fondant. There are lots of videos on my channel on how to cover a sphere cake with fondant. I smoothed out the fondant and trimmed off the excess fondant.
Now to make this ball look like a cow! I used copper and ivory to make the perfect cow nose colour and shaped my fondant using my gumpaste tools until I got the perfect shape. For his ears I rolled out some thin white fondant and cut out two circles. I rolled out my nose coloured fondant and cut out two smaller circles. Glued them together with water, pinched the one end and stuck them on my cake. For her eyes I used two black ovals and two small white ovals and placed those on my cake. I also added a little cute black tuff of hair for extra cuteness.
Finally it's time for those cow spots! I rolled out some thin black fondant and cut out different sized splotched and glued them onto my sphere using water. I added on his legs, feet, and tail. Of course my cow wouldn't just be laying on a cold hard board so we need some fresh grass for him! Using green buttercream and a grass tip I piped grass all around my cake.
FOLLOW ME:
Instagram- www.instagram.com/theicingartist.laurie
Facebook- https://www.facebook.com/laurietheici...
Twitter- www.twitter.com/theicingartist
Pintrest- www.pintrest.com/theicingartist
Website- www.theicingartist.com
Useful links!
Vegan Recipe for Surprise Inside Cake & Icing:
http://www.theicingartist.com/#!vegan...
If you want to make this cake non-vegan this recipe works great too!
Surprise Inside Cake Recipe:
http://www.theicingartist.com/#!Surpr...
Cutest Pig Cake Covered In Chocolate Mud CAKE Video:
https://www.youtube.com/watch?v=O0waU...
Buttercream Icing/frosting recipe-
http://bit.ly/1TSV7Y9
Buttercream icing step by step video-
https://www.youtube.com/watch?v=D8diT...
How to cover a cake in fondant video-
https://www.youtube.com/watch?v=sTmUP...
How to smooth ice a perfect buttercream cake video-
https://www.youtube.com/watch?v=GKPk0...
Buttercream Icing Ingredients:
-1 cup butter (room temperature)
-1 tbs vanilla
-4 cups of icing sugar
-1/4 cup water
For detailed recipes go to http://www.theicingartist.com
#NoCakeLimits
I love seeing pictures of your cakes and creations! Tag me on social media @theicingartist.laurie or email me at theicingartist@hotmail.com
BIG thank you to my Patreon supporters, who help make this show possible!
Darlene Meecham, Laurie de Vos, Stefanie Woosey, JK Denim (Koali Pops), Nancy Robertson, Alex Kate Jackson, Sandra Rocco
205
views
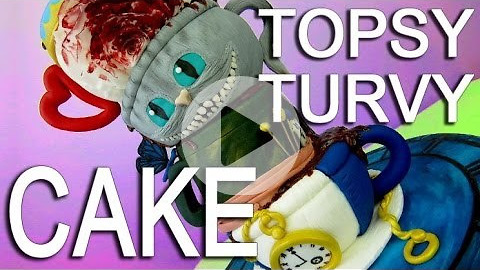
How To Make A Topsy Turvy Tiered Teacup Cake For An Alice In Wonderland Tea Party
Join my CHESHIRE CAT and I, as we make a CRAZY stacked TEACUP CAKE fit for a MAD HATTER'S Tea Party!
TOP 10 CRAZY CAKES - http://bit.ly/1t6LNEA
SUBSCRIBE HERE: http://bit.ly/28JL71L
Check out all the tools and Ingredients you'll need to make this cake here:
http://bit.ly/2bwGedu
Koalipop's AMAZING Alice dress cake:
https://www.youtube.com/watch?v=cKdJC...
I am so excited to share this week's tutorial with you! I have created a crazy topsy turvy stack of over flowing teacups for the crazy world that is "Alice in Wonderland".
When designing this cake, it was very important to me to capture all of my favourite characters. My favourite scene of both the original movie and the new live action movie, is the Mad Hatter's tea party. I decided smash both those ideas together, and came up with this crazy stack of teacups themed as my favourite characters.
The cake is positioned on a cake board covered in fondant as painted with food colouring to recreate the giant clock seen in the new Alice Through The Looking Glass Movie. I then made a 3D teacup saucer out of gumpaste that I placed on top of my cake board.
Each cake I started off the same way. I used a 4" half sphere cake pan to bake my cake. I carved it, so it would stack up all like a tower of teacups. I then crumb coated them with icing and covered the cakes in fondant.
The first teacup was designed as the White Rabbit in a waist coat. I used a toothpick to add fur texture to my fondant. Wrapped royal blue fondant around it to look like a jacket. I also made his forever famous "I'm late, I'm late for a vey important date! No time to say hello, goodbye! I'm late, I'm late, I'm late!" pocket watch. Using circle cookie cutters I cut out all the clock pieces. I drew on all of the little details using a black edible marker.
The second teacup was designed around the original Mad Hatter's hat. I textured my fondant using a piece of wall paper and covered my cake. I then used assorted edible colour dust also known as luster dust to highlight the details of the hat. I draped a dusty rose colours thin strip of fondant around the hat to look like fabric. I used brown colour dust on the edges of a small ripped piece of fondant to make it resemble an old burnt piece of paper.
This stack of teacups needs some support to hold it up. So I added in three dowels and a small cake plate to tier this cake.
The third teacup was designed around the beloved Cheshire Cat. I textured my fondant to look like fur again. Used a balling gumpaste tool to out line his eyes. I moulded all of his facial features out of fondant and glued them onto his face. I made his teacup handle out of his kitty cat tail! Wrapping around his body to form into a handle. Loveee this teacup!
The fourth and final teacup was designed after the Red Queen or as I like to call her "The Queen of Hearts". I made a large ruffled gumpaste rose on the side of the teacup. Then I painted half of that white rose red, with red food colouring! I topped it off with a gold crown and a heart shape handle.
To finish it off I painted my tea to look realistic with brown coloured gel paste. I flowed that off each edge of the teacups to make it look like the tea was overflowing all of the place!
Full official trailer for the new Alice Through The Looking Glass Movie!
https://www.youtube.com/watch?v=6WLBb...
FOLLOW ME:
Instagram- www.instagram.com/theicingartist.laurie
Facebook- https://www.facebook.com/laurietheici...
Twitter- www.twitter.com/theicingartist
Pintrest- www.pintrest.com/theicingartist
Website- www.theicingartist.com
Useful links!
3D Tea pot Cake for a Mad Hatter's Tea Party!
https://www.youtube.com/watch?v=HlGHK...
Vanilla pound cake recipe-
http://bit.ly/20Xp20l
Buttercream Icing/frosting recipe-
http://bit.ly/1TSV7Y9
Buttercream icing step by step video-
https://www.youtube.com/watch?v=D8diT...
How to cover a cake in fondant video-
https://www.youtube.com/watch?v=sTmUP...
Vanilla Pound Cake Ingredients:
-box white cake mix
-1cup all-purpose flour
-1 cup granulated sugar
-3/4 tsp salt
-1 1/3 cup water
-1/8 cup vegetable oil
-2 tsp vanilla
-1 cup sour cream
-4 egg whites
#NoCakeLimits
I love seeing pictures of your cakes and creations! Tag me on social media @theicingartist.laurie or email me at theicingartist@hotmail.com
Music by:
Sunny Afternoon - Upbeat Ukulele Background Music by Nicolai Heidlas Music is licensed under a Creative Commons License.
Nicolai Heidlas Music - Paint It
[142 BPM 'PAINT IT!' - Free Upbeat Pop Background Music by Nicolai Heidlas Music is licensed under a Creative Commons License.
Nicolai Heidlas Music - Morning Sun
Morning Sun - Free Happy Background Music by Nicolai Heidlas Music is licensed under a Creative Commons License.
Nicolai Heidlas Music - Pacific Sun
'PACIFIC SUN' - Free Happy Ukulele Background Music by Nicolai Heidlas Music is licensed under a Creative Commons License.
257
views

Easy Kooky Cookie Shopkins Character CAKE - How To With The Icing Artist
Learn how-to make a super easy Kooky Cookie Shopkins Cake! Check out my other SHOPKIN cakes!
MORE Shopkins Cakes: http://bit.ly/261w4EF
SUBSCRIBE HERE: http://bit.ly/28JL71L
Check out all the tools and Ingredients you'll need to make this cake here:
http://bit.ly/2bwGh8N
In this weeks tutorial, I will show you step by step instructions on how to make an adorable Shopkins cake using only buttercream icing! No fondant zone here!
We will be making Kooky Cookie using an 8" round vanilla cake. using a circle cutter I will cut out the bite marks for her cute little cookie head. I used ivory, brown and yellow food colouring to colour my buttercream for the perfect shade of "cookie". Then I iced my cake using a large round piping tip and a disposable piping bag. I smoothed it out perfectly using the paper towel technique.
For Kooky's arms I piped a large log shape the smoothed it out using the paper towel. For her feet I did the same thing but using hot pink buttercream.
For all of her facial features, I carefully outlined them, filled them in and paper toweled them smooth. I topped of my chocolate chip cookie character with chocolate buttercream frosting as the little chocolate chips. Hope the cookie monster doesn't get his hands on this adorable cookie!
I love going back to the basics with some on the simple cakes in cake decorating. Cakes don't have to be difficult they can be super easy and super fun! Have fun making your kids birthday cakes!
Easy Shopkins Lippy Lips Lipstick Character Cake:
https://www.youtube.com/watch?v=6KPzY...
Easy Cheeky Chocolate Shopkins Character Cake:
https://www.youtube.com/watch?v=hGpIJ...
Easy Shopkins Cupcake Queen Cupcake Cake:
https://www.youtube.com/watch?v=UMJJI...
Princess Barbie Shopkins Dress Cake:
https://www.youtube.com/watch?v=VtAk-...
FOLLOW ME:
Instagram- www.instagram.com/theicingartist.laurie
Facebook- https://www.facebook.com/laurietheici...
Twitter- www.twitter.com/theicingartist
Pintrest- www.pintrest.com/theicingartist
Website- www.theicingartist.com
Useful links!
Vanilla pound cake recipe-
http://bit.ly/20Xp20l
Buttercream Icing/frosting recipe-
http://bit.ly/1TSV7Y9
Buttercream icing step by step video-
https://www.youtube.com/watch?v=D8diT...
How to cover a cake in fondant video-
https://www.youtube.com/watch?v=sTmUP...
How to smooth ice a perfect buttercream cake video-
https://www.youtube.com/watch?v=GKPk0...
Vanilla Pound Cake Ingredients:
-box white cake mix
-1cup all-purpose flour
-1 cup granulated sugar
-3/4 tsp salt
-1 1/3 cup water
-1/8 cup vegetable oil
-2 tsp vanilla
-1 cup sour cream
-4 egg whites
Buttercream Icing Ingredients:
-1 cup butter (room temperature)
-1 tbs vanilla
-4 cups of icing sugar
-1/4 cup water
For detailed recipes go to http://www.theicingartist.com
#NoCakeLimits
I love seeing pictures of your cakes and creations! Tag me on social media @theicingartist.laurie or email me at theicingartist@hotmail.com
BIG thank you to my Patreon supporters, who help make this show possible!
Darlene Meecham, Laurie de Vos, Stefanie Woosey, JK Denim (Koali Pops), Nancy Robertson, Alex Kate Jackson, Sandra Rocco
Music:
Nicolai Heidlas Music - Drive
'DRIVE' - Fresh Upbeat Pop Background Music by Nicolai Heidlas Music is licensed under a Creative Commons License.
Nicolai Heidlas Music - Morning Sun
Morning Sun - Free Happy Background Music by Nicolai Heidlas Music is licensed under a Creative Commons License.
183
views

How-To Make A Melted Peanut Butter & CHOCOLATE BAR Drip Cake
You think this cake looks good on the outside?? Wait till you see what's INSIDE!
TOP 10 CRAZY CAKES - http://bit.ly/1t6LNEA
SUBSCRIBE HERE: http://bit.ly/28JL71L
Check out all the tools and Ingredients you'll need to make this cake here:
http://bit.ly/2bNhjkq
This week I am going to show you how to make a yummy, delicious, scrumptious, mouth watering, peanut butter and chocolate drip cake using my favourite chocolate bars! YUM!
To start off you are going to need two batches of my chocolate cake recipe. I baked two 8" round chocolate cakes, leveled them off and divided them in half. For the filling I took one cup of my vanilla buttercream icing and mixed in 1/4 cup of all natural peanut butter. This is my new favourite thing... peanut butter buttercream on EVERYTHING!!!
Using my offset spatula I spread a thin layer of my peanut butter buttercream over each layer of cake topping it off with chopped up chocolate bars! For the chocolate bars I decided to go with Oh Henry, Reeses Buttercup, Twix, Score and Chocolate Turtles but you can use whatever chocolate bars you like!
I cut all my chocolate bars at different heights and set them aside. I used the left over chocolate to sprinkle over my peanut butter filling.
Once my cake was all stacked up nice and tall, I iced it using two batches of my chocolate buttercream Recipe. Smoothed it out using my offset spatula and a piece of paper towel making sure I had nice square edges. Of course all of my recipes can be found on my website links down below.
I made some milk chocolate ganache and poured it over the top of my cake allowing the excess chocolate to drip over the edges of the cake. I then stuck al my chocolate bars right on top while the chocolate was still warm. For my heavier chocolate bars I inserted a cake pop stick to help hold up the weight.
Slice and ENJOY!
Chocolate Ganache Recipe:
1 cup of Melted chocolate
1/4 to 1/2 cup of milk or cream
Melt chocolate, heat cream and combine till smooth.
FOLLOW ME:
Instagram- www.instagram.com/theicingartist.laurie
Facebook- https://www.facebook.com/laurietheici...
Twitter- www.twitter.com/theicingartist
Pintrest- www.pintrest.com/theicingartist
Website- www.theicingartist.com
Useful links!
Chocolate Cake Recipe -
http://bit.ly/2bEnsjZ
Buttercream Icing/frosting recipe-
http://bit.ly/1TSV7Y9
Chocolate Icing/Frosting Recipe-
http://bit.ly/2bTDXGZ
Buttercream icing step by step video-
https://www.youtube.com/watch?v=D8diT...
How to cover a cake in fondant video-
https://www.youtube.com/watch?v=sTmUP...
How to smooth ice a perfect buttercream cake video-
https://www.youtube.com/watch?v=GKPk0...
Buttercream Icing Ingredients:
-1 cup butter (room temperature)
-1 tbs vanilla
-4 cups of icing sugar
-1/4 cup water
For detailed recipes go to http://www.theicingartist.com
#NoCakeLimits
I love seeing pictures of your cakes and creations! Tag me on social media @theicingartist.laurie or email me at theicingartist@hotmail.com
BIG thank you to my Patreon supporters, who help make this show possible!
Darlene Meecham, Laurie de Vos, Stefanie Woosey, JK Denim (Koali Pops), Nancy Robertson, Alex Kate Jackson, Sandra Rocco
Nicolai Heidlas Music - Drive
'DRIVE' - Fresh Upbeat Pop Background Music by Nicolai Heidlas Music is licensed under a Creative Commons License.
Nicolai Heidlas Music - Sunny Afternoon
Sunny Afternoon - Upbeat Ukulele Background Music by Nicolai Heidlas Music is licensed under a Creative Commons License.
Nicolai Heidlas Music - Let It Be Christmas
'LET IT BE CHRISTMAS' - UPBEAT UKULELE BACKGROUND MUSIC by Nicolai Heidlas Music is licensed under a Creative Commons License.
60
views

How To Make DIY Chocolate UNICORN Bark!
Fun and easy DIY UNICORN Chocolate Bark!
TOP 10 CRAZY CAKES - http://bit.ly/1t6LNEA
SUBSCRIBE HERE: http://bit.ly/28JL71L
Check out all the tools and Ingredients you'll need to make this cake here:
http://bit.ly/2byScmz
What better way to celebrate Unicorn then with chocolate! This video will walk you through all the easy steps to talk to make your very own unicorn bark right at home!
To start off, you are going to need to make some unicorn horns. I am using some white fondant that I have rolled out into a thin log. Cut the log into about 1" long pieces and tapper off the one end. Twist twist twist that fondant until you have a beautiful unicorn horn spiral. Dust with edible glitter and set that aside for later!
For the chocolate I am using compound melting chocolate also known as candy melts. These work perfect for projects like this, since you don't have to temper the chocolate. I decided to use white as my main colour, as well as pink yellow and purple. But you can use whatever colours you like!
I melted all my chocolates and places the coloured chocolate into zip lock bags. I spread my white melted chocolate over a sheet of parchment paper using my angled spatula also known as a pallet knife. Once that was thinly spread, I piped on little squiggly lines using my coloured chocolate. Using a tooth pick I dragged that through my chocolate to create a beautiful marbled look.
While the chocolate is still wet I sprinkled on my stars, white balls, and unicorn horns. Let your chocolate firm up for about 10 minutes and top with edible glitter! You're going to want to pop that in the fridge for about 10 minutes to completely set up. Then just use the parchment paper or your hands or your spatula to help break your chocolate bark apart.
For a finishing touch bag your chocolate in little goodie treat bags for party favours or DIY loot bags!
This is the perfect craft for any little girls birthday party. Let everyone do their own little unicorn chocolate and have fun with it!
FOLLOW ME:
Instagram- www.instagram.com/theicingartist.laurie
Facebook- https://www.facebook.com/laurietheici...
Twitter- www.twitter.com/theicingartist
Pintrest- www.pintrest.com/theicingartist
Website- www.theicingartist.com
Useful links!
Vanilla pound cake recipe-
http://bit.ly/20Xp20l
Buttercream Icing/frosting recipe-
http://bit.ly/1TSV7Y9
Buttercream icing step by step video-
https://www.youtube.com/watch?v=D8diT...
How to cover a cake in fondant video-
https://www.youtube.com/watch?v=sTmUP...
How to smooth ice a perfect buttercream cake video-
https://www.youtube.com/watch?v=GKPk0...
Vanilla Pound Cake Ingredients:
-box white cake mix
-1cup all-purpose flour
-1 cup granulated sugar
-3/4 tsp salt
-1 1/3 cup water
-1/8 cup vegetable oil
-2 tsp vanilla
-1 cup sour cream
-4 egg whites
Buttercream Icing Ingredients:
-1 cup butter (room temperature)
-1 tbs vanilla
-4 cups of icing sugar
-1/4 cup water
For detailed recipes go to http://www.theicingartist.com
#NoCakeLimits
I love seeing pictures of your cakes and creations! Tag me on social media @theicingartist.laurie or email me at theicingartist@hotmail.com
BIG thank you to my Patreon supporters, who help make this show possible!
Darlene Meecham, Laurie de Vos, Stefanie Woosey, JK Denim (Koali Pops), Nancy Robertson, Alex Kate Jackson, Sandra Rocco
Nicolai Heidlas Music - Drive
'DRIVE' - Fresh Upbeat Pop Background Music by Nicolai Heidlas Music is licensed under a Creative Commons License.
Nicolai Heidlas Music - Sunny Afternoon
Sunny Afternoon - Upbeat Ukulele Background Music by Nicolai Heidlas Music is licensed under a Creative Commons License.
Nicolai Heidlas Music - Morning Sun
Morning Sun - Free Happy Background Music by Nicolai Heidlas Music is licensed under a Creative Commons License.
80
views
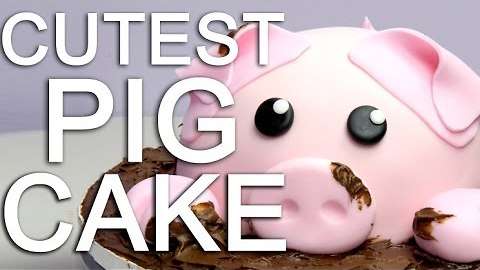
How to make a piggy cake covered in chocolate mud
This piggy looks ALMOST too cute to eat! Learn how to make your very own at home!
TOP 10 CRAZY CAKES - http://bit.ly/1t6LNEA
SUBSCRIBE HERE: http://bit.ly/28JL71L
FOLLOW ME:
Instagram- www.instagram.com/theicingartist.laurie
Facebook- https://www.facebook.com/laurietheici...
Twitter- www.twitter.com/theicingartist
Pintrest- www.pintrest.com/theicingartist
Website- www.theicingartist.com
In this week's tutorial I am going to teach you how to make an adorable piggy cake! I love doing simple farm animal cakes. To start off I made a batch of my vanilla pound cake recipe and baked it in a half sphere pan. Links to the pan and all of the tools and products I used to make this cake down below. I soaked my cake with simple syrup, making sure it stays perfectly moist. I then crumb coated my cake used a disposable bag and my vanilla buttercream icing. I smoothed it out with a spatula, and used a piece of paper towel to help make it perfectly smooth.
I lightly sprayed my cake with some water, to get it ready for my fondant. I used Confections Choice white fondant and dyed it a light shade of pink using ameri gel based food colouring. I rolled out my fondant, rolled it back over my rolling pin and then back over my cake. I used my hands and a fondant smoother to help smooth out my fondant. I trimmed off the extra fondant.
To make my delicious chocolate mud, I made a batch of my chocolate butter cream frosting. I added some extra cocoa powder and chocolate to make it extra chocolaty! I spread the "mud" all over my cake board, and set a little aside for later...
For his adorable piglet features, I started off with his snout (nose). I rolled out a ball of pink fondant and smooched it into an oval then used my gumpaste balling tool to make two little noise holes (nostrils). I glued it onto my cake using some water. For my pigs ears, I rolled out some thin pink fondant and cut out two large triangles rounded over the edged and glued them onto my cake. I flipped over the ears to make them look super cute and floppy. For his easy spiral tail, I rolled out a thin log of fondant then twisted it around a paint brush, pulled out the paint brush and glued it on him bum.
To make his hooves/feet, I divided my remaining fondant into four parts. I rolled each part into a ball, then flattened it slightly. I cut down into the fondant to shape a little hoof. I then placed then onto my chocolate mud. I added two little balls of black and white fondant to make his eyes. Then I finished him off with some extra chocolate mud!
I loved making this super cute piggy cake. It really does look like he is rolling around in the delicious chocolate mud! This cake would be easy for kids or adults and would make a perfect birthday cake. Especially for a first birthday farm animal theme.
Useful links!
Products used in this video:
8" Sphere Cake Pan
http://amzn.to/28VherR
Fondant
http://bit.ly/29kosqA
Small 9" Rolling Pin
http://bit.ly/29fKolu
Large 20" Rolling Pin
http://bit.ly/29sfET4
Disposable Piping Bags
http://bit.ly/293jzB2
Offset Spatula
http://bit.ly/293jKvP
Deep Pink Food Colouring
http://bit.ly/293pzJu
Piping Gel
http://amzn.to/28XoVBn
Vanilla pound cake recipe-
http://bit.ly/20Xp20l
Buttercream Icing/frosting recipe-
http://bit.ly/1TSV7Y9
Buttercream icing step by step video-
https://www.youtube.com/watch?v=D8diT...
How to cover a cake in fondant video-
https://www.youtube.com/watch?v=sTmUP...
How to smooth ice a perfect buttercream cake video-
https://www.youtube.com/watch?v=GKPk0...
The Good Dinosaur Cake
https://www.youtube.com/watch?v=3A_nI...
Jake and The Neverland Pirates 3D Ship Cake
https://www.youtube.com/watch?v=OFmyY...
Vanilla Pound Cake Ingredients:
-box white cake mix
-1cup all-purpose flour
-1 cup granulated sugar
-3/4 tsp salt
-1 1/3 cup water
-1/8 cup vegetable oil
-2 tsp vanilla
-1 cup sour cream
-4 egg whites
Buttercream Icing Ingredients:
-1 cup butter (room temperature)
-1 tbs vanilla
-4 cups of icing sugar
-1/4 cup water
For detailed recipes go to http://www.theicingartist.com
#NoCakeLimits
I love seeing pictures of your cakes and creations! Tag me on social media @theicingartist.laurie or email me at theicingartist@hotmail.com
BIG thank you to my Patreon supporters, who help make this show possible!
Darlene Meecham, Laurie de Vos, Stefanie Woosey, JK Denim (Koali Pops), Nancy Robertson, Alex Kate Jackson, Sandra Rocco
Nicolai Heidlas Music - Drive
'DRIVE' - Fresh Upbeat Pop Background Music by Nicolai Heidlas Music is licensed under a Creative Commons License.
Nicolai Heidlas Music - Let It Be Christmas
'LET IT BE CHRISTMAS' - UPBEAT UKULELE BACKGROUND MUSIC by Nicolai Heidlas Music is licensed under a Creative Commons License.
Nicolai Heidlas Music - Pacific Sun
'PACIFIC SUN' - Free Happy Ukulele Background Music by Nicolai Heidlas Music is licensed under a Creative Commons License.
6.02K
views
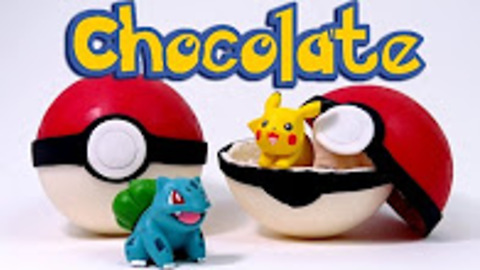
How to make chocolate Pokemon GO pokeballs
Learn How-To Make These Chocolate Poke-Snacks For your Next Pokemon GO Adventure!
TOP 10 CRAZY CAKES - http://bit.ly/1t6LNEA
SUBSCRIBE HERE: http://bit.ly/28JL71L
For all products used in this video click here!
http://bit.ly/2b5nPUU
I don't know about you guys but I am addicted to paying Pokemon GO!!! But, I took a break from playing this week so I could show you how to make these awesome CHOCOLATE POKEBALLS with super cute Pokemon figures inside! Break one open to find out which Pokemon you caught. Is it Squirtle? Or Bulbasaur? Or Charmander? Or maybe Pikachu?!?! Bring these to your next Pokeparty and everyone will think you're the Beedrill's knees!
I start out by melting white tempered compound chocolate wafers. I brush a layer of melted white chocolate into the silicone half sphere mould. After each half sphere is coated I put the mould in the freezer for about 5 minutes to allow the chocolate to harden. After the chocolate has set up I repeat that 2 more times. When the third coat has finished setting up I take them out of the freezer and pop them out of the mould.
Now that you have all of your bottom halves of the Pokeballs complete you can get started on the top red halves. Repeat the exact same process as you did for the white halves but this time use red tempered compound chocolate wafers instead of white.
With both halves of the Pokeballs made it's time to seal them up. I bought 4 cute little Pokemon toys and placed one Pokemon in each Pokeball. Squirtle, Bulbasaur and Charmander all went into their balls without any problem but Pikachu didn't want to go in the ball! So he hung out with us instead. I used some more melted white chocolate in a piping bag with a small hole cut in the end and carefully lined the top edge of the white half with chocolate. I then carefully placed the red half on top. You could try to mark the bottoms of the balls to tell you which Pokemon are in which Pokeball but I left mine as a surprise! I think it's more exciting that way when you open them up.
Next, I rolled out some black fondant using my small fondant rolling pin and cut long thin strips. I used a ruler as a guide for the knife (being careful not to cut myself) to run along to make sure the strips were cut straight and had a uniform width all the way along. I then brushed water on the strips and laid them out as straight as I could on the counter. Tipping a Pokeball on its side, I rolled it along the strip making sure to keep the seam of the 2 halves centered on the strip. The water on the fondant will make it sticky and allow it to grab onto the chocolate as you roll it along. I used the same circle cutter to cut out the seam where the 2 ends of the black stripes overlapped on the Pokeballs. I brushed water onto the black circles and stuck them onto the Pokeballs where I had cut away with the circle cutter. I used a slightly smaller circle cutter to cut out white circles. I then took an even smaller circle cutter and impressed it into the center of the white circles making it look like it's part of the button that opens the Pokeballs. I brushed water on the back of the white circles and placed them on the centre of the black circles on the Pokeballs.
Now we're all set to have a Pokeparty!
Pokemon Go has brought me back to my childhood and I LOVE IT! I remember so well my yellow Gameboy Colour that I used to play Pokemon Yellow on. It was the only game I had for Gameboy but I never put it down! And the Pokemon trading cards too!!! I never actually knew how to play with them...I just loved collecting them and trading with my brothers and friends!
I've had sooo much fun learning the best way to catch Pokemon in Pokemon Go and figuring out when the best time is to evolve them and power up! And it's so addicting trying to catch all of the rare Pokemon! I've also been figuring out some good strategies for battling gyms. My favourite trick for leveling up fast is definitely to use a lucky egg and go to a popular Pokemon catching area where there are tons of people. This way I can catch wayyy more Pokemon than normal and I also make sure to have lots of Pokemon ready to be evolved at the same time. The lucky egg doubles the xp you gain when you catch and evolve them. My top rarest Pokemon that I've caught are Scyther, Onyx , Rapidash, Electabuzz, Magmar, Pinsir, Porygon and Aerodactyl! I almost caught Snorlax but he ran away!!! :(
Music:
Nicolai Heidlas Music - Drive, Paint It, Morning Sun, Pacific Sun
Creative Commons License.
125
views

How to make a Star Wars BB-8 cake
The Force Awakens with this CAKE! Learn how to make your very own BB-8 cake at home!
TOP 10 CRAZY CAKES - http://bit.ly/1t6LNEA
SUBSCRIBE HERE: http://bit.ly/28JL71L
FOLLOW ME:
Instagram- www.instagram.com/theicingartist.laurie
Facebook- https://www.facebook.com/laurietheici...
Website- www.theicingartist.com
This cake has a very special spot in my heart. It was one of the most detailed time consuming cakes I have made, and it was all for my adorable nephew! I knew he wanted a Star Wars cake for his bithday. I was thinking a simple galaxy cake.... maybe something with Luke Skywalker, or Han Solo... perhaps a 3d fondant or gumpaste figurine.... but he fell in love with Yolanda Gamps crazy 3D standing up BB-8 cake on the How To Cake It YouTube channel. How could I say no?
Here is the breakdown of all the instructions in the video. I decided to make his head out of rice krispies, that way I could make it ahead of time. So I made a rice krispie structure using a small 4" sphere pan. I coated it in white chocolate then covered in with fondant. I used circle cookie cutters, gumpaste modeling tools, and piping tips to impress all of BB-8's details. For the perfect BB-8 orange, I used orange ameri gel food colouring and added a little brown to it. I rolled out my orange fondant and cut out little squares and rectangles to glue onto my head. I added on his eye and antennas. I rolled out some thick gumpaste and cut out a large thick disk on an angle for his neck.
Onto the cake! I made two batches of my vanilla pound cake recipe and baked them in two half sphere pans to make a whole sphere cake. I decided to tier my cake for extra support. So I added on my first cake, a layer of buttercream icing, four dowels, a cake board then my second cake all onto a 1/2" thick dowel to hold it all together. I crumb coated the whole cake, then covered my sphere in fondant. In this tutorial I show you step by step exactly how to cover a sphere cake perfectly in fondant.
I used the same tools to add in all the details on his ball of a body. I printed out a template for his panels from google to make creating the panels nice and easy. Rolled out my orange fondant, used the templates to cut out the panels and glued them onto my cake. I cut out the small panel details out of white fondant, the used a silver highlighter colour dust, to dust my white fondant details silver. Glued those onto my panels and added on the extra details using my gumpaste tools again.
I doweled his head for extra support, placed on his neck and head. My bb-8 is looking to clean! So I used a combination on brown and black colour dust using a sponge to apply so "dirt" to my BB-8. I coated my cake board in gel paste, then covered it with graham cracker crumbs. This way my 3D robot was rolling through the sand!
My final simple detail, was BB-8's on signal on his eye. I added a small white circle to his eye using white food colouring. I allowed that to dry for five minutes then coated the white with red food colouring, making sure to blend it in. Slice and enjoy! Just make sure to tell your guests head butting cakes is not recommended! I hope you enjoyed watching this video as much as I enjoyed making it.
Happy Birthday Carson!
Yolanda Gamp The Cake Jedi from How To Cake It's AMAZING BB-8 Cake:
https://www.youtube.com/watch?v=hksIc...
Star Wars The Force Awakens Official Movie Trailer (2015)
https://www.youtube.com/watch?v=sGbxm...
Useful links!
Products used in this video:
8" Sphere Cake Pan
http://amzn.to/28VherR
Fondant
http://bit.ly/29kosqA
Small 9" Rolling Pin
http://bit.ly/29fKolu
Large 20" Rolling Pin
http://bit.ly/29sfET4
Disposable Piping Bags
http://bit.ly/293jzB2
Offset Spatula
http://bit.ly/293jKvP
Piping Gel
http://amzn.to/28XoVBn
Gumpaste tools
http://bit.ly/29BaQro
Food Colouring
http://bit.ly/29oPBXi
5" Sphere Cake Pan
http://bit.ly/2aa45fU
Silver Luster Dust
http://bit.ly/2aa4Oxy
Circle Cookie Cutter Set
http://bit.ly/29OI88d
Black Colour Dust
http://bit.ly/29YpMmw
Brown Colour Dust
http://bit.ly/29YpWKu
White Food Colouring
http://amzn.to/28Ucgvf
Piping Tips
http://amzn.to/28YKHpc
Fondant Smoother
http://amzn.to/28Td70B
BB-8 Panel Template:
http://bit.ly/29z0qXk
Thank you for supporting my channel through my affiliate links!
Vanilla pound cake recipe-
http://bit.ly/20Xp20l
Buttercream Icing/frosting recipe-
http://bit.ly/1TSV7Y9
Buttercream icing step by step video-
https://www.youtube.com/watch?v=D8diT...
How to cover a cake in fondant video-
https://www.youtube.com/watch?v=sTmUP...
How to smooth ice a perfect buttercream cake video-
https://www.youtube.com/watch?v=GKPk0...
For detailed recipes go to http://www.theicingartist.com
All songs by: Nicolai Heidlas - Drive, Sunny Afternoon, Let It Be Christmas, Paint It, Morning Sun and Pacific Sun Creative Commons License.
120
views
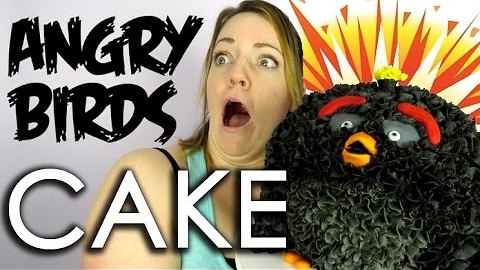
Angry Birds Movie cake Black Bomb Bird - How to with the Icing Artist
Go to https://nom.com/theicingartist For LIVE TUTORIALS!
In this weeks tutorial I am showing you how to make a black bomb angry bird from the new angry birds movie! I will teach you how to make this cake step by step!
For all of my recipes go to:
www.theicingartist.com
SUBSCRIBE HERE: www.youtube.com/theicingartist
Connect with me on:
Facebook: https://www.facebook.com/laurietheici...
Twitter: www.twitter.com/theicingartist
Pintrest: www.pintrest.com/theicingartist
Instagram: www.instagram.com/theicingartist.laurie
Website: www.theicingartist.com
BIG thank you to my Patreon supporters, who help make this show possible!
-Darlene Meecham
-Laurie de Vos
-Stefanie Woosey
-JK Denim (Koali Pops)
-Nancy Robertson
-Alex Kate Jackson
-Sandra Rocco
Thanks for watching!!!!
I'd love to see pictures of your cakes and creations! You can send picture here theicingartist@hotmail.com
I'll post them on my website viewer's cakes page http://www.theicingartist.com/#!your-...
209
views
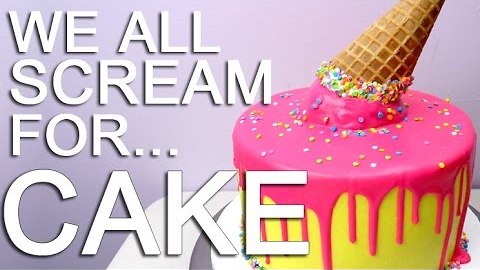
How to make a pinata melted ice cream cone drip cake
ATTN: VIDEO CONTAINS AWESOME INSTRUCTIONS FOR MAKING A MELTED ICE CREAM DREAM
TOP 10 CRAZY CAKES - http://bit.ly/1t6LNEA
SUBSCRIBE HERE: http://bit.ly/28JL71L
FOLLOW ME:
Instagram- www.instagram.com/theicingartist.laurie
Facebook- https://www.facebook.com/laurietheici...
Twitter- www.twitter.com/theicingartist
Pintrest- www.pintrest.com/theicingartist
Website- www.theicingartist.com
This week I made a crazy melted ice cream cone drip cake! But I decided to kick it up to the next level with a surprise inside PINATA!
I baked two batches of my vanilla pound cake recipe in 8" round 4" tall cake pans. Leveled off the tops and divided the cakes into four equal layers. For the pinata, we need to make a "secret chamber" for all of our goodies to go into.
Using a two inch circle cutter I cut out the center of three of the cake layers. I soaked them with simple syrup to make them nice and moist. I stacked them up spreading my delicious vanilla buttercream recipe in between each layer. Then using a paper funnel I filled the chamber with pastel rainbow confetti sprinkles! Lots..... and lots..... and lots.... of sprinkles!
Added another layer of buttercream and added my final cake right on top. Using a carving knife, I leveled off the edges of my cake, making sure everything was nice and straight. No wonky edges on this cake, no siree!
Using AmeriColor gel based food colouring I dyed my buttercream a bright lemon yellow. I filled a disposable piping bag, and used a Wilton tip number 789 to apply my icing to my cake. I smoothed out my frosting with an offset spatula. Then using a piece of paper towel I rubbed that onto my cake until it was perfectly smooth with nice square edges.
For the ice cream scoop, I made a giant cake pop using the left over cake scraps and icing. I mixed the cake crumbs and icing together to make the perfect consistency. I formed it into a large ball and set it in the fridge to cool. Once cool I placed in onto my cake.
For the "melted" look to my ice cream, I make a white chocolate ganache. I dyed it using a deep pink food colouring and mixed it up. Using a spoon, I dripped it all over the top of my cake making sure the ice cream scoop was completely covered. I then used my spoon to help guide the ganache right to the edge of the cake, causing the excess to drip over the sides. To add some extra drips I used a piping bag and piped a few drips here and there. While the ganache was still wet, I sprinkled some extra sprinkles on top.
For the Ice cream cone, I dipped it in tempered white compound chocolate. I then added some more sprinkles all along the top edge just to jazz it up a bit. I stuck the cone righttttt on top of my ice cream scoop. As if this cake didn't have enough sprinkles... I added a pretty little sprinkle trim!
When you cut in to it all of those sprinkles will come pouring out!
Useful links!
Products Used in this Video:
8"round tall cake pan
http://bit.ly/29ah8Rq
Disposable Piping Bags
http://bit.ly/293jzB2
Offset Spatula
http://bit.ly/293jKvP
Lemon Yellow Food Colouring
http://bit.ly/29fZ6ej
Deep Pink Food Colouring
http://bit.ly/293pzJu
Thank you for supporting me through my affiliate links! I proudly stand behind Flour Confections and love ALL of their products!
Vanilla pound cake recipe-
http://bit.ly/20Xp20l
Buttercream Icing/frosting recipe-
http://bit.ly/1TSV7Y9
Buttercream icing step by step video-
https://www.youtube.com/watch?v=D8diT...
How to cover a cake in fondant video-
https://www.youtube.com/watch?v=sTmUP...
How to smooth ice a perfect buttercream cake video-
https://www.youtube.com/watch?v=GKPk0...
White Chocolate Ganache Recipe:
-1cup white chocolate
-1/2 cup of milk or cream
melt chocolate and stir in warm cream. Let rest for 15 min until cool.
Vanilla Pound Cake Ingredients:
-box white cake mix
-1cup all-purpose flour
-1 cup granulated sugar
-3/4 tsp salt
-1 1/3 cup water
-1/8 cup vegetable oil
-2 tsp vanilla
-1 cup sour cream
-4 egg whites
Buttercream Icing Ingredients:
-1 cup butter (room temperature)
-1 tbs vanilla
-4 cups of icing sugar
-1/4 cup water
For detailed recipes go to http://www.theicingartist.com
#NoCakeLimits
I love seeing pictures of your cakes and creations! Tag me on social media @theicingartist.laurie or email me at theicingartist@hotmail.com
BIG thank you to my Patreon supporters, who help make this show possible!
Darlene Meecham, Laurie de Vos, Stefanie Woosey, JK Denim (Koali Pops), Nancy Robertson, Alex Kate Jackson, Sandra Rocco
Music:
Nicolai Heidlas Music - Drive
'DRIVE' - Fresh Upbeat Pop Background Music by Nicolai Heidlas Music is licensed under a Creative Commons License.
Nicolai Heidlas Music - Let It Be Christmas
Nicolai Heidlas Music - Paint It
187
views
1
comment