

The Illusion of MONEY, TIME & EGO - Alan Watts
SUBSCRIBE and check out my new Channel:
https://www.youtube.com/channel/UCM65z7cJmZUOpWUXVwHOc7g
Alan Wilson Watts (6 January 1915 – 16 November 1973) was a well-known British philosopher, writer, and speaker, best known for his interpretation of Eastern philosophy for Western audiences. He left behind more than 25 books and an audio library of nearly 400 talks, which are still in great demand.
49
views
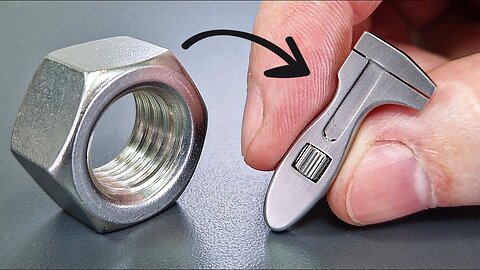
I turn a Nut into a tiny Adjustable Wrench
SUBSCRIBE and check out my new Channel:
https://www.youtube.com/channel/UCM65z7cJmZUOpWUXVwHOc7g
In this video I'm turning a stainless steel M20 nut into a tiny adjustable wrench. All three parts are completely made out of one single nut. First I turned the thread and the hexagon away on the lathe. After cutting a slit into it I was able to open it up with the help of a torch. A few heats later I had a very straight and flat piece of stainless steel. I first went then on the milling machine and milled the whole part to the final width of the wrench. I then cut of a piece with the hacksaw to make the body out of it. With a tiny t-slot endmill I was able to mill the t-slot very nicely with a very low feedrate and a lot of oil. After milling the square hole and drilling the deep 2.1mm hole I started to shape the outer contour. Then I moved on by making the movable part of the wrench. I milled it all in one operation with very careful steps to not risk and chatter marks or whatsoever. After filing the square bit round I sanded the rectangular part until it fitted nicely into the body. I then cut the M2 thread and cut the piece off with the hacksaw, assembled it with the body and sanded both parts flush. Then I started rounding off all edges with needle files, sandpaper and finished it with very fine steel wool for a brushed finish. All what's left to do now was making the knurled adjuster nut. For that I forged the remaining of the nut into a square piece, which I could clamp in the four jaw chuck on the lathe.I turned it round, supported it with a live center, put the knurling onto it, drilled and tapped the hole, chamfered it and parted it off. Then it was just a matter of quickly assembling the three pieces.
This was a very cool little project for me. I really like how it turned out. It's a very cool little item in my opinion.
If you have any questions about the process, machines i'm using or other stuff, just ask me in the comments. I read them all and i try to reply as soon as possible.
Sorry for my bad english, it's not my language. I try my best to improve my technical english.
Subscribe for more of my content. I'm uploading videos about mechanical stuff, as new creations and buildings and also restorations.
Thank you for watching :-)
41
views

ARE YOU AN ALPHA? - Simon Sinek - Why Leaders Eat Last
SUBSCRIBE and check out my new Channel:
https://www.youtube.com/channel/UCM65z7cJmZUOpWUXVwHOc7g
In this in-depth talk, ethnographer and leadership expert Simon Sinek reveals the hidden dynamics that inspire leadership and trust. In biological terms, leaders get the first pick of food and other spoils, but at a cost. When danger is present, the group expects the leader to mitigate all threats even at the expense of their personal well-being. Understanding this deep-seated expectation is the key difference between someone who is just an "authority" versus a true "leader."
For more animated talks please subscribe.
68
views
Antique Soldering Iron (Blowtorch) - Hot Restoration
SUBSCRIBE and check out my new Channel:
https://www.youtube.com/channel/UCM65z7cJmZUOpWUXVwHOc7g
In this video, I'm restoring an old German soldering iron.
This item was sent to me by one of my patrons from Germany. He saw it on eBay, asked me if I'm interested and then he bought it. Thank you for that. I'll send it back to him now.
I really liked the look of the handle and that's why I decided to restore it. It's a propane gas powered soldering iron made by Perkeo. I don't know how old this one is, but they built them since 1919 until today. The modern ones still look pretty much the same as the one I restored in this video, they just made some small changes over the years. I'm very happy how this project turned out, I really like the contrast of the dark wooden handle and the polished brass.
I hope you like my work and the video.
Huge thank you to all of my Patreon and PayPal supporters and specially to:
Paulina Zamora
afreeflyingsoul
sunniva thingstad
Micky McKay
Alan Hanson
Alex Roussos
Gregory
Joan Casanovas
John Romero
M. A.
Paul Mampilly
SA Graver
Vince Valenti
Zachary Grimes
Alejandro Cavazos
Allan Mckenzie
audi4444player
Bastian Alexander
Bloatmage
Brian Boots
Clément BERNARD
Conor Fowler
Dapper
Dave Ahern
Dawson Mertz
Drew Bell
Ernest Duran
Giambattista Martino
Guillaume Ladouceur
Harrison Hughes
Jack Champion
Jack Tian
Jake
Jeff Carr
Jeff Vier
joe
Joel Margolis
Julie Smith
justin f.
Jörg Thomsen
Kersten Rienow
Kevin
Lambapalooza
Llewellyn Schubert
Lucy Lole
Marc P
marilyne stotz
Mark Anderson
Martin Kunz
Matthew Hendrix
Matthew Ruediger
Merkias
Mikko Repka
Moeparker
Pascal Bertossa
Phoebe Knight
Ruslan Balkin
Rybread
Sasan Hezarkhani
Sebastian Wüst
Seth Feist
Sheepless
Shu
Stephen Lemon
Thibaut Hiegel
Wambaquamba
XxJonathXx
Yitch
Timestamps:
00:00 preview
00:36 disassembling
02:18 showing all the parts
02:39 cleaning the parts with the parts washer
02:57 disassemling two more parts
03:17 removing patina and soot with vinegar, salt and flour
04:07 restoring the wooden handle
04:40 restoring the big tube
06:10 stain the wooden handle
06:38 making a new ring for the wooden handle on the lathe
07:36 restoring the nut which tightens the wooden hanlde
08:04 restoring the holder of the soldering iron
08:46 restoring the sieving head and remake the knurling
09:21 restoring the sieving head cover
09:59 restoring the knurled ring
10:22 restoring the regulation part
10:47 restoring the valve needle
11:07 restoring the nut for the regulation part
11:31 restoring the valve tube
12:16 restoring the gas connection part
12:47 restoring the nut for the valve tube
13:13 restoring the nozzle
13:41 restoring the soldering iron
14:46 making a new holder for the soldering iron on the lathe, mill and welding machine
16:26 making a special countersinked bolt for the soldering iron
16:56 restoring the bolt to clamp the soldering iron holder
17:18 making a new handle for the previous restored bolt
18:47 making the steel parts black by heating up and quench in oil
19:14 showing all the parts before reassembling
19:34 reassembling
21:23 showing the finished product
22:00 final test
My camera:
Panasonic HC-V180
If you have any questions about the process, machines i'm using or other stuff, just ask me in the comments. I read them all and i try to reply as soon as possible.
Sorry for my bad english, it's not my language. I try my best to improve my technical english.
Subscribe for more of my content. I'm uploading videos about mechanical stuff, as new creations and buildings and also restorations.
Thank you for watching :-)
My Patreon Page:
https://www.patreon.com/mymechanics727
94
views
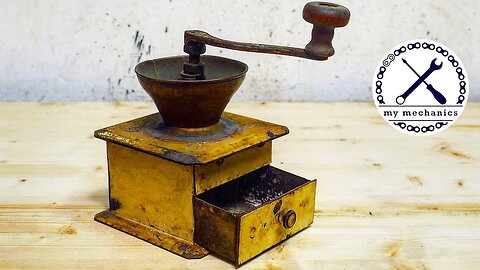
Rusty Old Coffee Grinder - Perfect Restoration
SUBSCRIBE and check out my new Channel:
https://www.youtube.com/channel/UCM65z7cJmZUOpWUXVwHOc7g
In this video I'm restoring an old coffee grinder.
A few weeks ago I bought an old bench grinder to restore on eBay. The guy who sold it was actually selling more antiques, he had a room filled with old items. I took a look at his other stuff and this unique coffee grinder caught my attention right away. The one thing that really impressed me on this coffee grinder was the metal body, usually they're made of wood. I also liked the colour very much. The restoration itself turned out to be a lot more challenging than I first expected. I'm very happy with the final result of this coffee grinder. I really like how the handle turned out.
I hope you like my work and the video.
Huge thank you to all of my Patreon and PayPal supporters and specially to:
Paulina Zamora
sunniva thingstad
afreeflyingsoul
Chris & Darcey
Gregory
Joan Casanovas
Joel Miller
John Romero
M. A.
SA Graver
Zachary Grimes
Alejandro Cavazos
Allan Mckenzie
audi4444player
Bastian Alexander
Bloatmage
Brian Boots
Clément BERNARD
Conor Fowler
Dapper
Dave Ahern
Dawson Mertz
Ernest Duran
Giambattista Martino
Harrison Hughes
Jack Champion
Jake
Jeff Carr
joe
Joel Margolis
Julie Smith
Kersten Rienow
Llewellyn Schubert
Lucy Lole
marilyne stotz
Mark Anderson
Martin Kunz
Matthew Hendrix
Matthew Ruediger
Merkias
Mikko Repka
Moeparker
Pascal Bertossa
Rybread
Sasan Hezarkhani
Sebastian Wüst
Seth Feist
Sheepless
Stephen Lemon
Thibaut Hiegel
Thomas
Wambaquamba
XxJonathXx
Yitch
Timestamps:
00:00 preview
00:36 disassembling
02:45 showing all the parts
02:55 cleaning the parts with warm water
03:17 removing the old paint with paint stripper
03:46 sandblasting
04:34 restoring the main part
05:32 restoring the drawer
05:58 restoring the wooden plate
07:44 restoring the shaft holder
08:26 making 4 new bolts for the shaft holder on the lathe
09:12 making 4 new square nuts and washers for these bolts on the lathe
09:55 restoring the top cover
10:35 restoring the hopper
12:29 making 4 copper rivets for the hopper
13:05 removing rust with MC-51
13:21 restoring the grinder ring
13:47 restoring the grinder shaft
14:56 restoring the two brass nuts
15:20 making a special brass washer for the nuts on the lathe
15:45 restoring and modify the complete handle
20:27 apply filler to the painted parts
20:58 apply 2k primer
21:08 wet sanding the primer
21:25 apply 2k matt black coat the the drawer (RAL 9005)
21:31 apply 2k sand yellow coat (RAL 1002)
21:54 replacing the old screws
22:11 showing all the parts before reassembling
22:30 reassembling
24:57 showing the finished product
25:33 final test
My camera:
Panasonic HC-V180
Links:
MC-51 rust remover:
http://www.mc-51.com/
If you have any questions about the process, machines i'm using or other stuff, just ask me in the comments. I read them all and i try to reply as soon as possible.
Sorry for my bad english, it's not my language. I try my best to improve my technical english.
Subscribe for more of my content. I'm uploading videos about mechanical stuff, as new creations and buildings and also restorations.
Thank you for watching :-)
my mechanics T-Shirts:
https://teespring.com/stores/my-mecha...
My Patreon Page:
https://patreon.com/mymechanics727
66
views
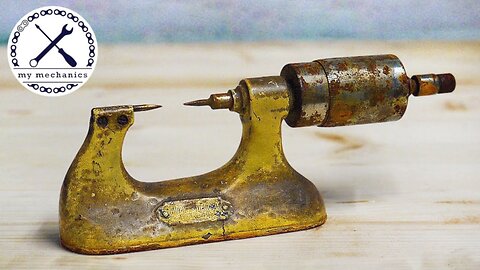
Antique Rusty Micrometer - Precise Restoration
SUBSCRIBE and check out my new Channel:
https://www.youtube.com/channel/UCM65z7cJmZUOpWUXVwHOc7g
I bought this micrometer on eBay for $25. When I was scrolling through the antique section of eBay and first saw this micrometer I wanted to restore it right away. I really like the unique look of those watchmaker micrometers. As a professional CNC-mechanic I'm very familiar with those measurement devices and I'm using them on a daily basis. The measurement range of this micrometer is from 0-25mm and you can measure exactly on 0.005mm. The micrometer was in a very bad condition, it was very rusty and it was kind of stuck. It was once re-painted to yellow, the original colour was black. That's why I decided to paint it black again. In the front of the micrometer there was a plate with the name and the location of the previous owner mounted with two rivets. The plate was in very bad condition and as I'm the new owner of it, I decided to make a new plate with my name and my location. I choose to create the plate with etching using ferric-chloride. I've never done that before, but the result came out very nice. Unfortunately I wasn't able to remove all the spots from the rust on the two parts with the scale on it, if I would sand it more I would lose the engravings. I'm still very happy how this restoration turned out.
I hope you like my work and the video.
Huge thank you to all of my Patreon and PayPal supporters and specially to:
Paulina Zamora
sunniva thingstad
SA Graver
Joel Miller
Joan Casanovas
afreeflyingsoul
acemaclace
Zachary Grimes
Sharath Padmanabhan
Allan Mckenzie
audi4444player
Bastian Alexander
Bloatmage
Brian Boots
Clément BERNARD
Conor Fowler
Dave Ahern
Dawson Mertz
Harrison Hughes
Ian Hutchinson
Jack Champion
Jake
Joel Margolis
Julie Smith
Kersten Rienow
Llewellyn Schubert
Lucy Lole
Mark Anderson
Martin Kunz
Matthew Hendrix
Matthew Ruediger
Moeparker
Pascal Bertossa
Rybread
Sasan Hezarkhani
Sheepless
Stephen Lemon
Thibaut Hiegel
Wambaquamba
XxJonathXx
Yitch
Timestamps:
00:00 preview
00:30 disassembling
02:01 showing all the parts
02:15 cleaning the parts with the parts washer
02:28 removing the old paint with paint stripper
02:45 removing the stuck parts
03:04 removing rust with MC-51
03:37 restoring the main part
06:08 restoring the parts for bluing
07:18 bluing
07:55 the missing spring
08:10 making a new spring
09:09 restoring the engraved parts
10:56 restoring the spindle and anvil
11:57 making two new bolts on the lathe for clamping the anvil
12:43 restoring the play adjustment ring
13:08 showing the spindle which didn't need restoration
13:16 making a new name plate
15:59 overview before reassembling
16:05 reasembling
17:12 calibration of the micrometer
17:52 mounting the new name plate with rivets
17:59 showing the finished product
18:30 measuring a part with the restored micrometer
My camera:
Panasonic HC-V180
If you have any questions about the process, machines i'm using or other stuff, just ask me in the comments. I read them all and i try to reply as soon as possible.
Sorry for my bad english, it's not my language. I try my best to improve my technical english.
Subscribe for more of my content. I'm uploading videos about mechanical stuff, as new creations and buildings and also restorations.
Thank you for watching :-)
My Patreon Page:
patreon.com/mymechanics727
51
views
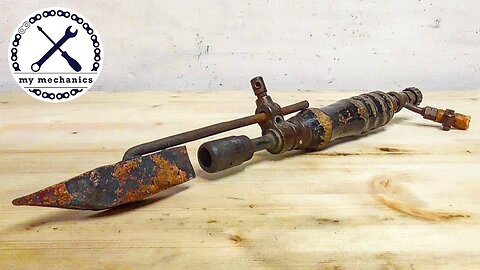
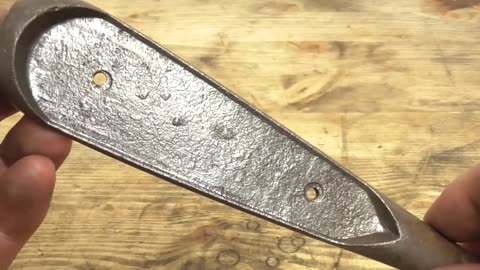
1918 Aircraft Rivet Hammer - Restoration
SUBSCRIBE and check out my new Channel:
https://www.youtube.com/channel/UCM65z7cJmZUOpWUXVwHOc7g
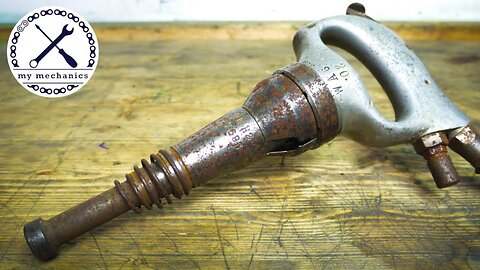
In this video I'm restoring an aircraft rivet hammer.
This pneumatic rivet hammer was sent to me by one of my subscribers from Germany, thank you for that. It's a very cool and unique looking tool, I've never seen this tool before and that's why I decided to restore it and make a video for you guys. I was told that this tool was stored in the basement when they had a flooding, that was probaly the reason why it was rusty and didn't work anymore. I had a few ups and downs during this restoration. The cast of the aluminium handle was very porous and a lot of tiny holes appeared after fine sanding and polishing, also the welding didn't work quite well. I first tried to TIG weld, but that didn't work at all. For the visible steel parts I decided to make them black, for the optic and also as rust protection. My idea was to sandblast those parts to make a nice and even finish, but because I'm using very fine glas bead all the small damages in the surface from the rust were still visible. So I had to sand them all away. The bluing worked very well and it makes a nice contrast to the polished parts in my oppinion. The old air fitting was put together out of three different pieces made of brass to get the right thread size. I didn't really liked that option and decided to make a new one. I really wasn't pleased during the restoration just because of the porous cast of the handle and I thought about it for a long time to not even publish the video because of that. But as soon as I tested it after the restoration I had a huge smile all over my face, this is a very cool tool and it ended up working perfectly fine. I hope you don't judge me to hard for my very bad welding abilities and the bad outcome of the aluminium handle.
I hope you like my work and the video.
Timestamps:
00:00 preview
00:25 pre-testing
00:33 disassembling
02:22 showing all the parts
02:39 cleaning the parts with the parts washer
02:57 removing rust with MC-51 rust remover
03:26 restoring the aluminium handle
06:43 making a new pin for the trigger on the lathe
07:07 restoring the front piece (hammer head)
07:31 restoring the adjustment screw
08:00 making a new air fitting on the lathe and mill
09:35 roughly cleaning all parts for sandblasting
10:56 masking for sandblasting
11:14 sandblasting the visible steel parts
12:04 sanding the sandblasted parts
13:00 restoring the small pin
13:16 bluing the visible steel parts
14:09 cleaning the mechanical parts
15:43 showing all the parts before reassembling
16:10 reassembling
18:23 showing the finished product
19:08 final testing
Time of this restoration:
This Project over 2,5 weeks
My camera:
Panasonic HC-V180
If you have any questions about the process, machines I'm using or other stuff, just ask me in the comments. I read them all and I try to reply as soon as possible.
Sorry for my bad English, it's not my language. I try my best to improve my technical English.
Subscribe for more of my content. I'm uploading videos about mechanical stuff, as new creations and buildings and also restorations.
Thank you for watching :-)
My Patreon Page:
patreon.com/mymechanics727
54
views

High Intensity Interval Training (HIIT) - Maximum Results, Minimum Time
SUBSCRIBE and check out my new Channel:
https://www.youtube.com/channel/UCM65z7cJmZUOpWUXVwHOc7g
High Intensity Interval Training, or HIIT, enjoys the benefits of both steady cardio AND weight lifting. The body burns fat 3x faster than steady cardio, while building muscle at the same time. Weight lifting alone does little to burn fat, and steady cardio, like jogging, does little to build muscle. During HIIT, The back and forth of explosive activity to rest causes muscle confusion and the body responds by growing muscle rapidly. At the same time the heart rate will skyrocket, burning glucose and giving you an excellent cardio session in a very short period of time. What’s probably most fascinating about HIIT is what happens after the workout is over. HIIT creates a strong excess post-oxygen consumption effect, where the body continues to consume oxygen after the workout in order to recover the muscles back to their preworkout state. So the body revs up the metabolism and keeps burning calories and fat during recovery and this effect can last up to 24 hours after the workout is done.
HIIT workouts can be done anywhere at anytime. There is no equipment or membership needed and most workouts are less than 30 minutes.
For more interesting videos please subscribe. Thanks!
Sources:
http://www.nrcresearchpress.com/doi/a...
http://www.fasebj.org/content/24/1_Su...
http://www.precisionnutrition.com/all...
https://www.ncbi.nlm.nih.gov/pmc/arti...
https://www.researchgate.net/publicat...
http://bmjopensem.bmj.com/content/1/1...
http://www.colorado.edu/intphys/Class...
http://www.carnevalijunior.com.br/wp-...
75
views
Antique Dented Oiler - Perfect Restoration
SUBSCRIBE and check out my new Channel:
https://www.youtube.com/channel/UCM65z7cJmZUOpWUXVwHOc7g
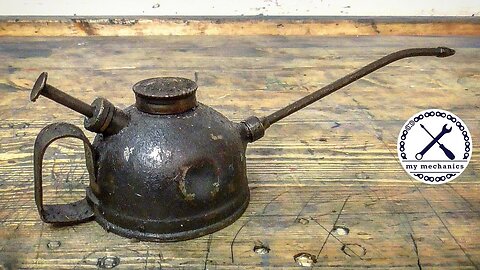
In this video I'm restoring an antique dented oiler.
My friend found this oiler in the steel waste at the recycling station. I really liked the unique design of it and I bought it from him for $5. It almost had no rust, but it was very dirty and had a lot of dents. The tricky part of this restoration was definitely the removing of all the dents in the can. I want to say thank you to my friend who helped me with this and to his boss, who allowed him to use the tools from his work place. I'm very happy how it turned out and I really like the new look of the oiler. I'll keep this oiler in my shop and I'm going to use it from now on.
I hope you like my work and the video.
Timestamps:
00:00 preview
00:22 disassembling
01:11 showing all the parts
01:27 cleaning the parts with the parts washer
01:59 cleaning the parts with warm water and Cif
02:21 showing the three new appeared parts
02:28 removing the paint with paint stripper
02:42 removing the rust on the inside with MC-51
03:00 removing the rust on the inside with small grinding stones
03:39 removing all the dents
04:47 using filler for the welding marks
05:02 cleaning up the rest of the can
06:02 restoring the cover
06:20 masking the parts before painting
06:48 applying two component primer
06:58 wet sanding with water
07:12 applying two component green coat (RAL 6005 moss green)
07:29 restoring the tube
08:35 restoring the pump shaft
09:17 restoring the spring
09:35 making a new cork gasket
09:52 making a new felt gasket
10:05 replacing the o-ring
10:10 showing all the parts before reassembling
10:23 reassembling
11:11 showing the finished product
11:40 final testing
My camera:
Panasonic HC-V180
If you have any questions about the process, machines i'm using or other stuff, just ask me in the comments. I read them all and i try to reply as soon as possible.
Sorry for my bad english, it's not my language. I try my best to improve my technical english.
Subscribe for more of my content. I'm uploading videos about mechanical stuff, as new creations and buildings and also restorations.
Thank you for watching :-)
My Patreon Page:
https://www.patreon.com/mymechanics727
29
views
1
comment

1930s Rusty Metal Shear - Perfect Restoration
SUBSCRIBE and check out my new Channel:
https://www.youtube.com/channel/UCM65z7cJmZUOpWUXVwHOc7g
1930s Rusty Metal Shear - Perfect Restoration
In this video I'm restoring a Beverly Shear model B1
My friend found this Beverly Shear in the steel waste at the recycling station. When I first saw this Beverly Shear I had no idea why it has such an unique shape. After a bit of research I quickly found out that this is a very well known tool. So I decided to restore it and bought it for $30. The Beverly Shear is a tool to cut sheet, because of it's unique shape it enables you to cut curved shapes and that's what makes the Beverly Shear so special. The Beverly Shear was invented by Kurt Nebel in 1931 in Chicago. There are 3 different sizes available: model B1, model B2 and model B3 which is the biggest one. They have made some changes over the years, but since 1947 the shears have remained virtually unchanged. For the color I decided to use a darker grey than the original and choose anthracide, I also added two washers. To make the parts black I used a bluing liquid called „Birchwood Casey - Super Blue“ and it worked very well. It's easy to handle and the big advantage over heating and quenching in oil is that you can do it without heating the parts up. So you won't change the structure of the steel and you can use it on hardened parts as well. Because I have no tools and experience in sharpening such blades, I decided to ask my friend Philipp Elsner from Elsener Messerschmied to do it. He's a professional knifemaker here in Rapperswil Switzerland. Check out his website, linked below. Overall I'm very happy how the Beverly Shear came out and as it is such a unique tool I'll keep it for myself.
I hope you like my work and the video.
Timestamps:
00:00 preview
00:38 testing
00:57 disassembling
03:45 showing all the parts
03:58 washing the parts
04:21 Removing paint with paint stripper
04:50 protecting the parts from rusting with Motorex MX50 oil spray
05:02 restoring the main part
06:49 restoring the front plate
08:18 restoring the back plate
09:09 restoring the two big bolts
09:50 restoring the nut
10:24 restoring the special washer
10:42 restoring the blade holding plate
11:21 making a new screw for the blade holding plate
12:32 polishing the new washer
12:44 assembling test
13:24 restoring and sharpening the blades
14:36 restoring the handle holder
15:39 restoring the handle and making a sleeve for it
17:54 restoring the screw for the handle
18:20 making a special washer on the lathe
19:18 restoring the sign
19:44 showing the two new rivets for the sign
19:52 restoring the small screws
20:15 making the parts black with Birchwood Casey - Super Blue
21:04 masking the parts with aluminum tape for sandblasting
21:46 sandblasting
22:51 filling the holes with 2K filler
23:18 masking the parts for painting
23:27 applying 2K primer
23:36 applying 2K anthracide coat
24:07 showing all the parts before reassembling
24:23 reassembling
26:29 adjusting the blade distance
26:40 showing the finished product
27:36 final testing
27:57 cut comparison before/after
My camera:
Panasonic HC-V180
If you have any questions about the process, machines I'm using or other stuff, just ask me in the comments. I read them all and I try to reply as soon as possible.
Sorry for my bad English, it's not my language. I try my best to improve my technical English.
Subscribe for more of my content. I'm uploading videos about mechanical stuff, as new creations and buildings and also restorations.
Thank you for watching
My Patreon Page:
https://www.patreon.com/mymechanics727
115
views

Is Life A Video Game? - Elon Musk
SUBSCRIBE and check out my new Channel:
https://www.youtube.com/channel/UCM65z7cJmZUOpWUXVwHOc7g
Elon Musk argues that we are living in a simulation RIGHT NOW. A pretty mind blowing idea. He even goes on to say that the chance of us living in base reality is 1 in Billions.
76
views

College is NOT the Only Path to Success - Casey Neistat & Gary Vaynerchuk
SUBSCRIBE and check out my new Channel:
https://www.youtube.com/channel/UCM65z7cJmZUOpWUXVwHOc7g
There is NO defined path to success. College can help you find that path, but it is certainly NOT the only path to success. Gary Vaynerchuk and Casey Neistat describe how business and entrepreneurship can not be taught in school.
65
views
Forgotten Rusty Oil Lamp - Restoration
SUBSCRIBE and check out my new Channel:
https://www.youtube.com/channel/UCM65z7cJmZUOpWUXVwHOc7g
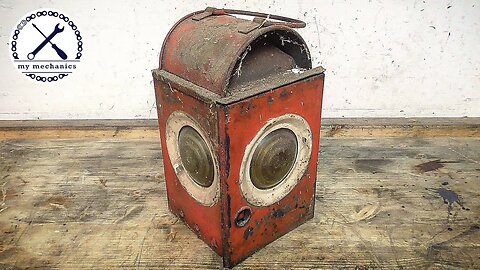
Forgotten Rusty Construction Oil Lamp - Restoration
In this video i'm restoring an old oil lamp made by Locher.
Like, comment, subscribe.
My friend found this oil lamp in the steel waste at the recycling station. This one was owned by a big swiss construction company called WALO, it was used as a signal light at construction sites. These oil lamps made by Locher were very common in switzerland for railroads as well. I really liked the look of this lamp, specially the combination of red and white. As I'm still a complete beginner when it comes to painting and working with sheet, I decided to challenge myself and restore this beautiful oil lamp. I learned a lot of new stuff, specially about the painting. The result came out quite nice and I'm happy with it.
I hope you like my work and the video.
Timestamps:
00:00 preview
00:53 disassembling
02:16 showing all the parts
02:28 washing the parts
03:00 pre test
03:09 measure the temperature of the lamp
03:28 removing the paint with paint stripper
04:49 bringing the sheets back in shape
05:58 removing the dents on the top part
06:41 sandblasting
07:31 using filler on the door
07:49 apply heat resistant paint
08:18 apply primer
08:29 apply white coat
09:15 apply red coat
10:22 restoring the glass
10:41 making new gaskets for the glass
11:29 restoring theclips
12:13 restoring the small steel shaft for the door
12:36 restoring the lock
13:01 making a new square shaft for the lock
14:15 restoring the new key for the lock
14:40 restoring the oil container
15:28 restoring the burner
16:32 replacing the wick
16:41 showing all the parts before reassembling
17:04 reassembling
18:38 showing the finished product
19:25 final test
Timestamps of used tools and machines:
01:57 300g hammer and 3mm punch
01:59 pliers
02:01 bench vice with soft jaws
02:38 parts washer with parts cleaner liquid, google it ;-)
02:57 lamp oil
03:00 lighter
03:09 laser temperature gauge
03:28 paint stripper
03:33 nylon brush
03:45 scraper
04:00 nylon brush for kitchen
04:34 universal spray (Motorex Intact MX50)
04:59 300g hammer and piece of aluminium
05:16 air die grinder wit sanding bit
05:25 angle grinder
05:28 300g hammer and 3mm punch
05:44 300g hammer and piece of aluminium
05:54 air die grinder wit sanding bit
06:41 sandblaster
07:35 two component filler
07:39 sandpaper for metal (grid 120, 240)
07:49 heat resistant paint matt black
08:11 masking tape
08:18 two component primer
08:29 two component white paint
08:49 masking tape
09:15 two component red paint
09:42 scalpel
10:28 cotton buffing wheel
10:51 scalpel
11:33 steel wire brush
11:37 steel wire brush
11:46 pliers
11:53 300g hammer
12:01 cotton buffing wheel
12:17 300g hammer
12:23 sandpaper for metal (grid 120, 240, 400)
12:28 cotton buffing wheel
12:40 steel wire brush
12:46 sandpaper for metal (grid 120, 240, 400)
12:51 cotton buffing wheel
13:01 lathe Weiler
13:17 milling machine Aciera F3, carbide endmill 10mm
13:43 lathe Weiler
13:55 belt grinder (grid 60)
14:00 sandpaper for metal (grid 120, 240, 400)
14:09 cotton buffing wheel
14:21 cotton buffing wheel
14:29 cord drill with steel wire brush
14:44 sandpaper for metal (grid 240, 400)
14:49 steel wire brush
14:56 cotton buffing wheel
15:13 funnel and acetone
15:31 mixture of equal parts of vinegar, salt and flour
15:55 nylon brush for kitchen
16:10 steel wire brush
16:16 sandpaper for metal (grid 240, 400)
16:22 cotton buffing wheel
17:12 300g hammer
17:31 300g hammer
18:08 lamp oil
18:14 tweezers
19:25 lighter
My camera:
Panasonic HC-V180
If you have any questions about the process, machines i'm using or other stuff, just ask me in the comments. I read them all and i try to reply as soon as possible.
Sorry for my bad english, it's not my language. I try my best to improve my technical english.
Subscribe for more of my content. I'm uploading videos about mechanical stuff, as new creations and buildings and also restorations.
Thank you for watching :-)
My Patreon Page:
https://www.patreon.com/mymechanics727
128
views

Tranquil Guided Meditation for Spiritual Awakening (7 min)
SUBSCRIBE and check out my new Channel:
https://www.youtube.com/channel/UCM65z7cJmZUOpWUXVwHOc7g
Close you eyes, get comfortable, breathe in deep and fill your body, exhale fully. Inhale positive energy and release stress and doubt. Focus on your breath. If thoughts arise in your mind, just let them float by light clouds in a blue sky. Find your peace. There is no right or wrong way to meditate. The purpose of this video is to help you align your mind, body and soul. When you open your eyes, you will see the world in a different light. Have a wonderful day. Namaste
For more guided meditation videos please subscribe.
Narrated by Faith
48
views
Handmade Silver Play Button - No Power Tools
SUBSCRIBE and check out my new Channel:
https://www.youtube.com/channel/UCM65z7cJmZUOpWUXVwHOc7g
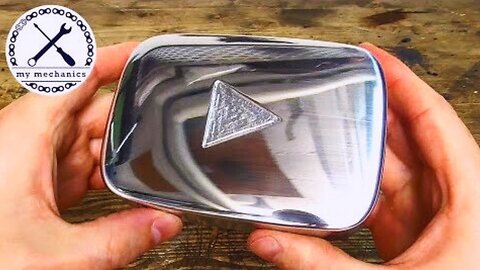
Handmade Play Button - No Power Tools.
In this video, I'm going to make a YouTube play button out of a piece of aluminum without any power tools.
Like, comment, subscribe.
First I want to say thank you to each and every one of you guys. Your support on this channel lately is just amazing.
As I needed to do some research and order some stuff for my current restoration, I decided to make a „silver“ play button without any power tools.
I hope you like my work and the video.
Timestamps:
00:00 starting with a piece of aluminium
00:12 outlining with a template
00:36 Making the outer contour with a multifile
01:31 making the front side with a multifile
02:58 Start removing scratches with a flat blunt-ended file
03:31 Removing scratches with sandpaper 120/240/400
03:53 making the triangle with a grooving chisel
04:42 Making a mirror polish
05:39 showing the finished product
Time of this restoration:
12 hours on this project
Timestamps of used tools and machines:
00:27 multifile
02:58 flat blunt-ended file
03:31 Metal sandpaper 120/180/400
04:00 grooving chisel and 300g hammer
04:22 flat chisel
04:26 Rounded and polished punch
04:42 Motorex oil spray (simular to WD-40)
04:56 One layer of a cotton buffing wheel
05:58 polish paste
My camera:
Panasonic HC-V180
If you have any questions about the process, tools I'm using or other stuff, just ask me in the comments. I read them all and I try to reply as soon as possible.
Sorry for my bad English, it's not my language. I try my best to improve my technical English.
Subscribe for more of my content. I'm uploading videos about mechanical stuff, such as new creations and buildings and also restorations.
Thank you for watching :-)
My Patreon Page:
https://www.patreon.com/mymechanics727
25
views
1930s Old timer Screwdriver - Perfect Restoration
SUBSCRIBE and check out my new Channel:
https://www.youtube.com/channel/UCM65z7cJmZUOpWUXVwHOc7g
In this video, I'm restoring a German screwdriver from the 1930s.
My friend found this rare screwdriver in the steel waste at the recycling station. It was dirty, rusty and from its look you can tell that it had a hard life. It was bent in all directions and was used for more than just tighten and loosen screws. I really liked the design of it, specially because of the look of the handle. I've never done woodworking before in my life, that's why I decided to challenge myself and restore this beauty. As I have no clue when it comes to wood, I had to do some research first. I found out that ash wood is very common for handles in general, that's why I decided to go with it. The second thought I had after deciding to restore it was that I'm not going to use any glue to fix the handles. I'm going to use handmade rivets, I've never done that before either. I was really happy with the result, it came out exactly how I wanted.
I hope you like my work and the video.
Timestamps:
00:00 preview
00:33 disassembling
01:33 showing all the parts
01:40 washing the parts
01:46 removing the rust
01:59 bending it back in shape
02:15 removing all deep scratches with a file
02:41 making the wooden handles
03:47 drilling the holes for the rivets
04:03 finishing the shape of the handles
04:44 countersink for the rivets
04:55 sanding and polishing the screwdriver
05:49 hardening and tempering the tip of the screwdriver
06:18 making two new rivets
06:44 preview before reassembling
07:01 reassembling
08:04 using linseed oil for the handle
08:17 showing the finished product
Timestamps of used tools and machines:
00:40 bench grinder
00:47 300g hammer and 3mm punch
01:04 2mm punch
01:40 parts washer with parts cleaner liquid, google it ;-)
01:46 steel wire brush
01:48 Dremel steel wire brushes
02:05 500g hammer
02:11 adjustable wrench
02:15 triangular file
02:31 flat file
02:51 belt grinder (grid 60)
03:26 semicircular rasp file
03:47 hand drill machine with drill 3.3mm
04:11 semicircular rasp file
04:17 wood sandpaper (grid 40, 80, 120, 150)
04:44 column drill with 3 lip countersink
05:01 metal sandpaper (grid 120, 240, 400)
05:27 polish paste
05:29 cotton polish disc
05:49 acetylene/oxygen torch
05:58 any oil will work
06:05 bake oven
06:11 sandpaper (grid 400)
06:18 lathe Weiler
07:01 grease
08:04 linseed oil
09:29 bolt M8
My camera:
Panasonic HC-V180
If you have any questions about the process, machines I'm using or other stuff, just ask me in the comments. I read them all and I try to reply as soon as possible.
Sorry for my bad English, it's not my language. I try my best to improve my technical English.
Subscribe for more of my content. I'm uploading videos about mechanical stuff, as new creations and buildings and also restorations.
Thank you for watching :-)
My Patreon Page:
https://www.patreon.com/mymechanics727
38
views

What Happens When You Drink SeaWater?
SUBSCRIBE and check out my new Channel:
https://www.youtube.com/channel/UCM65z7cJmZUOpWUXVwHOc7g
Over 2/3rds of the earth is covered in water, but only 2% of that water is pure. As clean drinking water becomes more scarce, you maybe wondering…What happens if I drink seawater?
Let’s first examine how our bodies absorb water. You may remember the process of Osmosis where water moves from a less concentrated solution to a more concentrated solution, through a semi permeable membrane. The cell’s membrane allows water to pass through, but not the particles dissolved in water, like salt. Normally the saltiness of water inside our cells is the same as the saltiness outside our cells. When you drink water, a concentration difference takes place. Water from the outside your cell moves inside to maintain balance. This is called an isotonic state.
When you drink too much seawater, the saltiness outside your cells will increase rapidly and the cells force water molecules out in order to restore balance. So even if you are already dehydrated, drinking sea water will cause your cells to release more water and you will end up peeing out more liquid than you take in.
Conversely if you chug a massive amount of pure water, the exact opposite will happen. The saltiness outside your cells will decrease rapidly and water will be forced into your cells. This can cause the cells to swell and burst, which in extreme cases leads to seizures, coma and sometimes death! This would only occur if you were to chug 6 liters or more in an instant though.
So what can you do if you are stranded on a deserted island with absolutely NO fresh water around? The simplest way to extract fresh clean water from the ocean is through distillation, which separates the salt from the water. In order to distill water you must heat the sea water so it evaporates, then trap the evaporated water vapor until it cools and condenses back into liquid water. Kinda like the moisture on your bathroom mirror after a hot shower. This condensed water will be free of all salt and 100% safe to drink.
And be sure to subscribe :)
98
views

Listen to Your Intuition
SUBSCRIBE and check out my new Channel:
https://www.youtube.com/channel/UCM65z7cJmZUOpWUXVwHOc7g
Did you ever have a gut reaction or an unexplained feeling that guided you to a decision? This phenomenon is called Intuition. We've all felt it, whether aware or not, but it's constantly working in the background of our minds. Intuition is the ability to understand something immediately, without the need for conscious reasoning. In this video, Daniel Cordaro Ph.D., explains the science behind our intuition, where is comes from, why we have it and how we can use it to our benefit.
For more weekly videos, Please Subscribe!
70
views
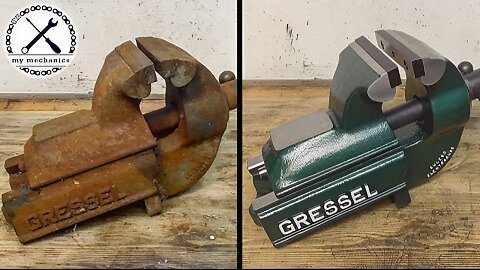
Rusty Deadlocked Vice - Perfect Restoration
SUBSCRIBE and check out my new Channel:
https://www.youtube.com/channel/UCM65z7cJmZUOpWUXVwHOc7g
Broken Vise Restoration - Gressel SwitBroken Vice Restoration - Gressel Switzerland.
In this video i'm restoring a broken swiss vice.
Like, comment, subscribe.
I bought this vice from a friend for 20$. It was super rusty and dirty, one part was missing, two screws were broken off and the movable jaw was completely stuck. Gressel is very well known in Switzerland for making very good, if not the best vices. That fact made it absolutely worth to restore it. They still produce this type of vice today, they just made some very small changes over the years. I found out that they built their vices in this style until 1991. So it's at least 27 years old. It had the rough jaws on, but you could always choose if you want them with rough or flat jaws when you buy a new one. I'm not a fan at all of the rough jaws, because they ruin every surface of clamped pieces. So I decided to put flat jaws on. I still restored the rough ones and I'm going to keep them. I restored this vice for myself.
I hope you like my work and the video.
Timestamps
00:00 preview
00:35 loosen the stuck movable jaw
02:09 disassembling
04:39 restoring the spindle
05:11 removing the pins
05:45 restoring the movable jaw
06:58 restoring the body (fix jaw)
08:14 sandblasting
10:09 painting
11:02 making the missing part
12:10 restoring two screws for the missing part
13:10 restoring the jaws
13:27 reassembling
15:53 showing off the finished product
If you have any questions about the process, machines I'm using or other stuff, just ask me in the comments. I read them all and I try to reply as soon as possible.
Sorry for my bad English, it's not my language. I try my best to improve my technical English.
Subscribe for more of my content. I'm uploading videos about mechanical stuff, as new creations and buildings and also restorations.
Thank you for watching :-)
My Patreon Page:
https://www.patreon.com/mymechanics727
28
views

Millennials in the Workforce, A Generation of Weakness - Simon Sinek
SUBSCRIBE and check out my new Channel:
https://www.youtube.com/channel/UCM65z7cJmZUOpWUXVwHOc7g
Simon Sinek explains how the millennial generation became so entitled. A combination of failed parenting strategies, technology, impatience and environment have created a wave of young people who can't hack it in the real world.
39
views
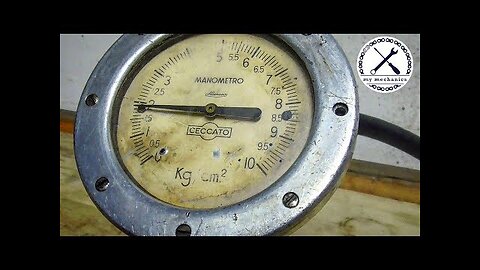
1950s Tyre Inflator - Perfect Restoration
SUBSCRIBE and check out my new Channel:
https://www.youtube.com/channel/UCM65z7cJmZUOpWUXVwHOc7g
1950s Broken Tyre Inflator with Pressure Gauge Restoration - Ceccato.
In this video I'm restoring a broken Italian tire inflator with pressure gauge from the 1950s.
Like, comment, subscribe.
I found this tire inflator with pressure gauge, which desperately needed a restoration. It was broken. Air was leaking everywhere, the handle wasn't working properly anymore and the pressure gauge didn't work either. This was definitely the most challenging restoration I did so far. I hope you like the result and the video.
Timestamps
00:00 preview and pretesting
00:59 disassembling
04:18 cleaning the parts with the parts washer
04:31 restoring the body
05:46 making a new bolt for the handle
06:11 restoring the handle
06:41 restoring the nuts
07:04 making new gaskets for the nuts
07:13 restoring the valve
07:47 making new gaskets for the valve
08:09 making a new glass for the pressure gauge
09:05 making a new gasket for the glass of the pressure gauge
09:22 making a new dial for the pressure gauge
11:27 the issue with the pressure gauge
12:03 making a distance disc for the pressure gauge
12:43 restoring the cover from the pressure gauge
13:14 making 10 new tiny bolts for the pressure gauge
13:47 restoring the case from the pressure gauge
14:42 restoring the tube with the valves
15:31 restoring the blue handle
15:46 making a new gasket for the pressure gauge
16:20 overview before assembling
16:52 assembling the body
18:33 assembling the tube with the valves
19:24 assembling and adjustment of the pressure gauge
21:42 showing off the finished product
22:47 final test
If you have any questions about the process, machines I'm using or other stuff, just ask me in the comments. I read them all and I try to reply as soon as possible.
Sorry for my bad English, it's not my language. I try my best to improve my technical English.
Subscribe for more of my content. I'm uploading videos about mechanical stuff, as new creations and buildings and also restorations.
Thank you for watching :-)
My Patreon Page:
https://www.patreon.com/mymechanics727
37
views
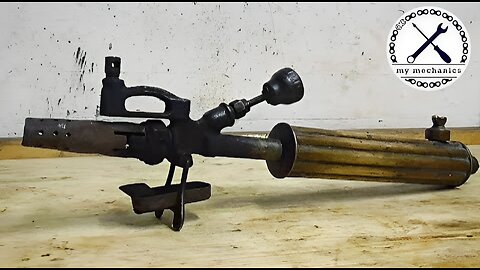
Antique Blowtorch Restoration - with testing!
SUBSCRIBE and check out my new Channel:
https://www.youtube.com/channel/UCM65z7cJmZUOpWUXVwHOc7g
Antique Swiss Blowtorch Restoration - with testing! Oerlikon Record
In this video, I'm restoring an antique Swiss blowtorch.
Like, comment, subscribe.
I found this old blowtorch, which was perfect for a nice restoration video. Before I started to disassemble I wanted to know if it still works and it did. The flame was quite inconsistent and fire leaked everywhere. By the first look, I saw that the front piece was damaged very hard, the bolt on top had a lot of slack, the handle of the pump was broken and it didn't lock.
After this first look, I started to disassemble. All the parts were easy to remove and went very well and fast.
To remove the soot and patina I used a mixture of flour, salt and vinegar. This is a very effective and cheap method, it takes a bit of time but it's worth waiting. I left the parts for 7 days. I made a new bolt on the lathe and recut the thread. To make the bolt black, I heated it to around 300-400°C and played it in olive oil, making it also rust proofing. Because I couldn't fix the front piece, I decided to make a new one and it worked very well. I made the gasket for it out of an exhaust gasket, because it had one layer of aluminium in it I first made a hole in the mill, then cut it roughly out and finished it with the belt grinder. Next up I removed all the scratches from the tank with sandpaper. As I can't engrave I decided to scratch the letters deeper with a needle and then I polished it. I did the same with the same with the filler cap and made a new gasket out of cork for it. The shaft from the pump was bent very hard, so I did straighten it with a hammer and polished it. As the handle from the pump was broken and it didn't lock, I decided to make a new one. I designed the handle and I was inspired by pictures of similar blowtorches on the internet, I was quite happy with the result. To make a new leather for the pump, I soaked a piece of leather in pure gasoline. I made a die and stamp to bring the leather in shape. To dry it faster I set it on fire and waited until the flames stopped, held it quickly under water and left it for 24 hours to dry. I took it out of the die, cut it in shape with scissors and pooched a hole in it. I ground the black handle clean with sandpaper on the lathe and made a new profile on the mill, after that I polished it to make it black and shiny. I made a new wick with a cotton cord.
Then I put it all back together. I used just a little bit of grease on all the threads and also on the pump leather. The pump had very good compression after assembling and I was very happy about the overall looking at the end.
Sorry for my bad English, it's not my language. I try my best to improve my technical English.
Subscribe for more of my content. I'm uploading videos about mechanical stuff, such as new creations, buildings, and restorations.
Thank you for watching :-)
My Patreon Page:
https://www.patreon.com/mymechanics727
26
views

Does More Money Equal More Happiness?
SUBSCRIBE and check out my new Channel:
https://www.youtube.com/channel/UCM65z7cJmZUOpWUXVwHOc7g
Psychologists have discovered that there are essentially 2 types of happiness, Extrinsic and Intrinsic. Extrinsic, focuses on money/material wealth, image and status. Happiness derived from these external sources result in a short-lived dopamine spurt and a never-ending state of wanting more. Intrinsic happiness on the other hand is derived from following a passion, personal growth, making the world a better place or loving relationships with family and friends. These are things that money can’t buy, and result in a long lasting joy from within.
For more interesting weekly videos PLEASE SUBSCRIBE :)
38
views

Mass Extinction Crisis TODAY
SUBSCRIBE and check out my new Channel:
https://www.youtube.com/channel/UCM65z7cJmZUOpWUXVwHOc7g
There have been 6 massive extinctions in our planet’s history. The first, happened 440 million years ago when an Extreme temperature drops froze the oceans and killed 86% of early life on earth.
Over the next 66 million years, the seas repopulated, but an enormous algae bloom sucked up all the oxygen in the ocean and suffocated over half of all aquatic life.
124 million years later, volcanic gases destroyed the ozone and caused the most devastating extinction in our planet’s existence.
Only 50 million years later, a giant volcanic rift split the earth, creating the Atlantic Ocean, but in doing so released a lethal wave of Carbon Dioxide, killing 80% of life.
Evolution had the next 135 million years transform small amphibious creatures into the biggest reptiles to ever roam our planet. However, An asteroid the size of a small city crashed into present-day Mexico rapidly wiping out nearly ALL the dinosaurs.
65 million years later humans have taken over as the dominant species. Our ability to use tools has given rise to an industrial revolution and control over practically every natural environment. With agriculture and modern medicine, the human population has exploded from 1 billion in 1900 to 7.5 billion in 2016.
It is because of our dominance and overconsumption that the 6th mass extinction is happening as we speak. Species today are dying out 1000x faster than before humans existed. There is now more plastic in the ocean than fish! Approximately 15 billion trees are chopped down each year and Carbon Dioxide levels have increased 25% in the last 50 years.
If we continue our destructive trend, Scientists predict half of all living species could be extinct in the next 100 years.
So what can YOU do?
Compost, recycle, start an edible garden, eat less meat, walk or bike instead of drive and do everything you can to reduce your footprint on this planet. We now know that it's going to take MORE than driving a Prius or changing your lightbulb to SAVE OUR PLANET. Every one of us is part of this world, and so what we do--or don’t do--has an impact on the world around us. We got ourselves into this mess, and now it is up to us to solve our way out.
For more interesting weekly videos PLEASE SUBSCRIBE :)
52
views
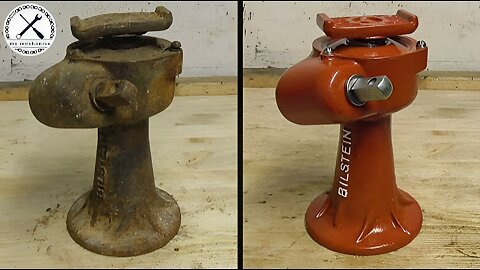
1930s German Spiral Jack - Perfect Restoration
SUBSCRIBE and check out my new Channel:
https://www.youtube.com/channel/UCM65z7cJmZUOpWUXVwHOc7g
1930s German Spiral Jack Restoration - Bilstein 2500kg.
In this video, I'm restoring a very old, super rusty and dirty German spiral jack. It's a Bilstein from the 1930s, it can lift 2500kg.
Like, comment, subscribe.
I found this spiral jack which needed a restoration desperately. It was super rusty at the bottom and very dirty in general, the top part was bent, but it was still working.
So I started with disassembling, which turned out to be very tricky. I was struggling quite a bit to get the gear wheel off the shaft because it was locked on it with two-pin connections. They were both blind, so I couldn't just hammer the pin out, I had to drill them out. I didn't drill exactly in line with the pins, that's why I needed to drill several times and the holes were not round anymore.
The top piece was forged on the shaft, so I first removed the holding material with my air-die grinder. Then I was able to hammer it off the shaft.
I removed the rivet heads on the bottom with my angle grinder.
Once I had everything in pieces, I started to wash them.
Some pieces I cleaned with sandblasting. I grinded two small pieces clean with the belt grinder, to remove rust and old paint. Same with the square head of the shaft, I welded the holes in it and made it all round and smooth again with the grinding wheel, file and Scotch Brite. I made the same with the gear wheel, but first, I needed to remove the old pins and drill them out. After that, I welded the holes, smoothed the welding with the file, cleaned the inside with reaming and cleaned it all with the steel brush.
To restore the top-end connection I first bent the big piece, made the back flat on the mill and then turned a new section which I will later press on the shaft. I also turned the shaft on the lath, made the same section on it and cleaned the front side. I hammered the disc flat with the hammer and turned the same diameter on the inside. Once I had that, I was able to put them all together, line all 3 pieces up with the old hole and drill that one up again on the mill for a new pin connection. I forged that top end back so that all pieces held tight together without slack. I drilled out the old rivets from the bottom.
Now it was time to paint. As the paint manual says, I cleaned the parts with water, but as soon as it was dry it started to rust again. That's why I covered the inside of it with grease. I painted all the pieces twice with 5 hours in between.
When the paint was dry, I started to assemble. First I put the cover over the spiral, screwed the gear wheel on it and locked the thread again with a weld. Next up I pressed the square shaft in the other gear wheel. I drilled one hole for the pin connection, hammered the pin in and then repeated that for the second pin. After I placed the bearing I put the spiral back in the case and I mounted the cover with the restored 3 screws. I put the piece with the spring in the hole of the back, put the little painted cover piece in and fixed it with another pin. As the last step, I mounted the bottom cover with two rivets, unfortunately, I forgot the press record on my camera, so there's no footage of that.
Last but not least I painted the text white, so it stand out very nicely.
It was a tricky restoration with a lot of machining.
Sorry for my bad English, it's not my language. I try my best to improve my technical English.
Subscribe for more of my content. I'm uploading videos about mechanical stuff, such as new creations and buildings and restorations.
Thank you for watching :-)
My Patreon Page:
https://www.patreon.com/mymechanics727
81
views
1
comment