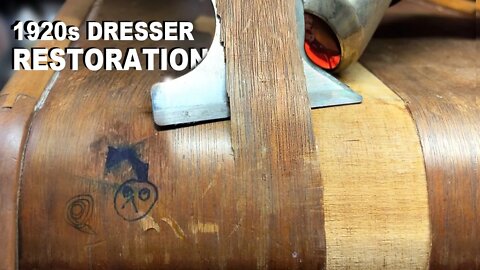
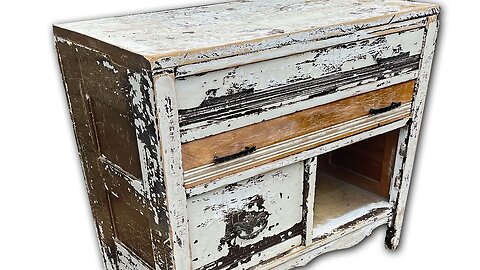
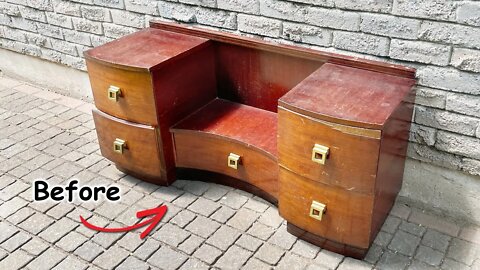
My Greatest Creation - Odd Art Deco Vanity Makeover
Get 30% off your first month with Ritual! https://ritual.com/modernmakeovers30
* These statements have not been evaluated by the Food and Drug Administration. This product is not intended to diagnose, treat, cure or prevent any disease
----------
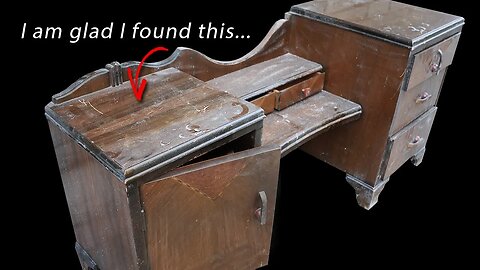
I found this art deco vanity on FB Marketplace, and I planned to turn it into a set of nightstands, as I typically like to do with vanities like this. However, the one photo in the listing was not enough to inform me of the fact that the two sides of the vanity were two different heights. My initial thought when I saw this was to just not buy it, but I'm very glad that I did because it forced me to think outside the box and come up with a solution that I'm honestly quite proud of :)
- Andy
----------
Products used in this video:
Dowel Pin Markers: https://amzn.to/3tI0GOK
Varathane Gel Stain (Chocolate): https://amzn.to/3ieOezY
Tung Oil: https://amzn.to/3ElcPxY
Brasso Metal Polish: https://amzn.to/3ZowpmT
Milwaukee Oscilating Tool: https://amzn.to/413n5WJ
----------
Follow me on Instagram to see more makeovers that you won't see here on YouTube:
https://www.instagram.com/modern.makeovers
My clothing store:
https://modernmade.shop
71.1K
views
15
comments
So.. Much.. Veneer Damage.. Retro Bar Cabinet Restoration
Thanks to Bespoke Post for sponsoring this video! Head to https://www.bespokepost.com/modernmakeovers20 and use code MODERNMAKEOVERS20 to grab your "box of awesome" and get 20% off your first box.
----------
This piece had veneer damage EVERYWHERE. I had to pull out three different veneer repair methods to tackle them all appropriately: 1) Replacing a part of the veneer with a new cut of veneer, 2) Patching the damage with wood epoxy then masking it using stain, and 3) Removing the veneer completely and just embracing the wood layer underneath.
But the most rewarding part of this restoration was figuring out how to get the light working again. The light fixture inside the middle door was missing the bulb, and the furniture being a retro piece from 1955, it used a type of bulb that is very difficult to find today. Unable to find a replacement bulb, I went and bought a new LED light bar. I then did some rewiring to enable the use of the existing push button that acts as an automatic activator for the light when the door is opened. Even though the circuit is a very simple one, I still felt like Tony Stark when I got it working.
If you enjoyed this restoration, please do me a favor and like the video! :)
----------
Below is a list of the tools and products that I used.
Paint Scraper: https://amzn.to/40xzGko
Ratcheting Screwdriver: https://amzn.to/3zmzcl9
J-Roller: https://amzn.to/41o3mRh
Wood Epoxy: https://amzn.to/2TkYM8m
Saman Paint Stripper: https://amzn.to/3HFBSvq
Pre-Stain Wood Conditioner: https://amzn.to/3oxJDM2
Gel Stain (Espresso): https://amzn.to/2Qx2eLx
Gel Stain (Dark Walnut): https://amzn.to/3eYoLdD
Polyeurathane Spray (Clear Satin): https://amzn.to/3eZa6Pw
As a disclaimer, the above links may be affiliate links, so if you make a purchase with the links provided, I may receive a small commission. There's no extra charge to you, but it helps me out!
----------
Follow me on Instagram to see more makeovers that you won't see here on YouTube:
https://www.instagram.com/modern.makeovers
31.7K
views
37
comments

The Industrialization of an IKEA Dresser | IKEA HACK
In this makeover, I give an Ikea dresser a new rustic industrial look.
If you enjoyed this makeover, please like and subscribe to see more. And if you have any questions, I would be happy to answer your comments.
Thank you for watching :)
- Andy from Modern Makeovers
----------
Below is a list of some of the tools and products that I used.
Top Drawer Handles: https://homedepot.sjv.io/rn2xyR
Steampunk Handles: https://bit.ly/3DHRQ7p
Tablesaw Pushblock: https://amzn.to/3sX5Ipm
DeWalt Circular Saw: https://amzn.to/3hKNwvT
Kreg Pocket-Hole Jig: https://amzn.to/2TBoBk8
Corner Clamp: https://www.banggood.com/custlink/GK3YBVCwgm
Tiny Sander: https://amzn.to/3ApHVlc
Minwax Pre-Stain Wood Conditioner: https://amzn.to/3oxJDM2
Varathane Gel Stain (Espresso): https://amzn.to/2Qx2eLx
Rustoleum Flat Black Primer Spray: https://amzn.to/3hBcrBX
Minwax Polyeurathane Spray (Semi-Gloss): https://amzn.to/3yrxaxS
As a disclaimer, the above links may be affiliate links, so if you make a purchase with the links provided, I may receive a small commission. There's no extra charge to you, but it helps me out!
----------
Follow me on Instagram to see more flips that you won't see here on YouTube:
https://www.instagram.com/modern.makeovers
----------
#ikeahack #furnituremakeover #asmr
12.1K
views
34
comments
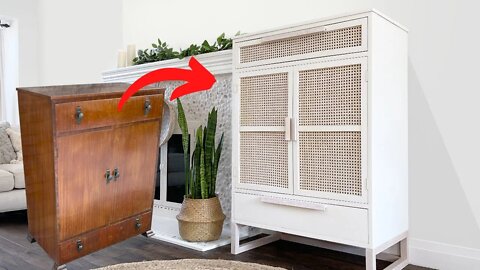
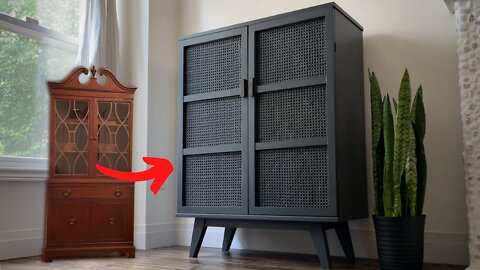
OLD CABINET to Modern Cane Showpiece | Furniture Makeover
In this furniture makeover, I transform a dated cabinet/dresser using cane, handmade handles and legs, and a white + whitewash color combo for a modern boho look.
I found this piece on FB Marketplace many months ago and it was sitting in storage waiting for me to come up with an idea for it. Ever since my last cane makeover, I've wanted to reattempt the caning process (last time I didn't wet the cane prior to stapling, which I now know is the best way to ensure a tight application). This piece did not look like a good candidate for a caning project because, well, it didn't have an opening for me to cane. But then I thought, why don't I just MAKE an opening and cane it... And just like that, this video was conceived.
Check out my other cane makeover in a dark color:
https://www.youtube.com/watch?v=VXgx1cKn5mE
I hope you found some value in this video. Thank you for watching! :)
- Andy
----------
0:00 Timestamps
2:17 Cutting out windows in drawer and doors
4:41 Routing ledge on windows
5:50 Sanding
6:08 Making a shelf
7:58 Priming/sealing
10:24 Caning
13:46 Making legs
15:40 Making handles
16:05 Painting
17:20 Whitewashing cane
18:16 Whitewashing handles and legs
18:40 Topcoat
19:18 Attaching hardware
19:55 Done
----------
Below is a list of some tools and products used in this video:
Cane: https://www.levairscaningsupplies.ca/ (Canada only)
Dremel Ultra-Saw: https://amzn.to/3wlm8IC
DeWalt Jigsaw: https://amzn.to/3reXuIt
Bosch Router: https://amzn.to/34A7029
SurfPrep Electric Sander: https://www.surfprepsanding.com?aff=76 (code MODERN10 for -10%)
Ridgid Orbit Sander: https://amzn.to/3v2x9yh
Shelf Holder Pegs: https://amzn.to/34C8j0v
Cover Stain Primer: https://amzn.to/3gLhVbt
As a disclaimer, the above links may be affiliate links, so if you make a purchase with the links provided, I may receive a small commission. There's no extra charge to you, but it helps me out!
----------
Follow me on Instagram to see more makeovers that you won't see here on YouTube:
https://www.instagram.com/modern.makeovers
----------
#asmr
14.2K
views
56
comments
Restoring a Painted Mid-Century Modern Dresser
In this makeover, I take a refinished dresser back in time to its original wooden glory.
This dresser was floating around on Facebook Marketplace for weeks before I stumbled across it. The seller had written that it would be perfect for a refinishing project, and that's exactly what I picked it up for. This piece was constructed with 100% solid elm -- even the sides of the drawers -- which is a rare and valuable find, so I had to go with a full wood stain restoration to bring out the beautiful grains. It had been previously chalk painted with some stenciling on the door; the chalk paint was peeling and chipping everywhere, due to a lack of proper prep work on the wood prior to painting. This made it quite easy to just scrape off most of the paint, with some help of a paint stripper.
If you enjoyed this makeover, please like and subscribe to see more. And if you have any questions, I would be happy to answer your comments.
Thank you for watching :)
- Andy from Modern Makeovers
----------
Below is a list of the tools and products that I used.
Glue Syringe: https://amzn.to/36JsIhj
Tiny Detail Sander: https://amzn.to/3ApHVlc
Wood Epoxy: https://amzn.to/2TkYM8m
Pre-Stain Wood Conditioner: https://amzn.to/3oxJDM2
Stain (Chocolate): https://amzn.to/3ieOezY
Stain (Golden Oak 210B): https://amzn.to/3BcYVf7
Polyeurathane Spray (Semi-Gloss): https://amzn.to/3yrxaxS
Drill Press Guide: https://amzn.to/3z8QgbA
Belt/Disc Sander: https://amzn.to/3rnt46T
Ridgid Orbit Sander: https://amzn.to/3v2x9yh
DeWalt Jigsaw: https://amzn.to/3reXuIt
As a disclaimer, the above links may be affiliate links, so if you make a purchase with the links provided, I may receive a small commission. There's no extra charge to you, but it helps me out!
----------
Follow me on Instagram to see more flips that you won't see here on YouTube:
https://www.instagram.com/modern.makeovers
10.8K
views
51
comments
An Industrial Restoration of a VERY Worn Out Dresser...
A vintage dresser is restored and given a new rustic industrial look, featuring a restoration of antique cast iron castors.
When I found this dresser on FB Marketplace, I noticed that it was entirely solid wood. No MDF, no particle board, all 100% solid. Whenever I run across a piece like this, my first thought is to restore it and bring out the wood hiding underneath. Since all the black stained surfaces were solid, sanding through the stain and minor scratches wouldn't be an issue. However, there were some major cracks along the top and sides. When I plan on painting, this isn't a problem since the cracks can be patched up with some Bondo and painted over to hide the damage. For a restoration, it's much more difficult to repair major damages AND hide it. My solution was to first use wood epoxy to match the wood color as much as possible, and then go with a rustic look by creating wormholes and other marks of character all around the dresser. Doing this effectively camouflaged whatever major damages that were fixed, and I love the dark accents that they created once the dark wax was applied.
I hope you found some value in this video, and thank you for watching! :)
- Andy
----------
Below is a list of the tools and products that I used.
Square Ruler: https://amzn.to/3LDSszc
Dremel Ultra-Saw: https://amzn.to/3wlm8IC
Wire Brush Wheel: https://amzn.to/3LmgUUr
WD-40 White Lithium Grease: https://amzn.to/3wIdVBQ
DeWalt Orbit Sander: https://amzn.to/3D1Pgcp
Goo Gone: https://amzn.to/3INvt1M
Wood Epoxy: https://amzn.to/2TkYM8m
As a disclaimer, the above links are affiliate links, so if you make a purchase with the links provided, I receive a small commission. There's no extra charge to you, but it helps me out!
----------
Follow me on Instagram to see more makeovers that you won't see here on YouTube:
https://www.instagram.com/modern.makeovers
7.44K
views
30
comments

Have you seen furniture this shiny before? It used to be garbage…
Watch me take an abandoned piece of furniture and transform it into a super glossy modern designer cabinet.
In this video, I try using Hollandlac Brilliant 98 by Fine Paints of Europe for the very first time. It's an extremely glossy and premium oil enamel paint that's very difficult to spray flawlessly, and you'll get to see how much I struggle with it. Thankfully, I'm able to achieve a nice finish in the end, thanks to a wet sanding and polishing technique that I learned from Kayla Payne (here's her IG: https://www.instagram.com/paintedbykaylapayne/).
----------
Below is a list of the tools and products that I used.
Fine Paints of Europe: https://finepaintsofeurope.com/shop/hollandlac-brilliant-98/
TurtleWax Polishing Compound: https://amzn.to/3HyGMfp
3M Machine Polish: https://amzn.to/3OotsfD
3M Ultrafine Machine Polish: https://amzn.to/3HypG14
Gold handles: https://amzn.to/3y4HOMM
Buffing & polishing kit: https://amzn.to/3QvXlg1
DeWalt Orbit Sander: https://amzn.to/3D1Pgcp
California Air Compressor (15 gal): https://amzn.to/3fuZK98
Spray Gun (Graco FX3000): https://amzn.to/3xZrUk9
As a disclaimer, the above links may be affiliate links, so if you make a purchase with the links provided, I may receive a small commission. There's no extra charge to you, but it helps me out!
----------
Follow me on Instagram to see more makeovers that you won't see here on YouTube:
https://www.instagram.com/modern.makeovers
7.04K
views
25
comments
Restoring the FLAKIEST dresser of all time... Furniture Restoration
The restoration of a 1965 dresser that just may be the flakiest piece of furniture I have ever seen. You never know what may lie underneath...
I got this dresser for free on Facebook Marketplace. I was drawn to the simple midcentury modern design, and aside from some small damages, it was in great condition. Because of the brown flaky layer, it was hard to tell what kind of quality lied underneath, but I was pleasantly surprised in the end.
Hope you enjoy the video :)
- Andy
----------
Below is a list of tools and products that I used.
Saman Stripper: https://amzn.to/3HFBSvq
Wood Epoxy: https://amzn.to/2TkYM8m
Detail Sander: https://amzn.to/3ApHVlc
Saman Stain (Black): https://amzn.to/3tt61sO
DeWalt Orbit Sander: https://amzn.to/3D1Pgcp
Razor Blade Scraper: https://amzn.to/2RoNhfd
Polyeurathane Spray (Clear Satin): https://amzn.to/3eZa6Pw
As a disclaimer, the above links may be affiliate links, so if you make a purchase with the links provided, I may receive a small commission. There's no extra charge to you, but it helps me out!
----------
Follow me on Instagram for more makeovers and to keep up with me between videos!
https://www.instagram.com/modern.makeovers
7.24K
views
38
comments
Old Hutch to Modern Cane Cabinet | Furniture Makeover
In this makeover, I transform a vintage hutch into a modern cane door cabinet, with MCM style legs and handles made from scratch.
The hutch was split into two parts; the bottom half was refinished in charcoal black, and this video shows the process for the top half. Both were sold for a profit!
If you enjoyed this makeover, please like and subscribe to see more. And if you have any questions, I would be happy to answer your comments.
Thank you for watching :)
- Andy from Modern Makeovers
----------
Below is a list of the tools and products that I used.
Cane (Canada only): https://www.levairscaningsupplies.ca/
Bondo Body Filler: https://amzn.to/3bGhFZb
Rustoleum Chalked Paint: https://amzn.to/3f2wVlj
Zinsser Shellac: https://amzn.to/3v3qBiR
Saman Wood Stain: https://amzn.to/3hBzRqD
Elmer's Wood Filler (Natural): https://amzn.to/3hFy7wS
Varathane Satin Floor Finish (Clear Satin): https://amzn.to/3is36wq
Minwax Polyeurathane Spray (Clear Satin): https://amzn.to/3eZa6Pw
Kreg Pocket-Hole Jig: https://amzn.to/2TBoBk8
California Air Compressor (15 gal): https://amzn.to/3fuZK98
Spray Gun Holder: https://amzn.to/3cuH4Wn
As a disclaimer, the above links may be affiliate links, so if you make a purchase with the links provided, I may receive a small commission. There's no extra charge to you, but it helps me out!
----------
Follow me on Instagram to see more flips that you won't see here on YouTube:
https://www.instagram.com/modern.makeovers/
8.01K
views
37
comments
A Completely Contemporary Makeover from an Ordinary Dresser
Head to https://squarespace.com/modernmakeovers to save 10% off your first purchase of a website or domain using code modernmakeovers
This dresser was purchased from Facebook Marketplace. The main appeal that made me buy it was how high quality it was overall, aside from scratches and stains that needed some work to remove. The original legs looked very frail because of how thin and far apart they were, so I went with my go-to leg design and shortened the skirt to bring them in. The handles also weren't to my taste, but I wanted to honor their original shape in the new ones that I made, hence the resulting design.
I hope you enjoy this makeover :)
- Andy
----------
Below is a list of tools and products that I used.
Goo Gone: https://amzn.to/3INvt1M
DeWalt Orbit Sander: https://amzn.to/3D1Pgcp
Saman Stripper: https://amzn.to/3HFBSvq
Kreg Pocket-Hole Jig: https://amzn.to/2TBoBk8
Saman Stain (Black): https://amzn.to/3tt61sO
Saman Stain (Dark Oak): https://amzn.to/3cEdxwh
Glue Dots: https://amzn.to/3oqW6BR
As a disclaimer, the above links may be affiliate links, so if you make a purchase with the links provided, I may receive a small commission. There's no extra charge to you, but it helps me out!
----------
Follow me on Instagram for more makeovers and to keep up with me between videos!
https://www.instagram.com/modern.makeovers
5.42K
views
42
comments
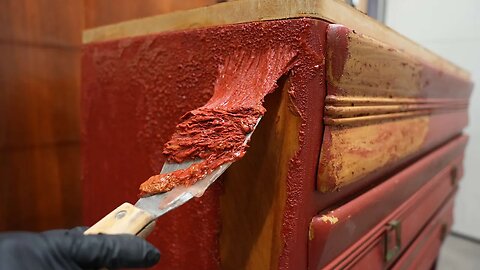
The WORST veneer I've ever worked on... Furniture Restoration
The veneer on this dresser was damaged beyond repair. Watch me restore it back to life!
I wasn't sure how the veneer edge bands would be as an alternative to one large veneer. They normally aren't used to cover a wide area, and I couldn't find anyone online who attempted the same thing. My main concern was that the contact cement would seep up between the strips as I pressed them down, but this wasn't a big issue. It happened in a few spots, and it was easily fixed with some careful knifing. In the end, the piece turned out to my satisfaction, especially since the stain color was very close to what I had envisioned with the Flagstone stain. However, I probably won't ever use veneer edge bands to cover a large surface area again... Buying a sheet of veneer would have been WAY easier!
Oh and I forgot to mention in the video. I didn't stain the drawers like I did with the body because I noticed that the veneer on the drawers were "reddish", so using the same Flagstone stain wouldn't have resulted in the same color as the body. Since the handles were already black, I didn't want the drawers themselves to be distracting. Thus, I decided to just topcoat right after sanding the existing stain.
Anyways, thank you for watching! If you have any questions, comment them below and I'll get back to you :)
- Andy
----------
Below is a list of the tools and products that I used.
Razor Blade Scraper: https://amzn.to/2RoNhfd
Heat Gun: https://amzn.to/3Mrk8Ys
Contact Cement: https://amzn.to/3tAH5Q2
Stripper: https://amzn.to/3HFBSvq
Oil Based Stain (Flagstone): https://amzn.to/3vMmxH4
Water Based Stain (Black): https://amzn.to/3tt61sO
Topcoat (Water Based, Flat): https://amzn.to/3pEMEM8
SurfPrep Electric Sander: https://www.surfprepsanding.com?aff=76 (code MODERN10 for -10%)
As a disclaimer, the above links may be affiliate links, so if you make a purchase with the links provided, I may receive a small commission. There's no extra charge to you, but it helps me out!
----------
Follow me on Instagram to see more makeovers that you won't see here on YouTube:
https://www.instagram.com/modern.makeovers
1.04K
views
8
comments
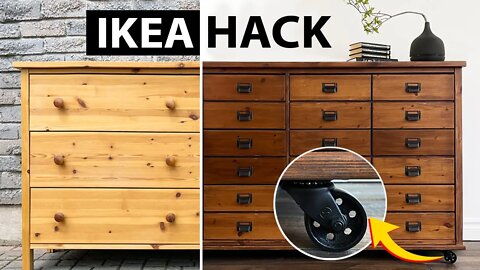
Turning an IKEA Dresser into an Industrial Apothecary Cabinet | IKEA HACK
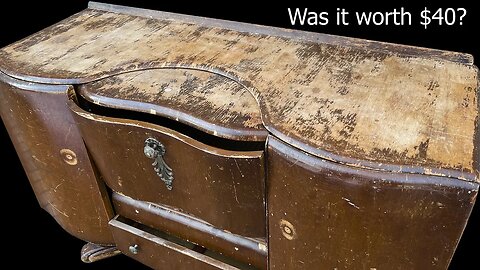
I picked up this very generic Ikea dresser on FB Marketplace for $40 and turned it into an industrial apothecary cabinet.
The top was overhanging a little too much for my liking, so it was chopped off just half an inch. Then, I chopped off the legs and gave the dresser a base board to sit on so that I could screw on some new metal casters. For the base board, I used the top of a desk that I found on FB Marketplace for $30, which was a cheaper alternative to buying a new wooden board of the same size (plus I got to turn the desk into a set of nightstands to flip for profit, so win win!) Each of the six drawers were multiplied (faux multiplied?) using a router, giving the dresser a 24-drawer look. Each "new" drawer was then given their own metal label holder handle to really sell the look. The whole thing was stained using a dark walnut stain, giving some areas an additional coat for some tone variation. Finally, it was spray sealed in clear satin poly -- except for the top; I brushed on the poly for the top since this provides a thicker coat for extra durability, which is needed since pine is a very soft wood.
If you enjoyed this makeover, please like and subscribe to see more. And if you have any questions, I would be happy to answer your comments.
Thank you for watching :)
- Andy from Modern Makeovers
----------
Below is a list of some of the tools and products that I used.
Label Holder Handles: https://amzn.to/3iAjNEJ
Wood Filler (Natural): https://amzn.to/3hFy7wS
Pre-Stain Wood Conditioner: https://amzn.to/3oxJDM2
Gel Stain (Dark Walnut): https://amzn.to/3eYoLdD
Polyeurathane (Clear Satin): https://amzn.to/3v7rtDa
Polyeurathane Spray (Semi-Gloss): https://amzn.to/3yrxaxS
Flat Black Primer Spray: https://amzn.to/3hBcrBX
Ryobi Router: https://amzn.to/3yteWfI
As a disclaimer, the above links may be affiliate links, so if you make a purchase with the links provided, I may receive a small commission. There's no extra charge to you, but it helps me out!
----------
Follow me on Instagram to see more flips that you won't see here on YouTube:
https://www.instagram.com/modern.makeovers
----------
#ikeahack #furnituremakeover #asmr
546
views
2
comments
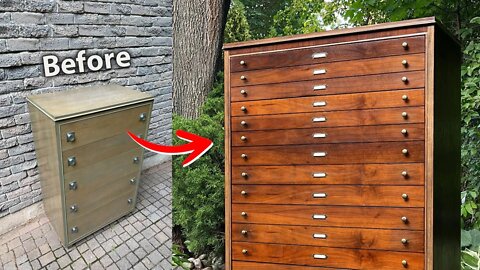
Turning a Regular Dresser into an Architect Cabinet
In this makeover, I give a 5 drawer dresser the look of a 15 drawer architect cabinet.
Thank you for watching :)
- Andy from Modern Makeovers
----------
Below is a list of the tools and products that I used.
Ridgid Orbit Sander: https://amzn.to/3v2x9yh
Tiny Sander: https://amzn.to/3ApHVlc
Glue Syringe: https://amzn.to/36JsIhj
Wood Epoxy: https://amzn.to/2TkYM8m
Dremel Ultra-Saw: https://amzn.to/3wlm8IC
Minwax Pre-Stain Wood Conditioner: https://amzn.to/3oxJDM2
Varathane Gel Stain (Espresso): https://amzn.to/2Qx2eLx
Varathane Oil Stain (Golden Pecan): https://amzn.to/2X93mIk
Saman Lemon Oil: https://amzn.to/3AhItsC
Belt/Disc Sander: https://amzn.to/3rnt46T
Arm-R-Seal Topcoat (Oil Based, Satin): https://amzn.to/2VE7YFo
As a disclaimer, the above links may be affiliate links, so if you make a purchase with the links provided, I may receive a small commission. There's no extra charge to you, but it helps me out!
----------
Follow me on Instagram to see more flips that you won't see here on YouTube:
https://www.instagram.com/modern.makeovers
582
views
6
comments

The MOST Paint I've Ever Seen on a Dresser... Furniture Restoration
Head to https://squarespace.com/modernmakeovers to save 10% off your first purchase of a website or domain using code modernmakeovers
This restoration may be the most drastic one I ever do. Never in my furniture refinishing days have I seen a dresser with 3 and a half pounds of paint (yes, I weighed it). It's one of those makeovers where I just love seeing the before and after side by side... I hope you enjoy this video!
- Andy
----------
Below is a list of the tools and products that I used.
Heat Gun: https://amzn.to/3Mrk8Ys
Orbit Sander: https://amzn.to/3D1Pgcp
Router: https://amzn.to/34A7029
Dremel Ultra-Saw: https://amzn.to/3wlm8IC
Circular Saw: https://amzn.to/3hKNwvT
Square Ruler: https://amzn.to/3LDSszc
SurfPrep Electric Sander: https://www.surfprepsanding.com?aff=76 (code MODERN10 for -10%)
As a disclaimer, the above links may be affiliate links, so if you make a purchase with the links provided, I may receive a small commission. There's no extra charge to you, but it helps me out!
----------
Follow me on Instagram to see more makeovers that you won't see here on YouTube:
https://www.instagram.com/modern.makeovers
647
views
10
comments
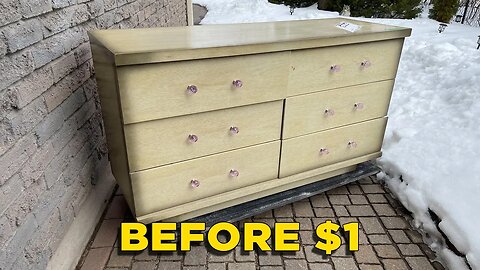
I Bought this for a Singular Dollar.. Contemporary Furniture Makeover
I purchased this dresser from an auction for an entire dollar. Nobody else bid for it, so lucky me~
I actually really like when I find dressers like this that have all the drawer fronts touching edge-to-edge. It makes the front of the dresser one big canvas, and it gives me a ton of creative freedom. My original idea with the handles, as seen in the video, had to be scrapped because it didn't look as nice as I thought it would. I think with the drawers themselves looking so nice on their own with the scored lines, and the handles being a bit chunky, it was just much better to keep it simple and do one handle per drawer.
If you enjoyed this makeover, please like and subscribe to see more. And if you have any questions, I would be happy to answer your comments.
Thank you for watching :)
- Andy
----------
Below is a list of the tools and products that I used.
Kreg Pocket-Hole Jig: https://amzn.to/2TBoBk8
Tablesaw Pushblock: https://amzn.to/3sX5Ipm
DeWalt Jigsaw: https://amzn.to/3reXuIt
Minwax Pre-Stain Wood Conditioner: https://amzn.to/3oxJDM2
Varathane Gel Stain (Kona): https://amzn.to/3Zubygz
Varathane Gel Stain (Early American): https://amzn.to/40Rqnv4
Arm-R-Seal Topcoat (Oil Based, Semi-Gloss): https://amzn.to/3ZppXL6
As a disclaimer, the above links may be affiliate links, so if you make a purchase with the links provided, I may receive a small commission. There's no extra charge to you, but it helps me out!
----------
Follow me on Instagram to see more makeovers that you won't see here on YouTube:
https://www.instagram.com/modern.makeovers
975
views
12
comments
120 Year Old Washstand Restoration
Thank you to Tailored Canvases for sponsoring this video! Use code ANDY15 at https://tailoredcanvases.com for 15% off on your custom canvas.
----------
I found this washstand on Facebook Marketplace and brought it home for $40, which is about the highest I'd be willing to pay for a piece in this rough of a shape. I knew the paint and shellac layers would be quite the challenge to remove going into it, but these makeovers are usually the most rewarding in the end.
When I noticed that the entire piece was 100% solid wood, I immediately decided that I want to stain it; this meant that I'd have to do a very thorough job of removing the layers of gunk. Another challenge of scraping this much is trying to avoid digging into the wood with the scraper by accident.
I wanted to raise the height of the piece, so I gave it some tall legs with extra shelf space at the bottom, using what was originally the top of the piece. The vacant space behind the missing door was turned into a wine storage space with a removable rack.
If you enjoy the video, please hit the like button and let me know what you think :)
- Andy
----------
Below is a list of some tools and products that I used:
Pocket-Hole Jig: https://amzn.to/2TBoBk8
Screwdriver Right Angle Attachment: https://amzn.to/3JXMx9N
Ratcheting Screwdriver: https://amzn.to/3zmzcl9
Jigsaw: https://amzn.to/3reXuIt
Circular Saw: https://amzn.to/3hKNwvT
Gel Stain (Dark Walnut): https://amzn.to/3eYoLdD
As a disclaimer, the above links may be affiliate links, so if you make a purchase with the links provided, I may receive a small commission. There's no extra charge to you, but it helps me out!
----------
Follow me on Instagram to see more makeovers that you won't see here on YouTube:
https://www.instagram.com/modern.makeovers
#tailoredcanvases
643
views
14
comments
Painted Mid-Century Modern Dresser Restoration
Go to https://strms.net/factor75_modernmakeovers and use code POGMODERNJUN50 for my special Factor75 discount and to support my channel! #ad
----------
Another Marketplace find for $20. I actually didn't mind the color that it was painted in, but it definitely needed a refresh, so I had to strip it clean. I think the top originally had a shelving or display unit, which would explain why there was a big section of the top that wasn't painted.
Let me know what you thought about this one, and thanks for watching :)
- Andy
----------
Below is a list of the tools and products that I used.
Razor Blade Scraper: https://amzn.to/2RoNhfd
Paint Stripper: https://amzn.to/3HFBSvq
Square Ruler: https://amzn.to/3LDSszc
Detail Sanding Block: https://amzn.to/3ApHVlc
Ryobi Router: https://amzn.to/3yteWfI
Wood Epoxy: https://amzn.to/2TkYM8m
Olfa Rotary Cutter: https://amzn.to/3NHehRl
Spray Adhesive: https://amzn.to/3Xl6Hiy
Brasso Metal Polish: https://amzn.to/3ZowpmT
As a disclaimer, the above links may be affiliate links, so if you make a purchase with the links provided, I may receive a small commission. There's no extra charge to you, but it helps me out!
----------
Follow me on Instagram to see more makeovers that you won't see here on YouTube:
https://www.instagram.com/modern.makeovers
791
views
8
comments
I Don’t Need a Bed Frame… So I Made THIS
LED Cabinet Light for $0.54 only on Temu app (Reg $5.39): https://temu.to/m/u4ygpr9mi6h
Download the Temu app through https://temu.to/k/usWRtHrziKaxqV6 to get a $100 coupon bundle for free (for all users)
Or search "dkf2926" on Temu app to claim!
FREE shipping + FREE returns for up to 90 days.
----------
It's been a while since I've done a makeover with painting involved. This headboard was actually 100% solid wood, so I heavily contemplated NOT painting it, but the grain wasn't particularly amazing, plus the painted look really gives it a modern look -- after all, the channel IS called Modern Makeovers.
Let me know what you thought of this one! I appreciate the support :)
Also, as mentioned in this video, I just opened up my merchandise store!! I'm planning on working on more designs that I personally love, so please check it out and stay tuned for more :)
https://modernmade.shop/
- Andy
----------
items from Temu:
Heavy Duty Double-Sided Tapes CA$2.49: https://temu.to/m/u7cubnjw1fh
CNC Router Bit CA$5.99: https://temu.to/m/uvmi4wsennj
4pcs Dowel Centering Pins CA$1.99: https://temu.to/m/umqckx44ldx
2pcs Bench Dog Clamps CA$38.49: https://temu.to/m/ug4w7ngwjfz
Woodworking Edge Ruler CA$14.39: https://temu.to/m/un0gsn0k4h2
Square Hole Mortise Chisel Drill Bit Tools CA$8.49: https://temu.to/m/u7lzmw2xdnd
Squeeze Sauce Bottle CA$3.19: https://temu.to/m/uj9z60l6idf
50pcs Releasable Reusable Zip Ties CA$2.69: https://temu.to/m/u1b7wt53fo0
Hand Tool 201B Toggle Clamp CA$4.69: https://temu.to/m/u39gpkr0ac8
Plastic Fly Swatter CA$2.99: https://temu.to/m/u2oq00x26fb
30 Degree Angle Drilling Hole Locator CA$34.79: https://temu.to/m/u7lglarwrxz
Floor Brush CA$3.89: https://temu.to/m/utkpadpa99v
Clear-Cut Stock Guides For Table Saw CA$46.49: https://temu.to/m/uaju40woadt
T Track Miter Bar Slider CA$13.49: https://temu.to/m/uuq2jrrxqq4
Accurate Layout Tool CA$14.99: https://temu.to/m/uccr51sds3y
Vertical Self Centering Dowel Jig Kit CA$12.23: https://temu.to/m/uj00404yk03
----------
Follow me on Instagram to see more makeovers that you won't see here on YouTube:
https://www.instagram.com/modern.makeovers
777
views
6
comments

How I turned a GARBAGE cabinet into a showpiece
#shorts #short #shortvideo #shortsvideo #furnituremakeover #upcycle #upcyclefurniture #furnitureflip #trashtotreasure
456
views
4
comments
I Turned an IKEA Bookshelf into a Modern TV Console | IKEA HACK
Get the exclusive NordVPN deal on the 2 year plan with 4 extra months for free using my link https://nordvpn.com/modernmakeovers - it's risk-free with Nord's 30-day money-back guarantee.
With this Ikea makeover, I wanted to go for a very modern look. A friend of mine had recently got married, and they needed a new TV console for their home. The gold hinges and legs were picked to compliment some of the other modern furniture that they already own; I normally like to make my own legs rather than buying a set, but I personally dislike the look of wood that's painted gold.
My main concern going into this project was whether or not I would be able to attach all the hardware onto the piece, given how thin Ikea furniture can be. To account for this, I used drywall anchors before screwing. Fortunately, the anchors were reliably strong, and I had no issues with any hardware being weakly attached.
Hope you enjoy the video :)
- Andy
----------
Below is a list of the tools and products that I used.
Ryobi Router: https://amzn.to/3yteWfI
Bosch Router: https://amzn.to/34A7029
Core Box Router Bit: https://amzn.to/3U9mGNE
Bondo Body Filler: https://amzn.to/3bGhFZb
Spray Gun: https://amzn.to/3xZrUk9
California Air Compressor (15 gal): https://amzn.to/3fuZK98
Ratcheting Screwdriver: https://amzn.to/3zmzcl9
Orbit Sander: https://amzn.to/3D1Pgcp
Legs: https://amzn.to/3zpBsrC
Click Magnets: https://www.homedepot.com/
Soft-Open Stays: https://www.leevalley.com/
As a disclaimer, the above links may be affiliate links, so if you make a purchase with the links provided, I may receive a small commission. There's no extra charge to you, but it helps me out!
----------
Follow me on Instagram to see more makeovers that you won't see here on YouTube:
https://www.instagram.com/modern.makeovers
470
views
9
comments
When Life Gives You a Vanity, Make Nightstands | Furniture Makeover
Head to https://squarespace.com/modernmakeovers to save 10% off your first purchase of a website or domain using code modernmakeovers
In this makeover, I transform an old vanity to a pair of MCM nightstands, featuring custom made handles and legs, and a lot of Bondo repairs.
My initial plan for this makeover was to stain one of the drawers on each piece; however, I also really wanted to try out the shown leg design for a long time, and I decided that a stained drawer would add one too many design elements to the overall look.
Let me know what you think!
- Andy
----------
Below is a list of the tools and products that I used.
Cutting Pliers: https://amzn.to/3f3OIsi
Bondo Body Filler: https://amzn.to/3bGhFZb
Putty Knife: https://amzn.to/3bDOXs7
DeWalt Orbit Sander: https://amzn.to/3D1Pgcp
Elmer's Wood Filler (Natural): https://amzn.to/3hFy7wS
DeWalt Jigsaw: https://amzn.to/3reXuIt
DeWalt Circular Saw: https://amzn.to/3hKNwvT
Square Ruler: https://amzn.to/3LDSszc
Belt/Disc Sander: https://amzn.to/3rnt46T
Detail Sanding Block: https://amzn.to/3ApHVlc
Varathane Gel Stain (Dark Walnut): https://amzn.to/3eYoLdD
Minwax Polyeurathane Spray (Clear Satin): https://amzn.to/3eZa6Pw
Kreg Screws: https://amzn.to/3pIR6t3
Peel & Stick Wallpaper: from Home Depot
As a disclaimer, the above links may be affiliate links, so if you make a purchase with the links provided, I may receive a small commission. There's no extra charge to you, but it helps me out!
----------
Follow me on Instagram to see more makeovers that you won't see here on YouTube:
https://www.instagram.com/modern.makeovers
413
views
8
comments
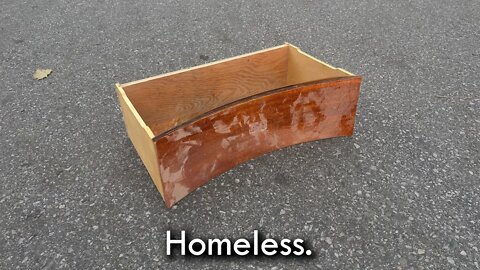
I Built a Home for this Lonely Drawer using Scraps :) Furniture Makeover
Skip the waitlist and invest in blue-chip art for the very first time by signing up for Masterworks: https://masterworks.art/modernmakeovers
Purchase shares in great masterpieces from artists like Pablo Picasso, Banksy, Andy Warhol, and more.
“net returns” refers to the annualized internal rate of return net of all fees and costs, calculated from the offering closing date to the sale date. IRR may not be indicative of Masterworks paintings not yet sold and past performance is not indicative of future results. See important Reg A disclosures: https://www.masterworks.com/about/disclaimer
----------
Some of you may recognize this drawer if you've seen my previous video: https://youtu.be/vEwkTXbQblA
On that video, many people commented asking about the fate of the middle drawer. It's been sitting in my garage collecting dust for a few months, and I finally got around to making use of it.
If you enjoyed this makeover, please like and subscribe to see more! Thank you for watching :)
- Andy
----------
Below is a list of the tools and products that I used.
Jigsaw: https://amzn.to/3reXuIt
Orbit Sander: https://amzn.to/3D1Pgcp
Dowel Pin Markers: https://amzn.to/3tI0GOK
Sanding Block: https://amzn.to/3ApHVlc
Tung 'N Teak Oil: https://amzn.to/3ElcPxY
Paint Stripper: https://amzn.to/3HFBSvq
As a disclaimer, the above links may be affiliate links, so if you make a purchase with the links provided, I may receive a small commission. There's no extra charge to you, but it helps me out!
----------
Follow me on Instagram to see more makeovers that you won't see here on YouTube:
https://www.instagram.com/modern.makeovers
#asmr #furnituremakeover
467
views
5
comments

Rust and Paint REMOVED! Furniture Restoration
In this furniture makeover, I give a Bauhaus design cabinet from the 1920s a restoration to give it a more modern and "retro" look, taking inspiration from retro coolers from the 1950s!
I picked up this very unique piece from FB Marketplace for just $10. When I saw how the metal frame was rusting and painted all over, I was itching to bring it back to life.
Using a grit progression of 60, 120, 280, 600, 1000, to 2000 and a final buff with Flitz Polish, I gave the frame a mirror finish. Given the round shape and the amount of surface area, this was quite the time consuming task. Luckily, I found this process to be extremely satisfying, so I was only a little bit miserable sanding away at it for days.
For the body, I wanted to switch out just the top with a bit of a thicker and sturdier wood. It was just a little too flimsy for my liking, and it's a simple way to drastically increase the quality of a piece. For the paint, I used Krylon's All-In-One Fusion spray paint in Glossy Red Pepper. The back of the can tells you to apply the next coat within 2 hours or after 48 hours, and I learned that there's a reason for this. I applied my third coat 24 hours after my second, and it looked like there had been an earthquake. I believe this happened because the surface was dry while the inside was still drying, and applying another coat made the dried up layer "scrunch up". To fix this, I waited the full 48 hours for it to dry, sanded it smooth, then applied my coats. Lesson learned!
The handle design was heavily inspired by some of the fridge door handles from the 1950s. I really love the retro look...
I hope you find some value in this video. If you do, please give it a like! I appreciate it :)
- Andy
----------
Below is a list of some of the tools and products that I used.
SurfPrep Electric Sander: https://www.surfprepsanding.com?aff=76 (Use code MODERN10 for a discount!)
Flitz Polish: https://amzn.to/3DjnDKs
Glue Syringe: https://amzn.to/36JsIhj
Krylon Fusion Spray Paint: https://amzn.to/3oiULxV
Minwax Wood Stain (Jacobean 2750): https://amzn.to/3G1p7Lk
Minwax Polyeurathane Spray (Semi-Gloss): https://amzn.to/3yrxaxS
As a disclaimer, the above links are affiliate links, so if you make a purchase with the links provided, I may receive a small commission. There's no extra charge to you, but it helps me out!
----------
Follow me on Instagram to see more makeovers that you won't see here on YouTube:
https://www.instagram.com/modern.makeovers
#restoration #furnituremakeover #asmr
332
views
5
comments

DIY Liquor Cabinet Makeover | Curbside Rescue
In this furniture makeover, I transform an abandoned torso of a china cabinet into a liquor cabinet... with 3D shutter doors that pop out!
Louver doors with slats that pop out is something that I've wanted to attempt for a long time, but I just never found the perfect piece to try it on... until I ran across this. I found this top half of a china cabinet on the curb. Not only was it entirely solid wood, but it was also in amazing condition, so I knew it had big potential to be transformed into a high quality piece. I decided to turn it into a liquor cabinet, hence the wine bottle silhouettes on the doors.
Going into this project, I knew it wouldn't be easy; the markings and cuts would have to be precise in order for the slats to be spaced evenly across all three doors. It also turns out that cutting and sanding 135 slats with extreme care is quite time consuming (I think I spent 2 whole days just sanding all the edges). The chinoiserie leg design was also one that I had never built before, so that was a new challenge on its own.
In the end, I'm very pleased with the outcome of this project, and with this video I hope to share some of that joy.
- Andy
----------
You can see the final shots of this piece here - https://www.instagram.com/p/CU2lTD7rlRI/
All of my pieces are sold locally in Ontario, Canada (no online shop yet... sorry!)
----------
Below is a list of some of the tools and products that I used.
Tiny Sanding Block: https://amzn.to/3ApHVlc
Kreg Pocket-Hole Jig: https://amzn.to/2TBoBk8
Zinsser Shellac: https://amzn.to/3v3qBiR
Minwax Stain (Ebony): https://amzn.to/3lsgRg0
Minwax Polyurethane Spray (Clear Satin): https://amzn.to/3eZa6Pw
DeWalt Jigsaw: https://amzn.to/3reXuIt
Spray Gun Holder: https://amzn.to/3cuH4Wn
California Air Compressor (15 gal): https://amzn.to/3fuZK98
As a disclaimer, the above links may be affiliate links, so if you make a purchase with the links provided, I may receive a small commission. There's no extra charge to you, but it helps me out!
----------
#furnituremakeover #asmr
330
views
3
comments