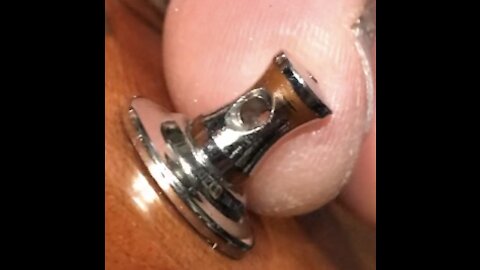
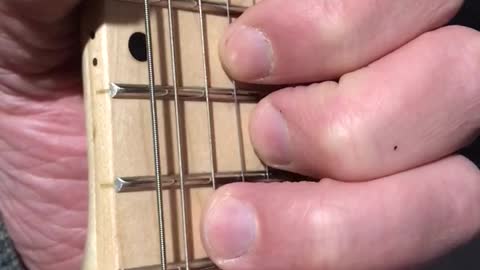
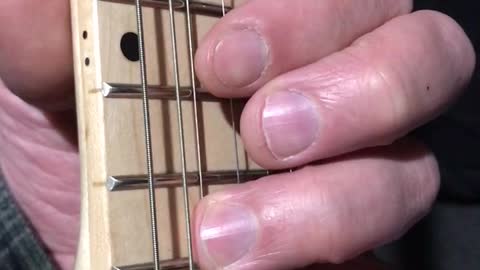
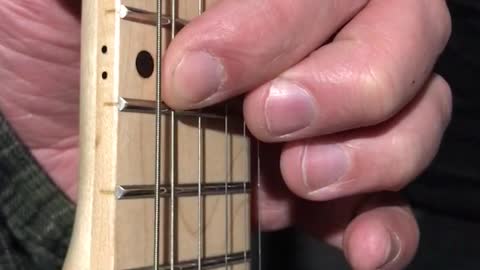
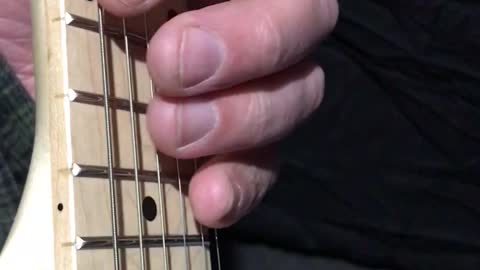
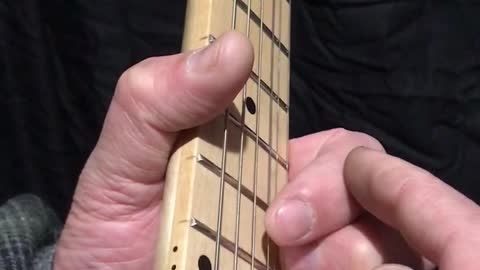
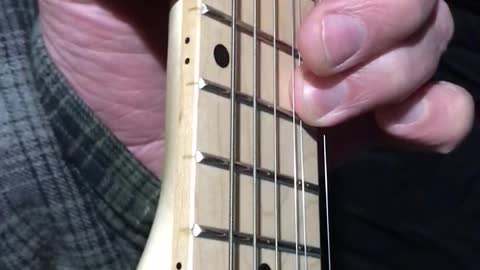
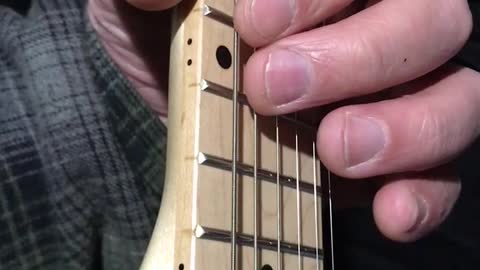
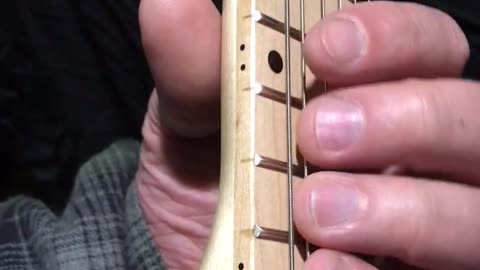
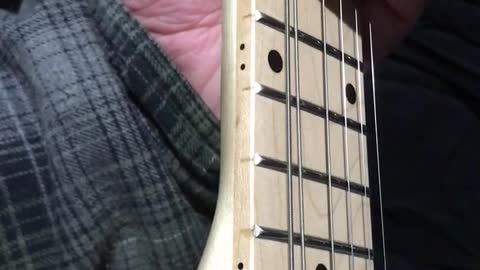
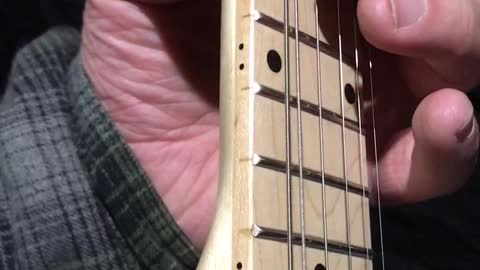
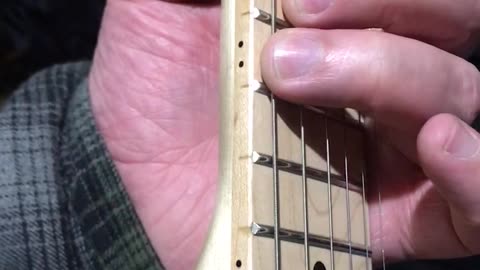
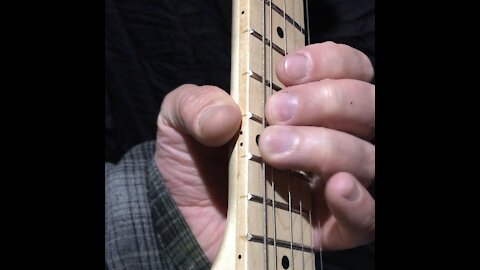
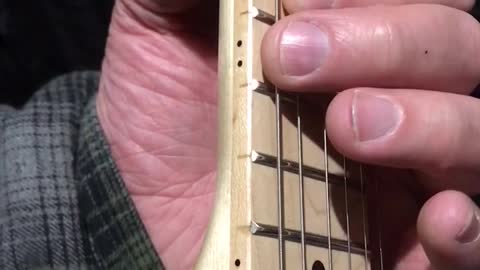
Guitar Maintenance and Repair - Inspecting tuning machine holes for burrs
In this video, we inspect the tuning machines during a routine string change job.
We are looking closely at the hole where the string goes thru the peg, looking for burrs or rough edges that the string might touch.
I use a 1/8” shank diamond tip bits, and just use them like a tiny file.
The metal on these tuning machines is kind of soft, so beware not to use power tools for this job, as you may grind away more material than you intended.
By doing thus job by hand, you can keep your eye on the tool, and make single, gentle, targeted strokes, so that you remove exactly enough material, and not any more.
Nice things about this job are
1) you could prevent an unplanned string break, which usually occurs at the least convenient time, like, when you are trying to play your guitar...
2) as far as i know, you only have to do this job once, unless the strings actually create new burrs. Just have to inspect pegs during each string change to see.
Also, when you have the strings off is a good time to exercise the tuning pegs and see how they turn.
Lube if necessary.
Snug up loose screws at end of tuner knob to make tuner turn harder. Turn peg as you adjust the screw. Micro-adjust all tuner screws until all tuning pegs turn, and feel, the same
I started looking at the tuner peg holes on my guitars after i broke THREE!!! brand new strings in one day!
I finally took a look at the peg, because the string always broke on the same end.
Sure enough, there was a sharp burr in the tuning peg hole, that the string would go over under tension as the (brand new!!) string was being tuned.
I would say most of the tuning pegs i have inspected, have had these burrs.
Also, inspect the bridge end of the string, for any burrs or sharp edges.
The guitar in this video has string notches carved out in the bridge pin holes, but i will probably take a small file and put a nice gentle radius on those string notches.
For the above job, plan on 6 hours of your own labor. 1 hour for each peg. Each peg has 2 holes that need de-burred. It may take you less than 6 hours, but if you plan for 6 hours you won’t be rushed, and can take as much time as you need to do A+ work.
Note in the video thumbnail, the size of the burr compared to the size of my fingerprint ridges.
To to this job well, you will need a bright light so you can watch your progress while you work.
You’ll need to be comfortable, and a well-adjusted, ergonomically correct work station.
88
views
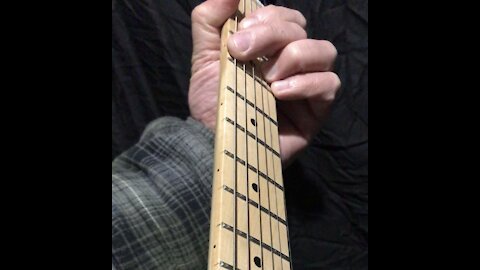
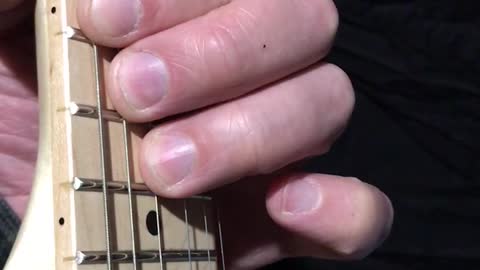
Guitar Theory - Moving Between G and C Chords
In this exercise, we practice moving from a G chord to a C chord.
Note that the pinky finger and ring finger both stay put, in a perfect 4th shape, and become dual anchor points for the rest of the maneuver,
While the middle finger and pointer finger, become a moveable Major 3rd shape, for both the G and C chords.
This exercise would be helpful if you were trying to learn AC/DC You Shook Me All Night Long,
And this exercise is good for many other reasons, in particular, for 3 chord songs that use G-C-D
Also, this G shape outlines part of the notes of the E minor pentatonic scale
This maneuver will be combined with another lesson to bring together G-C-D chord changes.
What is still amazing to me, is what this one little trick can do,
Which is to allow you to use your ring finger to post up an anchor point on the B string, 3rd fret,
And then use that ring finger as a pivot point to move between G-C-D just by feel, without having to look at your fingers.
With your ring finger set up as ONE single anchor point, from which to access the three chords you need,
your attention is now free to do more important things, like sing, and work out new songs.
Always remember that a guitar is an accompany instrument, and its job is to accompany the human voice,
So the job of the guitar, is to serve the singer.
Eventually, you will be wanting to write actual songs, with actual lyrics, which become your intellectual property...
So there are kind of two paths you can take as a guitar player,
1) continue playing guitar until you get good enough to play lead guitar, but never sing.
2) work on rhythm guitar, and singing lead.
Personally, i believe all musicians should aspire to be singers, and the leader of a band
251
views
Guitar Theory - Moving Between G and C chords quickly and smoothly
In this exercise, we continue working on moving back and forth between the G and C chords, until that motion feels very natural, and you can get the chords to sound good each time.
Try this exercise these different ways.
1) try to get the chord to sound pretty close each time, for 8 times
2) try to get the chord to sound slightly different each time, for 8 times
3) do exercises to practice control of your grip force.
For example play the same chord 8 times in a row, but squeeze the strings slightly harder each time, until you are squeezing almost as hard as you can...
Then reverse the process, and play the same chord 8 times in a row, but squeezing slightly softer each time, until you are squeezing “too” lightly...
This will help re-calibrate your grip, which has gotten stronger since you first started playing guitar, so therefore you don’t need to squeeze as hard, but you probably still do.
The purpose of this lesson would be to train you to grip as lightly as necessary, and no harder.
There is a similar exercise for calibrating grip strength on your pick grip. You are probably gripping your pick too tightly, now that you are stronger...
95
views
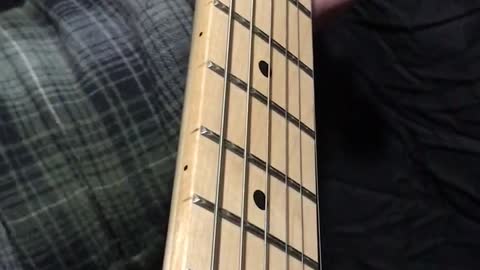
Guitar Theory - Moveable C shaped chord - From C to C
In this exercise, we continue practicing making this moveable C chord shape in every hand position, starting at C in the 12th hand position, and working our way down to C in the 1st hand position, and back up.
What you can’t see here, is that my hand needs to get into the 0th hand position, with my pointer finger behind the nut.
You probably noticed that all of the notes of my chords didn’t ring clean, and thats just an indication to me that i need more practice myself, and/or that i should avoid that chord shape in songs until it gets better.
24
views
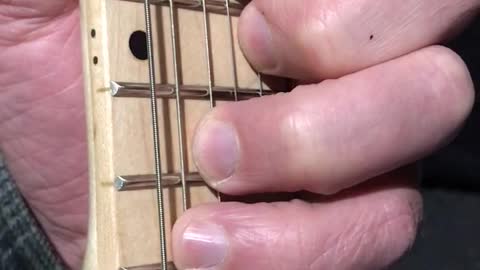
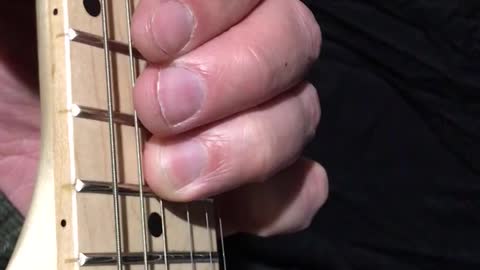
Guitar Theory - The Moveable C Shaped Chord
In this exercise, we practice on this movable C shaped chord.
Its important to note that this is NOT how to make a standard C shaped chord in the first hand position, although it does use the exact same notes.
The difference being that with a standard C chord, the G string is open, and the B string is fretted on the 1st fret.
But as soon as you move into any other hand position, that G string needs to be fretted correctly relative to surrounding notes.
Please note that the pointer finger is NOT in the root or octave position for this particular chord,
The pointer finger is only in relative root position for that pair of two fingers.
This 4 finger shape incorporates 2 different 2 finger shapes,
which are the Major 3rd shape on pinky and ring fingers,
and Blue note shape on the pointer and middle fingers.
If you are doing these lessons in order, you should have already done some exercises for these two shapes
116
views
Guitar Theory - The Minor Pentatonic Scale on E-A-D strings
In this exercise, we listen to the root note and all 5 notes of the minor Pentatonic
This scale is movable up and down the strings, so practice these maneuvers on every fret.
Try doing this scale every way possible. For example, use just one finger to do the entire scale, and then use the next finger, and so on...
This scale consists of the root note (1), the minor 3rd (3) perfect 4th (4) perfect 5th (5) minor 7 (7) octave (8)
1, 3, 4, 5, 7, 8
From 1 to m3 is 3 half steps on same string.
From m3 to p4 is 2 half steps on adjacent strings, but looks like M2 shape
From p4 to p5 is 2 half steps on same string.
From p5 to m7 is 3 half steps across adjacent strings, and looks like m3 shape.
From m7 to 8 is 2 half steps on same string.
65
views
Guitar Theory - Perfect 4th - 5 half steps on two strings, using all four fingers
In this exercise, we listen to the sound of the root note and the perfect 4th, or 5 half steps,
on the E and A strings at the 12th fret on a guitar that is tuned E standard,
Using each of the 4 fingers.
This exercise is meant to reinforce the idea that you can use any finger to make any sound,
And to reinforce the idea that you can pick-up your anchor finger, or root, and move it to a new location, which is a Perfect 4th up, and usually a safe bet when ascending or descending scales.
Do this exercise across all pairs of adjacent strings, and on all frets,
Making sure to sharpen the note on the B string by one half step when doing GB pair of strings
These exercises are not meant to teach anyone how to play any song,
But rather, these exercises are meant to prepare anyone who is new to guitar,
These exercises are meant to systematically work our way thru every finger, every maneuver, on every string, on every fret...
So that there is literally no note that you haven’t played, with every finger, at every tempo, ...
These lessons are meant to teach people how to play the guitar itself, as a stand-alone instrument,
So that when they are ready to learn ‘songs’, they will not be fumbling around trying to learn ‘guitar’
It is my opinion that if you can teach someone how to play just one guitar,
they should then be able to play any song they want to...
But you can teach someone 10 songs, and they still won’t know how to play guitar.
85
views
Guitar Theory - Major 2nd shape - 2 half steps
In this exercise, we listen to the sound of the root note and the Major 2nd note, which is 2 half steps, or one whole step, above the root note.
We also listen and compare the sounds of the root note and the minor 3rd, the Major 3rd, and Perfect 4th
This maneuver is useful as a foundation that you can use to build more on later.
48
views
Guitar Theory - Blue Note and Blues Scale - 6 half steps
In this exercise, we practice chord and finger shapes centered on using the Blue note, which is 6 half steps above the root note, and also 6 half steps below the octave note...
Not only is the Blue note exactly half way in between the root note and the octave note,
The Blue note is also exactly half way in between the Perfect 4th and Perfect 5th.
25
views
Guitar Theory - The Octave Shape - 12 half steps
In this exercise, we listen to the sound of the root note, and the octave note, which is 12 half steps above the root note, and has the same letter name like A to A, B to B, etc
By using the pointer finger, and ring finger.
This exercise should be done using all possible finger combinations, on all strings, on all frets,
And remembering to sharpen the B string note when necessary.
This is a very important chord shape, because it is the root and the octave,
which together, are arguably the foundation of all other music theory
Also, this shape is exercising your fingers and getting them to work together, so seamlessly that they both become like co-anchor points, co-reference points,
With neither finger being any more or less than the other finger.
Instead of just using your pointer finger as the root, master, reference, anchor point,
And moving UP to the other finger(s) as the scale degree, the slave, the traveller, the tentacle, the claw, the ...
You now use your ring finger as the equally important root, reference, anchor point,
And work your way DOWN thru the scale degrees, one half step at a time...
Eventually we will practice using each of the 5 fingers and thumb as the root, anchor, reference note,
But for today, i hope the overall significance of this particular octave shape, using these two fingers, is not lost on the listener.
And eventually each of the 5 fingers will become equally capable of being the anchor,
By which point you may not even need the crutch of anchor points anymore,
and each finger would be equally capable of being its own independent anchor point, knowing where it is, without any need for help from other fingers or anchor point crutches
This exercise is also useful because it is bringing the ring finger into a slightly awkward position,
And that will prepare the ring finger to go into an even more awkward position, which is the Perfect 5th, which is a very important note.
38
views
2
comments
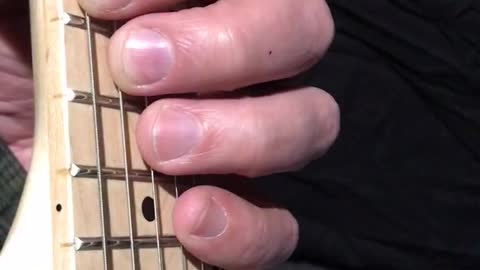
Guitar Theory - Moveable Blue Note Shape - 6 Half Steps
In this exercise, we listen to the sound of the root note and its blue note, which is 6 half steps above, and also 6 half steps below, the root note and/or octave note.
We listen to how this shape sounds relatively as we move up and down the length of the strings.
When using this shape, you don’t have to fret all 4 strings all the time. You could fret just 1 string, and mute the other 3 strings.
So practice muting and fretting each of the strings while using this hand shape.
This shape is useful because it is the 6th half step, and the next lesson will be the 7th half step, or the Perfect 5th.
This chord shape is preparing your ring finger for its next task, which will be to move from its position 2 strings away from the root note, to a position just 1 string away from the root note.
Once the ring finger can establish itself as an anchor point, reference point, pivot point, at the Perfect 5th,
then the other fingers can use the ring finger to find other nearby notes
Since we have already counted UP one half step at a time from 0 to 6, we could keep counting UP from 7 to 12,
OR,
We could count DOWN one half step at a time from 12 to 7, etc.
Why?
Because music moves too fast for you to be fumbling around trying to figure out how to count 11 half steps UP, when you could just as easily just count 1 half step DOWN.
So, just like we learned where the 1st fret is,
And we learned where the first hand position is,
But then we skipped to the 12th hand position, without needing to know anything about hand positions 1-11.
So far, we have been counting UP from the root note, and each half step farther we get away from the root note, is another half step we have to “count” if we are counting frets.
And so 1 half step, and 2 half steps, and 3 half steps,
were kind of easy to visualize, and were easily within your reach
But as we get to the 6th half step, and beyond, it gets harder to visualize, and reach.
to work around this problem, we just go up an octave, and begin counting DOWN by half steps.
If i know 12 half steps is an octave, and 11 half steps is a major 7th,
Then all i have to do is go UP 12 half steps, to the octave, and then back DOWN one half step to the Major 7
And down 2,3,4,5,6,7 half steps,
So that you can intuitively “count frets” from bottom to top, and top to bottom,
As for the perfect 4th and perfect 5th,
You’ll intuitively know how to find these important notes, several different ways,
and your ear-hand will just know what to do to make it work, to get the next note you want to hear, in any situation.
The next lessons will be about 7,8,9,10,11,12 half steps
if we counted UP by one half step at a time, from 1,2,3,4,5,6,7
We will now count DOWN by one half step at a time, from 12,11,10,9,8,7,6,5
Note that half steps 5,6,7 get counted both from the bottom UP, AND from the top DOWN,
Whereas half steps 1,2,3,4 and 12,11,10,9 only get counted ONCE from the bottom, or top, respectively
102
views
Guitar Theory - Root Note and Blue Note - 6 half steps
In this exercise, we practice listening to the sound of the root note and the blue note, on the EADG strings on E standard tuned guitar.
If we did this exercise on the ADGB strings, we would have to sharpen the B string by a half step.
This shape is moveable up and down full length of the strings.
This one shape can be played for extended time, as a slide or gliss, to practice your arm intonation.
I have played this single shape for a several hour practice session, just playing along with songs i like, and i would recommend it to others as a practice idea.
To me, i think it can sound good as you move around, because no matter where your root note is, if you move the whole hand up or down a half step, the fingers that were in your blue notes will now be either on a perfect 4th or a perfect 5th, both of which sound good, and are not inherently minor or major sounds.
Theres just something about how this shape sounds, moving up and down the strings.
The blue note is 6 half steps above the root note
The blue note is exactly half way between a root and its octave
The blue note has been banned as the Devils Chord etc
The blue note can be used as a passing-note or pick-up note between P4-P5
The blue note is what distinguishes the blues scale from the minor pentatonic scale.
The blue note can be used as an anchor or pivot point, from which to find and reference other notes.
As far as my lesson plans go, this lesson is an exciting milestone, because to me it means im half-way thru all 12 half steps to an octave.
This root-blue-octave-blue shape itself is exciting because it symbolizes the half-way point on all scales and chords
This shape is easy to remember. Easy to visualize, easy to explain.
This shape also symbolizes your progress as a guitar player. from not being able to fret a single note, to being able to use all 4 fingers, to fret 4 strings, across 4 frets.
This shape can be used as the anchor, or reference, or structure, or skeleton, ...
For making future progress.
So to summarize where we started, where we are now, and where we are going...
We started at zero. 0. Silence. Mute. Rest.
Then we learned the names of the open guitar strings, EADGBE,
and then we learned that the 2 dots at the 12th fret signify the exact center of the scale length of the string, from nut to bridge.
2 dots in sheet music means repeat,
and 2 dots on a guitar fingerboard also means repeat.
So at the 12th fret, the notes on each string repeat, and so we get EADGBE again, just an octave higher.
And so we used the 12th fret as our arbitrary root note, and practiced maneuvers and shapes based on that root note.
So we learned the root note is the first note,
And then we went up, one half step at a time, 1,2,3,4,5,6 half steps
And then we learned the proper names of 2nd notes (1 and 2 half steps)
(minor 2 and Major 2)
And then we learned the 3rd notes (3 and 4 half steps)
(minor 3 and Major 3)
And then we learned about the Perfect 4th, which is a huge milestone. 5 half steps.
And here we are now at the blue note, at 6 half steps.
Next, will be 7 half steps, or a perfect 5th, which is another huge milestone, equally important to the perfect 4th.
And after that, all that will be left is the 8,9,10,11,12 half steps, also known as the
minor 6th and Major 6th ( 8 and 9 half steps)
minor 7th and Major 7th (10 and 11 half steps)
And then back to the root note at the 12th half step, otherwise known as the 8th note or
Octave
73
views
Guitar Theory - The Blue Note - 6 half steps
In this exercise, we listen to the blue note, which is 6 half steps above the root note.
We use one finger to play both notes,
Then we use two fingers to play both notes.
This maneuver will get you from any root note, to its blue note, on every pair of adjacent strings,
except G-B, where you would need to sharpen the B string by one half step, (which would be the same shape as a Perfect 5th or power chord elsewhere)
The blue note is an interesting note because its 6 half steps which is exactly half of the 12 steps in any octave.
The blue note is the only note in between the perfect 4th and perfect 5th.
The blue note is not claimed by the major or minor scale.
The blue note is the only note that distinguishes the blues scale from the minor pentatonic scale.
The blue note serves as an excellent pick-up note or passing-note when moving from P4-P5 or P5-P4
What that means is, if you are playing A blues scale in 5th hand position, and you have 3 fingers on the A string, then your middle finger will be on the blue note.
The blue note, and its perfect 4th, which is technically the Major 7th, usually sound pretty good together in a blues scale, double stops, chord, etc
There are songs written about the blue note
The St Louis Blues Hockey Club is named after the blue note
This interval has been officially banned by the Church, and called the Devils Chord
Its hard to overstate the significance of this note, or interval, or chord
110
views
Guitar Theory - The D shape
In this exercise, we use 3 fingers on 3 strings to make the D chord shape.
While we will be fretting the G-B-E strings, the D string will always be there, open, creating an Open D string root note for all of this chord shape in every hand position.
This D chord shape is moveable up and down the length of these 3 strings.
Practice this chord shape up and down the strings. It will require you to sightly adjust your fingers at every new hand position.
You will want to open and close your hand, and land precisely, where your fingers are positioned such that all 3 strings can be clearly heard. The strings are all fretted correctly enough, and the fingers are not accidentally touching somewhere.
Lift or open all 3 fingers OFF the strings, and then lower or close all 3 fingers together ON the strings.
Open-Close-Open-Close
Off-On-Off-On
Keep practicing making this chord shape on the fly, having it come together at the same time, instead of using one finger as an anchor point, and then placing your other fingers down one at a time. Music goes by too fast, so you’ll need to get faster at putting this chord shape together.
Once you master one chord shape, and being able to apply it, and remove it, smooth and quick, then we will move into changing between this D chord shape and some other chord shapes that commonly go along with it, such as the G shape and the C shape
This D shape is one of the 3 fundamental chord shapes for the 3 chord songs that use G-C-D cowboy chords
89
views
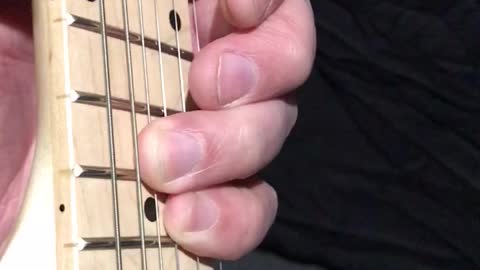
Guitar Theory - The Perfect 4th - using pinky and ring fingers on adjacent strings
In this listening exercise, we listen to the sound of the Perfect 4th interval, while using the pinky and ring ringers across two strings.
On a standard E tuned guitar, there is a perfect 4th interval, or offset, between all pairs of adjacent strings, except between G-B strings.
So to do this exercise, use your pinky and ring fingers, to fret all possible notes, on all possible strings, on all possible frets...
Between the G and B strings, you will have to adjust your pinky finger UP one fret, to get the Perfect 4th shape and sound.
To train your ear to hear the perfect 4th interval, use the song ‘Here Comes The Bride’
E A A A
A D D D
D G G G
G B# B# B#
B E E E
This exercise is important because it gets your pinky and ring fingers exercised, and strong, and working independently, and working together,
And most importantly, it gets these 2 fingers prepared to become HALF of a G chord shape.
29
views
Guitar Theory - combining two shapes into a bigger chord
In this exercise, we combine two of the ideas we learned earlier
1) the two finger Major 3rd shape on the EA strings
2) the two finger Perfect 4th shape on the Be strings
And because of those earlier rote exercises you have already practiced, your fingers are now prepared to work well together on this more complicated chord.
This shape of this chord the G shape. The G chord is one of the most important chords on guitar, for several reasons.
52
views
Guitar Theory - Practicing Perfect 4th using all fingers, on all strings, on all frets...
In this exercise we continue to practice listening to the perfect 4th interval,
But now we will be using the two middle fingers,
to fret two adjacent strings, at the same fret.
The idea of this exercise is to develop a good ear, and a sense of the way the perfect 4th / 5 half-step interval “should” sound, over the entire register and range of your guitar... every string, every fret...
During this exercise, you’ll want to think of the root note as variable, and moveable, and that any note can be a root note,
and the root note can change from one note to the next, during a song...
But that for the purpose of this exercise, the root note will be considered to be the lower sounding note, and the perfect 4th interval will be the higher sounding note.
The other purpose of this exercise is to develop the muscle memory, and ear-hand coordination,
across all possible combinations of fingers, strings, and frets...
So that when you are playing, and you want to hear the sound of the perfect 4th interval,
from the root note where you are right now, using a certain finger, on a certain string, on a certain fret,
As long as your ear knows what it wants to hear, your fingers will naturally cooperate, and find the note, using whichever finger is necessary, or available.
Your fingers will know what to do, because they have already done it before, because you have taken the time, to do the rote exercises, of practicing every possible perfect 4th interval on the guitar, using every possible combination of fingers.
Conversely, even if you aren’t consciously thinking about music theory when you move from note to note, your fingers will just naturally move into a perfect 4th position by habit, because after enough practice your fingers get so comfortable with the go-to maneuver of the perfect 4, they will just go there out of habit, because its usually a safe note, even if you just use it as a transition, or pick-up note, or noodle, or slur, or gliss, or scale degree, or chord, or...
As these exercises progress, you will use pinky and ring finger to make perfect 4th shape.
This is important, because that shape is HALF of the G chord shape.
This is why i believe G chord is intermediate level guitar lesson.
Because in order to do a proper G chord, student must be able to use all 4 fingers individually to fret notes,
and student must also be able to get all 4 fingers to cooperate and work together in every possible shape.
If you introduce a G chord on day 1 guitar lesson, you are asking student to use 4 clumsy fingers, and play 6 strings...
After years of fruitless attempts to master several notes at once (chords)
It occurred to me that i hadn’t even mastered a single note.
I mean, i could make my guitar make sounds, but i could’t make a single note sound good,
at the right time, the right loudness, the right bend, the right gliss,
So while these exercised are meant to get you used to listening to the full range of sounds your guitar is capable of making,
When you are done with the exercise, forget about every other sound your guitar could make,
and just focus on ONE sound that you are making right now, and whether it sounds good in the mix,
and if not, what you are going to do about it, and when...
97
views
Mostly the Perfect 4th across two adjacent strings
In this exercise, we practice using two fingers to fret two adjacent strings on the same fret.
Depending on guitar tuning, usually most pairs of adjacent strings has this perfect 4th offset, or 5 half steps.
except G-B pair of adjacent strings in standard E tuning, which is a Major 3rd offset, or 4 half-steps.
This is an exercise to familiarize yourself with listening to the sound of the perfect 4th interval.
and to practice one of the most fundamental aspects of guitar playing, and guitar design, which is the perfect 4th.
This exercise should be practiced using every pair of fingers, on every pair of adjacent strings, on every fret.
The song “Here Comes The Bride” is one easy way to practice, and to remember, the sound of a perfect 4th interval.
Here-comes-the-bride = E-A-A-A etc
Practice listening to the sound of that perfect 4th interval on every possible pair of adjacent strings and frets
Except!
The G-B strings in standard E tuning,
Which will require you to fret the B string one fret higher, to get the perfect 4th interval.
Then verify that ‘Here Comes The Bride’ sounds correct on G-B strings, on all frets, with all possible finger pairs.
25
views
Guitar Theory - Using the Perfect 4th as a reference point for finding other notes
In this exercise, we emphasize the perfect 4th, which is 5 half steps,
which is the fundamental offset between open adjacent strings on a standard tuned guitar
(except G-B string offset which is 4 half steps or a Major 3)
To find a perfect 4th in most situations, we can either go up the same string 5 half steps, or stay on the same fret and jump to the next string.
With the perfect 4th as your new reference point (the old reference point was the root note), you can now easily find the notes directly above and below the perfect 4th note.
In the realm of music theory, in order of importance, (probably)
Root - octave
Perfect 4th - Perfect 5th
minor - Major - 3rds and 7ths
So now, once you understand the root note, and the notes just above and below it, and you understand the perfect 4th and notes just above and below, you are able to develop a deeper understanding of each interval or scale degree, from several different reference, or anchor points.
To put it in basketball terms, if we have one foot as the pivot foot, we are kinda stuck in one small area, BUT we can pivot around and reach anywhere in that area with our other foot.
Lets call your pivot foot the root note.
Now imagine that you take a step, and now your other foot is your new pivot foot.
Lets call this new foot position the perfect 4th.
You now have the option of going backward, to the other foot (root) or you have the option of taking another step forward (perfect 5th)
By mastering the art of moving between these perfect 4th intervals, you give yourself a good foundation for anchoring and referencing other nearby notes.
227
views
Guitar shapes and intervals - minor 3rd shapes using all 4 fingers
In this exercise, we practice listening to the minor 3rd interval, and exploring the different shapes we can use to get the minor 3rd sound.
The minor 3rd sound is 3 half-steps above the root note sound.
These exercises are meant to build muscle memory for for all fingers equally, so that later on your fingers will just naturally cooperate to get the sounds you want to hear in your ears.
In these exercises, we train each finger individually, and as part of a team of fingers, so that the fingers can operate naturally in all possible scenarios
There are two brute-force approaches to getting thru these exercises on your own.
1) list and name the 12 half-step intervals in an octave, then practice every possible way of fingering each of those intervals
2) start with any note as a nominal root note. Practice every possible two-fingering shape with that root, and then figure out the proper name for each of those interval sounds
Between these two approaches, you should be able to practice all possible two-finger shapes, and all possible intervals.
Its not enough just to blow thru these exercises, do the bare minimum, and move on.
A better approach would be to make time and space for yourself.
Don’t say, im going to learn the proper names of 12 sounds today...
Say, im going to learn the proper sound of ONE interval today
You could start with any interval.
The perfect 5th is an excellent interval to start with, which is 7 half-steps,
and its power chord shape is the foundation and reference anchor point for many other shapes and chords
But wherever you start with these interval shapes, be sure to move around and practice all other intervals and shapes
This particular minor 3rd transition shape would be played on the middle two strings [DG] as part of the 5th position A minor pentatonic/blues scale and is also transposable
117
views

Guitar Shapes - Major 3rd shape using pinky and ring finger
In this exercise, we practice the Major 3rd shape on the pinky and ring finger.
While this particular shape isn’t used much, its important to know that its is theoretically possible, and that we know how to use it, but choose not to, because there are usually better alternatives available.
This shape could also be used as part of a minor pentatonic shape building exercise,
As this shape exercise uses two notes from the minor pentatonic, which would be the minor 3rd and the perfect 5th.
63
views
Guitar Shapes and Intervals - Minor 3rd - 3 half-steps above root note
In this listening exercise, we listen to the sound of the minor 3rd, which is 3 half-steps above a root.
These notes could be played together or by themselves.
Practice this interval with all fingers, everywhere (except G-B strings).
Find how to make a minor 3rd between G-B
This shape or interval is just one of many,
And this shape, interval, or transition is also used in other ways, with other names,
Meaning that what you learn today with this shape, will prepare you for tomorrow when you see the same shape somewhere else.
65
views
Guitar Shapes - Major 3rd shape using two middle fingers
In this exercise we practice the Major 3rd shape, up and down the fretboard, using the two middle fingers.
This shape is useable almost everywhere (except G-B string offset, first and last frets)
This shape can be used as a foundation, to build into an open C chord, for example.
54
views
Major 3rd shape on two adjacent strings with two adjacent fingers
What is a shape?
the way, or shape, you hold your fingers in while making a chord, or part of a chord.
A shape usually has a name, such as “D shape”, and what this means is, that shape is most often associated with the shape of a D chord, however that basic D chord shape is transposable, and can be played elsewhere on those same strings, and could technically be called by its proper chord name when its played elsewhere other than D...
The major 3rd is 4 half-steps above the root note.
The major 3rd is 1 half-step below the perfect 4th.
In this exercise, we use all four fingers to fret the root note,
and practice the ways of using the shape with adjacent fingers to fret the Major 3rd sound.
This is a moveable shape, that works on every set of adjacent strings except G-B
(Between G-B the strings are offset by a Major 3rd, so instead of 1 fret offset, use the same fret for both strings, on all frets, like you would do P4 offsets on other strings.)
It also works on every fret, except near far ends of fretboard when you run out of frets.
So practice these two notes together, with all fingers, on all strings, on all frets.
Practice these notes individually, one after another, to get an opinion on the contrasting sounds.
Practice these notes together as a chord, as a double-stop (2 note chord)
This shape is just one of many shapes.
We can figure out how many shapes there are by starting with 1 fret and 1 finger, and then doing 2 frets with 2 fingers, 3X3, 4X4
And there are books available that describe every possible chord and its proper name, and why it is named what it is...
But for today, just worry about getting thru playing every note, on every string, on every fret, with every finger (1X1)
Then work on this Major 3rd shape for a day.
Here is how i practice this, and maybe its all wrong, but...
I decide im going to practice Major 3rds that day, which will probably be a 2–4 hour practice session...
I pick random songs as backing tracks and play along with them.
I practice these major 3rd shapes, everywhere, with every song.
And the next day i might pick something else, like minor 3rd, or perfect 5th, or octave
And just play that one interval all day, for every song.
After a few rotations thru the interval shapes, your hands will just naturally move to where they need to be...
And your ear will be able to discern the various intervals, in different registers.
This Major 3rd shape is also useful because it is the foundation for the open chords G and C, which are very important chords for beginners to learn,
But unfortunately both chords are quite difficult for the beginner to master, which i suspect leads to many beginners wanting to quit guitar.
Its literally like asking a kindergartner who is just now trying to learn the alphabet, to spell out a 4 letter or 6 letter word.
Learning shapes is so important on guitar. You can use one shape you have learned, to segue into the next shape to learn.
For example, i will probably use this Major 3rd shape, as a segue into a minor 3rd shape.
48
views
Major 3rd shape, up and down the strings
In this exercise, we continue practicing the Major 3rd shape, which is 4 half-steps above any root.
But instead of practicing the shape with different fingers,
We practice the shape on different frets, up and down the fretboard.
And then we practice it with all different fingers.
Its hard to emphasize the importance of rote exercises, on focusing on using just one finger, or one note, or one shape, to build a foundation, so what you practice today helps you move into what you practice tomorrow
17
views